How to Make Dubai Chocolate Bar – Easy & Delicious Chocolate Recipe
Introduction
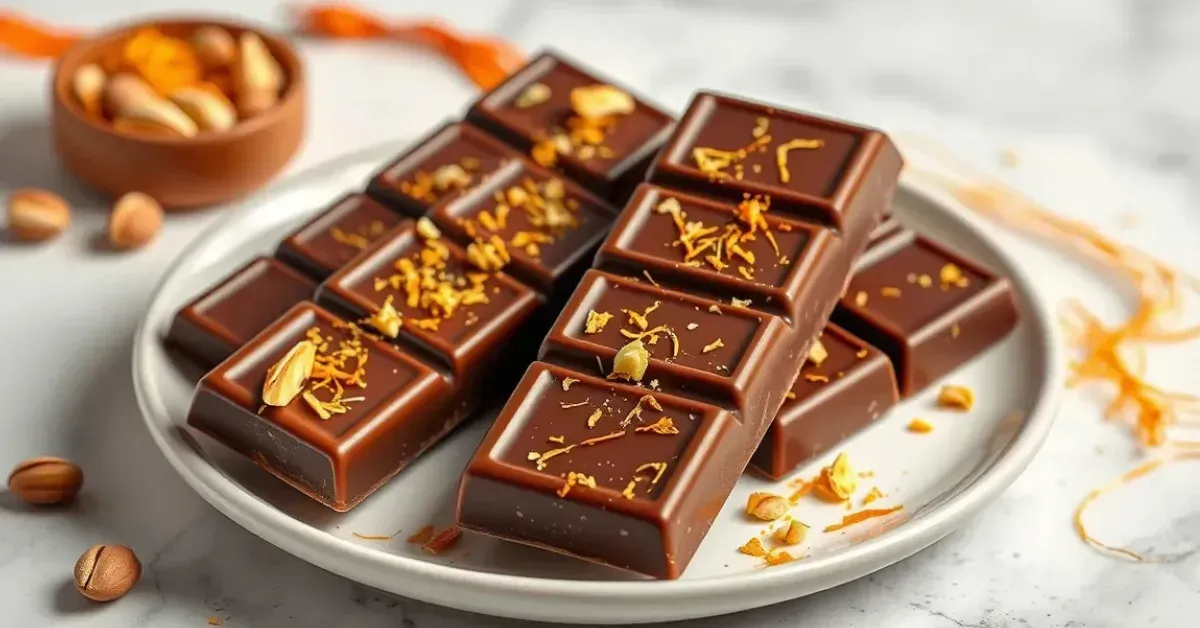
Dubai chocolate bars are a luxurious treat known for their rich flavors, smooth textures, and premium ingredients. Inspired by the vibrant culinary heritage of the Middle East, these chocolate bars often feature a blend of high-quality milk and dark chocolate, combined with indulgent flavors like pistachios, saffron, and tahini. Whether enjoyed as a dessert or given as a beautifully packaged gift, Dubai chocolate bars offer an unforgettable experience for chocolate lovers.
What makes these chocolate bars truly special is the combination of silky chocolate and unique ingredients like candy melts, roasted nuts, and aromatic spices, which elevate their taste and presentation. By using the right chocolate molds and tempering techniques, you can create a professional-quality chocolate bar right in your own kitchen.
In this guide, you’ll learn how to make your own Dubai chocolate bar with simple ingredients and step-by-step instructions. Get ready to enjoy a homemade chocolate treat that rivals the finest confections from Dubai’s renowned chocolate shops. Let’s get started!
What Makes Dubai Chocolate Bars Special
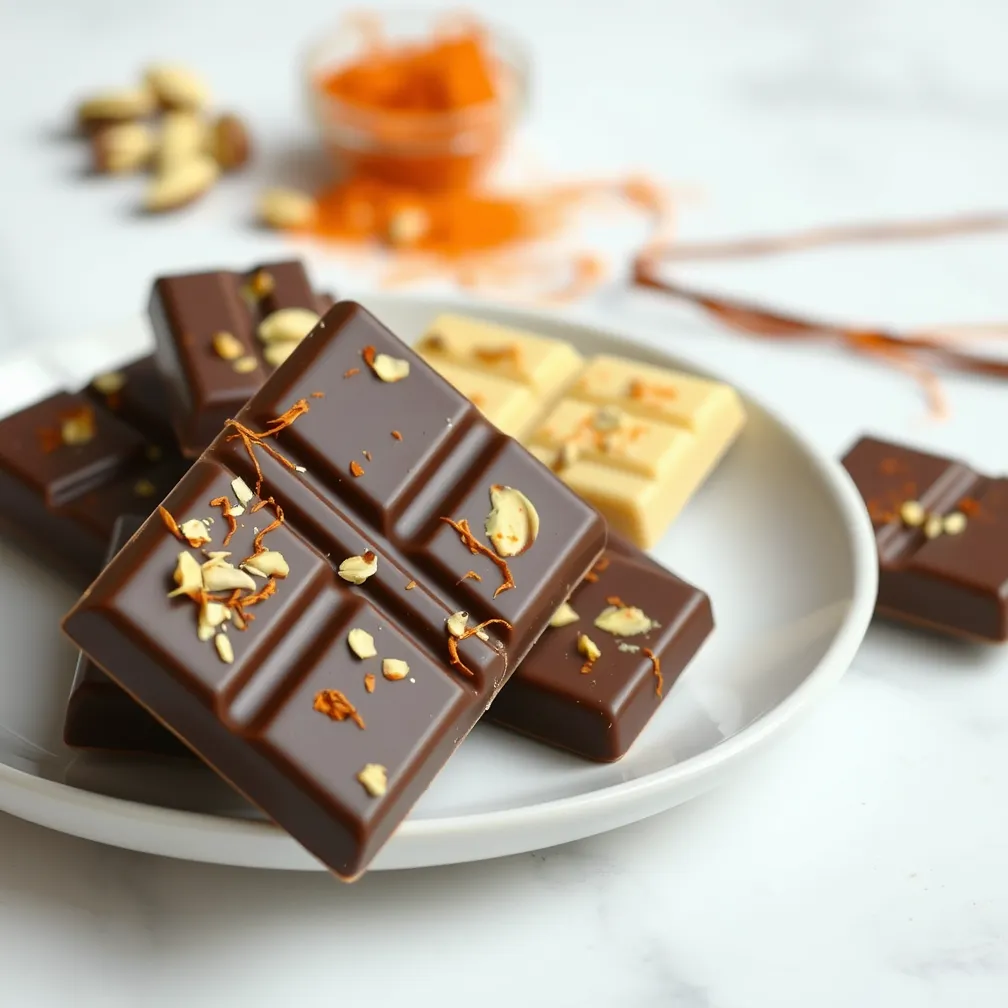
Dubai chocolate bars stand out due to their rich flavors, premium ingredients, and luxurious textures. Whether you prefer the smooth creaminess of milk chocolate, the deep intensity of dark chocolate, or the visual appeal of pink chocolate, these bars are a delightful fusion of traditional Middle Eastern flavors and fine chocolate-making techniques.
The Rich Flavors of Dubai Chocolate
One of the key characteristics of Dubai chocolate bars is their well-balanced blend of milk and dark chocolate. The combination creates a velvety texture with just the right amount of sweetness and bitterness. What sets these bars apart, however, is the infusion of Middle Eastern flavors such as:
- Pistachios – A signature ingredient, adding a subtle nutty crunch and vibrant green color.
- Tahini – A smooth sesame paste that enhances the richness of the chocolate.
- Saffron – A luxurious spice that adds a hint of floral aroma and depth.
- Cardamom – A warm, slightly spicy note that complements the chocolate’s natural flavors.
These ingredients not only elevate the taste but also bring an authentic Middle Eastern twist to traditional chocolate bars.
Choosing the Right Chocolate for the Best Results
The quality of your chocolate plays a major role in achieving the perfect homemade Dubai chocolate bar. Here’s a breakdown of different types of chocolate and their benefits:
- Milk Chocolate – Creamy and sweet, ideal for those who prefer a smooth texture.
- Dark Chocolate – Offers a rich, intense cocoa flavor, perfect for balancing sweetness.
- Pink Chocolate – Also known as ruby chocolate, it has a slightly fruity taste and an eye-catching color.
For the best results, it’s recommended to use high-quality chocolate brands such as:
- Callebaut – Known for its smooth texture and excellent melting properties.
- Valrhona – A premium brand that delivers rich and deep cocoa flavors.
- Wilton Melts – Great for creating decorative chocolate bars with vibrant colors.
Using high-quality chocolate ensures a superior taste, texture, and consistency.
Essential Tools for Making a Perfect Chocolate Bar
To create a professional-looking Dubai chocolate bar at home, having the right tools is essential. Some must-have equipment includes:
- Chocolate Molds – Helps shape your chocolate into perfect bars with a smooth finish.
- Double Boiler – Ensures gentle melting of the chocolate without burning.
- Spatula – Useful for stirring and spreading melted chocolate evenly.
- Candy Thermometer – Essential for tempering chocolate to achieve a glossy texture and prevent blooming.
Why Tempering Chocolate is Important
Tempering chocolate is an essential technique in the art of chocolate making. It involves carefully heating and cooling the chocolate to stabilize the cocoa butter, which results in:
- A smooth, glossy appearance.
- A firm texture that doesn’t melt easily in your hands.
- A satisfying snap when you break the bar.
By mastering these techniques, you can create a homemade Dubai chocolate bar that rivals those found in luxury confectionery stores.
Ingredients Needed for Dubai Chocolate Bar Recipe
Creating an authentic Dubai chocolate bar starts with selecting high-quality ingredients. From the base chocolate to the unique Middle Eastern flavors, every component plays a role in achieving the perfect taste and texture.
Basic Ingredients for a Classic Chocolate Bar
A great chocolate bar begins with premium chocolate and essential ingredients that provide a smooth, creamy texture and rich flavor. Here’s what you’ll need:
- Milk Chocolate – Offers a creamy, sweet base for a balanced chocolate bar.
- Dark Chocolate – Adds depth and enhances the overall richness.
- Candy Melts – Useful for decorative designs and adding vibrant colors.
- Cocoa Butter – Improves texture and gives the chocolate a smooth melt-in-your-mouth feel.
- Cocoa Powder – Enhances the chocolate flavor and provides a deep, luxurious taste.
These ingredients form the foundation of a well-balanced, high-quality chocolate bar.
Flavorful Additions for an Authentic Taste
To give your Dubai chocolate bar a signature Middle Eastern twist, consider incorporating these flavorful ingredients:
- Pistachios – A classic ingredient that adds a nutty crunch and a pop of color.
- Almonds or Hazelnuts – Provide texture and a rich, buttery taste.
- Tahini – Introduces a smooth, nutty flavor that complements the chocolate.
- Saffron – Adds an exotic floral note and a hint of luxury.
- Rose Water – Offers a delicate floral aroma, enhancing the overall depth of flavor.
These additions make the chocolate bar uniquely flavorful, setting it apart from traditional recipes.
Where to Buy Quality Chocolate Ingredients in Dubai
For the best results, sourcing high-quality chocolate and ingredients is essential. Here are some of the best places to buy premium chocolate and specialty ingredients in Dubai:
- Spinneys & Waitrose – Offer a wide selection of premium chocolate brands.
- Al Nassma Chocolate Boutique – Specializes in fine-quality chocolate products.
- Dubai Spice Souk – A great place to find saffron, cardamom, and rose water.
- Candylicious – A top spot for unique candy melts, chocolate molds, and decorative elements.
- Baking Centers and Specialty Stores – Shops like Tavola and Wilton in Dubai stock high-quality cocoa butter, molds, and tempering tools.
By choosing the right ingredients from reputable sources, you can ensure your homemade Dubai chocolate bar is of the highest quality, with flavors that rival those found in luxury chocolate boutiques.
Dubai Chocolate Bar Recipe
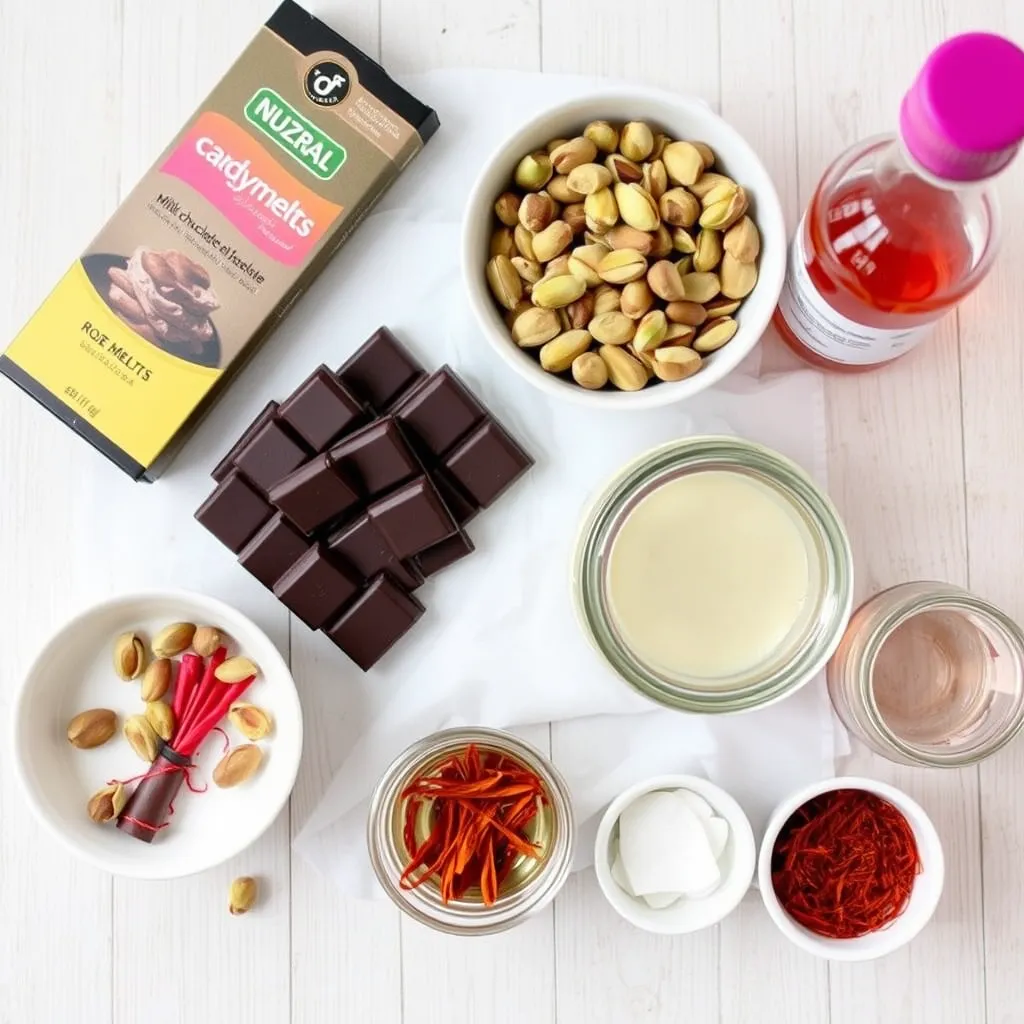
Ingredients
- Milk Chocolate – 200g, chopped
- Dark Chocolate – 100g, chopped
- Candy Melts (optional) – 50g, for decoration
- Cocoa Butter – 2 tbsp, for smooth texture
- Cocoa Powder – 1 tbsp, for extra richness
- Pistachios – ¼ cup, chopped
- Tahini – 1 tbsp, for a nutty flavor
- Saffron or Rose Water – ½ tsp, for Middle Eastern aroma
- Prep Time: 15 minutes
- Cook Time: 10 minutes
- Total Time: 25 minutes
- Servings: 4 large bars
- Yield: 4 chocolate bars
Key Features:
✔️ Luxuriously rich and smooth texture
✔️ Infused with Middle Eastern flavors
✔️ Easy to customize with different nuts and toppings
✔️ Perfect for gifting or indulgent snacking
Nutrition Facts (Per Serving)
- Calories: ~280
- Fat: 18g
- Carbohydrates: 24g
- Protein: 4g
- Sugar: 18g
- Fiber: 2g
Step-by-Step Guide to Making Dubai Chocolate Bars
Step 1 – Melting and Tempering the Chocolate
- Melting the Chocolate:
- Double Boiler Method:
- Fill a pot with a small amount of water and bring it to a simmer. Place a heatproof bowl (such as glass or metal) on top of the pot, ensuring the bottom of the bowl doesn’t touch the water.
- Add chopped milk chocolate, dark chocolate, or candy melts to the bowl. Keep stirring until the chocolate has fully melted and reaches a smooth, creamy texture.
- Microwave Method:
- Place your chopped chocolate in a microwave-safe bowl and heat in short bursts (30 seconds), stirring between intervals. This prevents overheating, which can cause the chocolate to seize.
- Double Boiler Method:
- Tempering the Chocolate (Optional but Recommended):
Tempering is a process of heating and cooling chocolate to stabilize it, giving it that shiny, glossy finish and ensuring it snaps when you break a piece. Without tempering, the chocolate may look dull and have a softer texture.- How to Temper:
- Heat your chocolate to about 45°C (113°F) to fully melt it.
- Let it cool down to 27°C (80°F) by stirring occasionally.
- Reheat it to about 31°C (88°F) to bring it to the proper working temperature.
This process ensures your chocolate sets with a smooth, shiny appearance and crisp texture.
- How to Temper:
Step 2 – Pouring into Chocolate Molds
- Choosing the Right Molds:
Chocolate molds come in various shapes and sizes. For a traditional chocolate bar, silicone or polycarbonate molds are ideal as they are flexible and allow easy removal of the chocolate once set. Look for molds that are made for chocolate bars for the best results. - Avoiding Air Bubbles:
After pouring the melted chocolate into the mold, gently tap the mold against the counter to help any trapped air bubbles rise to the surface. This ensures a smooth and even chocolate bar without imperfections or holes.
If you’re making more intricate designs, you can also use a spatula to spread the chocolate evenly into the corners of the mold. This will help fill every space and give the chocolate a professional look.
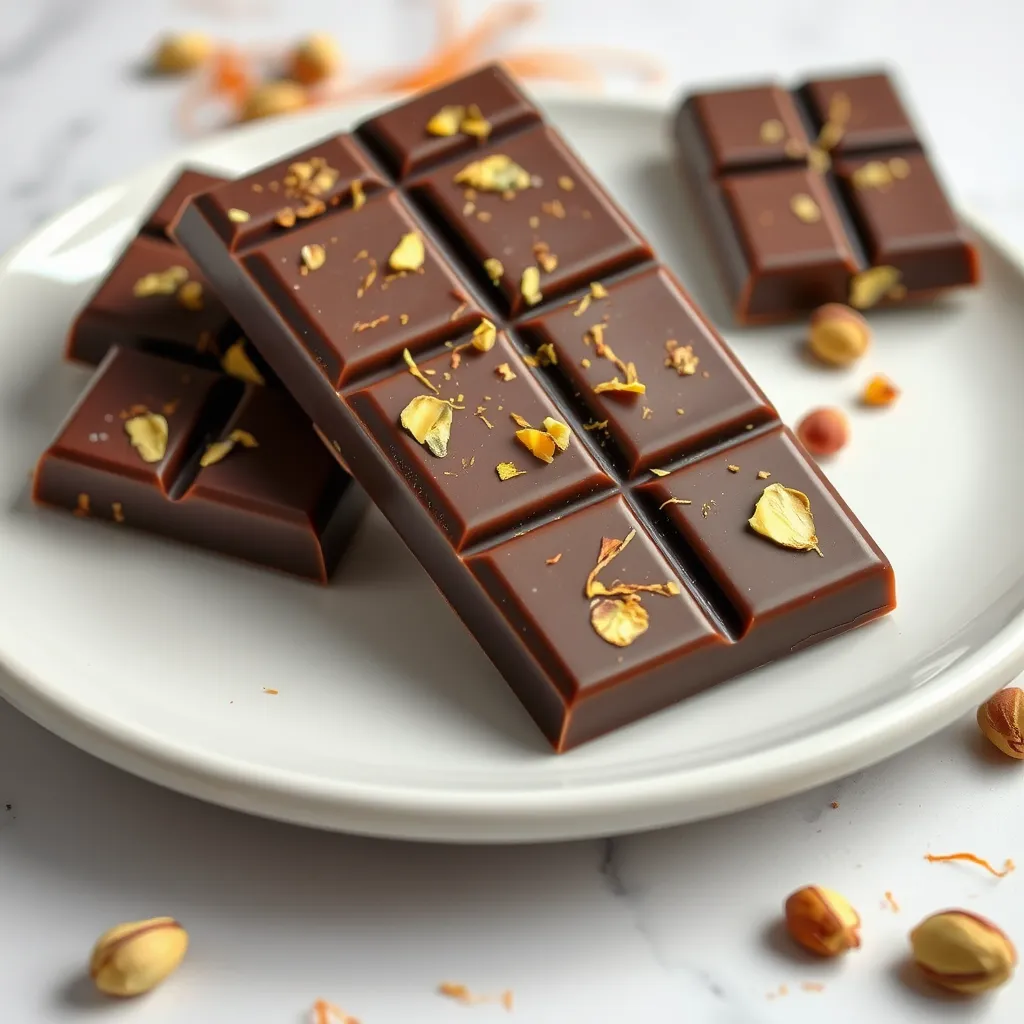
Step 3 – Adding Toppings and Flavors
- Enhancing the Flavor:
This is where you can get creative! Adding pistachios, almonds, or crushed hazelnuts can provide a crunchy texture that contrasts beautifully with the smooth chocolate. You can also use saffron for a luxurious, floral note, or rose water for a subtle, aromatic essence. - Decorative Designs:
For a decorative touch, melt candy melts in different colors and use a piping bag or spoon to drizzle them over the solid chocolate in artistic patterns. You could also add edible gold flakes for a touch of luxury or sprinkle sea salt for a sweet-salty combination. These embellishments will not only add flavor but also make your chocolate bar visually appealing.
Step 4 – Cooling and Unmolding the Chocolate Bar
- Proper Cooling:
To achieve the perfect set without cracks, it’s important to allow your chocolate to cool properly. If you’ve tempered it, let it set at room temperature for a few minutes. Afterward, you can place it in the fridge for about 30 minutes to solidify fully.
Cooling at room temperature prevents the chocolate from becoming too brittle and cracking. If you put it in the fridge immediately, it may cause the chocolate to set unevenly or develop a dull appearance. - Unmolding the Chocolate Bar:
Once your chocolate is fully cooled and hardened, gently press the mold or twist it (if using silicone molds) to release the chocolate. Be sure not to force it, as this could cause the chocolate to break or crack. - Storage Tips:
Chocolate bars should be stored in a cool, dry place. Ideally, they should be kept at a temperature of 15-18°C (59-64°F). Store your chocolate bars in an airtight container to prevent them from absorbing moisture or odors from the surrounding environment. Avoid storing them in the fridge for long periods, as this can cause the chocolate to bloom (white streaks on the surface caused by cocoa fat rising to the top).
These steps will guide you in making a luxurious Dubai-inspired chocolate bar that’s not only delicious but visually appealing too. If you want, you can even make these chocolate bars as gifts or share them during special occasions.
Tips for Making the Best Homemade Chocolate Bars
How to Avoid Common Mistakes in Chocolate Making
Making homemade chocolate bars can be a fun and rewarding process, but there are a few common mistakes you’ll want to avoid to ensure your chocolate turns out perfectly.
- Chocolate Burning:
- Problem: If chocolate is heated too quickly or at too high a temperature, it can burn and become grainy or clumpy.
- Fix: Always melt chocolate using a gentle, low-heat method, like a double boiler or microwave in short bursts. Stir frequently to help it melt evenly and avoid overheating.
- Improper Setting (Soft Texture):
- Problem: Sometimes, chocolate bars remain soft and don’t firm up properly after cooling. This can happen if the chocolate wasn’t tempered properly or if it cooled too quickly in a cold environment.
- Fix: Ensure the chocolate is tempered properly, and allow it to cool slowly at room temperature before refrigerating it. If the texture is still soft, you can return it to the fridge for 10-15 minutes to firm it up further.
- Chocolate Bloom (White Streaks on Chocolate Bars):
- Problem: Chocolate bloom happens when the cocoa butter separates and rises to the surface, creating white streaks or spots. This is usually a result of improper cooling or storage, such as exposing the chocolate to fluctuations in temperature.
- Fix: To prevent bloom, always store chocolate in a cool, dry place (15-18°C or 59-64°F). If bloom does happen, don’t worry; it’s still safe to eat, but it may not look as appealing. To fix the texture, simply remelt the chocolate and re-temper it.
Fun Variations to Try
- Pink Chocolate Bars:
- Create a beautiful, fun twist on traditional chocolate bars by adding pink chocolate melts or using freeze-dried strawberries for a fruity, tangy addition. Pink chocolate gives a vibrant color and adds a delicate sweetness that’s perfect for special occasions.
- Green Chocolate Melts:
- For an exotic touch, use green chocolate melts or add matcha powder to your chocolate mixture for a unique green hue and earthy flavor. It’s a great variation if you’re aiming for a healthier or more sophisticated chocolate flavor profile.
- Tahini Chocolate Bars:
- Incorporating tahini (sesame paste) into your chocolate bar creates a rich, creamy, and nutty flavor that’s reminiscent of Middle Eastern desserts. You can swirl tahini into the melted chocolate for a marbled effect, creating both a visual and flavor contrast.
- Add Crunchy Elements:
- Add texture to your chocolate bars by including nuts (like pistachios, almonds, or hazelnuts), rice crisps, or even crushed cookies. These additions provide a satisfying crunch and balance out the smoothness of the chocolate.
How to Store and Package Your Chocolate Bars
- Storage Tips:
- Best Temperature Conditions: Store your homemade chocolate bars in a cool, dry place away from direct sunlight. The ideal temperature for chocolate storage is between 15-18°C (59-64°F). Avoid storing them in the fridge for long periods, as this can cause condensation and ruin the texture.
- Airtight Containers: Use airtight containers to keep your chocolate bars fresh and prevent them from absorbing moisture or odors from the surrounding environment. You can also wrap them in parchment paper or wax paper before placing them in a container to keep them protected.
- Creative Packaging Ideas for Gifting:
- Personalized Wrapping: Consider wrapping your chocolate bars in colorful cellophane or printed paper for a festive touch. Tie them with ribbons or twine for a rustic, handmade feel.
- Gift Boxes: Place your chocolate bars in gift boxes with decorative touches like dried flowers, tags, or bows to make them more gift-worthy.
- Clear Plastic Bags: If you’re gifting multiple chocolate bars, a clear plastic bag with a decorative label or card can give a professional and elegant look.
- Custom Labels: Add custom labels to your chocolate bars with the recipe name, ingredients, or a fun message. This adds a personal touch and makes the gift feel special.
Pro Tips for a Perfect Dubai Chocolate Bar
- Master the Tempering Process:
Tempering is key to achieving a shiny, smooth finish on your chocolate. If you’re new to tempering, consider investing in a candy thermometer. It helps you monitor the chocolate’s temperature for perfect results. To temper, melt chocolate to around 45°C (113°F), then cool it to about 27°C (80°F) and reheat to 31°C (88°F) for dark chocolate (slightly lower for milk or white chocolate). This process ensures the chocolate hardens correctly and has a glossy, professional appearance. - Use High-Quality Ingredients:
For the best chocolate bars, choose premium chocolate brands like Callebaut, Valrhona, or Wilton melts. These chocolates have superior flavor and texture, making a big difference in your homemade bars. Fresh ingredients, such as fresh pistachios or saffron threads, will also enhance the flavor and give your chocolate a more authentic Middle Eastern twist. - Avoid Overheating the Chocolate:
Chocolate can burn easily, especially when using a microwave. Always melt in short bursts (20-30 seconds at a time) and stir in between to prevent overheating. If you’re using a double boiler, make sure the bowl doesn’t touch the water to avoid any moisture getting into your chocolate. - Add Texture with the Right Toppings:
For the perfect balance of creamy chocolate and crunchy texture, try adding pistachios, crunchy rice puffs, or crushed candied fruits like dried apricots. You can also experiment with spices such as cardamom or rose water to give your chocolate bars a distinctive flavor profile. - Let Chocolate Set Slowly:
After pouring your melted chocolate into molds, allow it to set at room temperature first before refrigerating. Rapid cooling can cause the chocolate to lose its smooth finish. Let the chocolate firm up in the molds for at least 1-2 hours before carefully removing.
You’ll Also Love
If you’re a fan of making your own chocolates, you’ll definitely want to try these recipes that pair perfectly with the Dubai Chocolate Bar:
- Pistachio Chocolate Bark:
Combine rich dark chocolate with crunchy pistachios and a sprinkle of sea salt for a luxurious, yet simple treat. The combination of flavors is a great way to experiment with Middle Eastern ingredients. - Homemade Chocolate Truffles:
Learn how to make decadent chocolate truffles using your favorite chocolate and fillings like raspberry puree, caramel, or hazelnut praline. These bite-sized delights are perfect for gifting or indulgence. - Turkish Delight Chocolate Bars:
Add an exotic twist by incorporating pieces of Turkish delight into your chocolate bar. The chewy, rose-flavored candy pairs wonderfully with milk or dark chocolate for a truly special treat. - Saffron Chocolate Fudge:
Infuse rich saffron threads into a creamy chocolate fudge for a sophisticated dessert. This recipe brings out the golden warmth of saffron and pairs it beautifully with chocolate’s sweetness.
These recipes not only complement the Dubai Chocolate Bar but also elevate your chocolate-making skills with exciting new variations and flavors!
Conclusion
Making a Dubai chocolate bar at home is a delightful and rewarding experience that combines rich, smooth chocolate with exotic flavors inspired by Middle Eastern ingredients. By following the simple steps—melting and tempering your chocolate, adding your favorite toppings, and carefully cooling your bars—you can create a beautiful, personalized chocolate treat that rivals any store-bought version.
Don’t be afraid to experiment with unique flavors like pistachios, saffron, or rose water to give your chocolate bars a signature twist. Whether you prefer milk chocolate, dark chocolate, or even pink chocolate, the possibilities for customizing your homemade bars are endless.
We’d love to see your creations! Share your Dubai chocolate bar adventures on social media by tagging us with #BeesRecipes. Show off your designs, toppings, and flavor combinations to inspire others and join the chocolate-making community! Happy chocolate making!