Quesabirrias: The Ultimate Guide to Mexico’s Most Addictive Tacos
Introduction
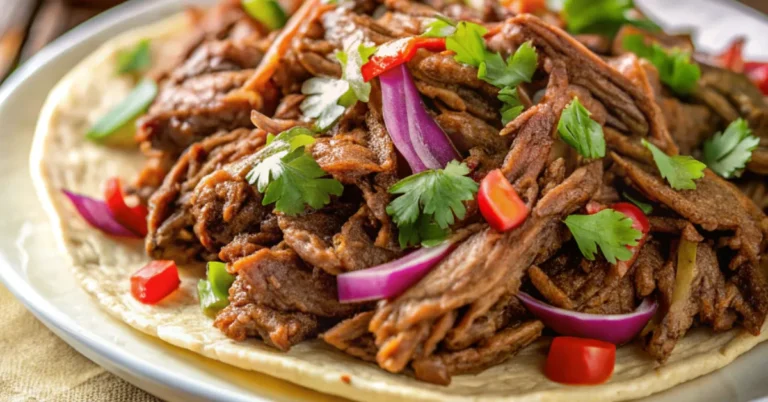
If you’re a fan of tacos, then you’ve likely heard of Quesabirrias – a mouthwatering fusion of two Mexican classics: queso (cheese) and birria (a flavorful meat stew). These crispy, cheesy tacos have been stealing the hearts of food lovers worldwide, and for good reason! Imagine a perfectly tender beef filling, melted cheese, and a crispy taco shell that’s dipped into a rich and aromatic consommé – the result is nothing short of heavenly.
In this ultimate guide, we’ll dive into everything you need to know about quesabirrias: the history, the essential ingredients, how to make them at home, and why they are absolutely irresistible. Whether you’re a seasoned cook or a beginner in the kitchen, this recipe will guide you step by step to create the most delicious quesabirrias you’ve ever tasted.
What Is This Recipe?
Quesabirrias are a type of taco that originated in the region of Jalisco, Mexico. The dish is a creative and indulgent twist on traditional birria tacos. While birria on its own is a rich, flavorful stew typically made from beef, goat, or lamb, quesabirrias take it a step further by adding melted cheese inside the taco, making it a cheesy, juicy masterpiece.
The key to great quesabirrias is the quality of the meat and the consommé (the flavorful broth that the meat is cooked in). The tacos are filled with slow-braised, shredded beef, a combination of flavorful spices, and cheese, then fried until crispy. They are often served with a side of consommé for dipping, taking each bite to another level of deliciousness.
Essential Ingredients
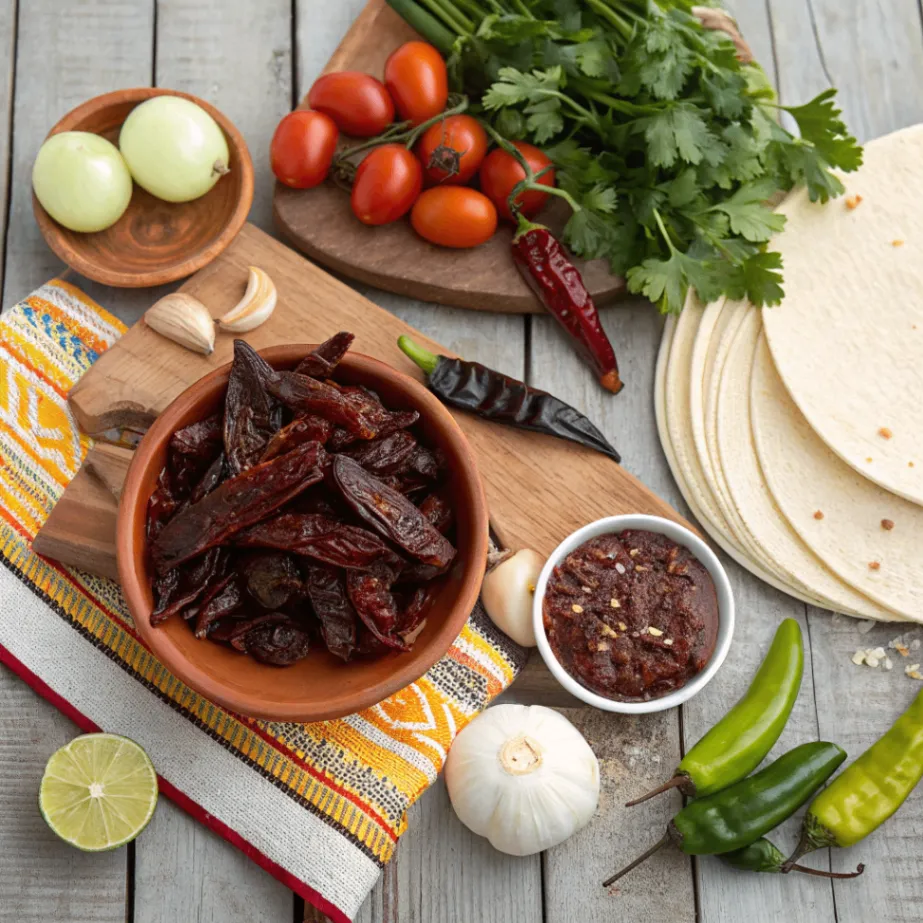
To make the perfect quesabirrias, you’ll need the following ingredients:
- Beef short ribs or chuck roast (You can also use lamb if you prefer the traditional birria flavor)
- Corn tortillas (They need to be sturdy to hold the fillings and crispy when fried)
- Oaxaca cheese (or mozzarella as a substitute for a stretchy, melty texture)
- Guajillo chiles (These are key to giving the dish its authentic flavor)
- Ancho chiles (For a touch of smokiness)
- Cinnamon stick
- Cloves (For aromatic depth)
- Bay leaves
- Garlic
- Onion
- Tomatoes (For sweetness and acidity)
- Beef broth or water (To create the consommé)
- Cilantro and lime (For garnishing)
- Salt and pepper (To taste)
Alternative Ingredients
If you can’t find some of the traditional ingredients, don’t worry! Here are some alternatives to consider:
- Cheese: While Oaxaca cheese is the traditional choice for quesabirrias, you can also use mozzarella or jack cheese for that gooey, melt-in-your-mouth experience.
- Meat: While beef short ribs or chuck roast are commonly used, you can opt for pork shoulder or even chicken for a lighter version.
- Chiles: If you can’t find guajillo chiles or ancho chiles, you can try pasilla chiles or chipotle chiles as substitutes.
- Consommé: If you’re short on time, store-bought beef broth can serve as a quick base for your consommé. Just make sure to add the necessary spices to enhance the flavor.
Prep Time: 15 minutes
Cook Time: 3 hours
Total Time: 3 hours 15 minutes
Servings: 6 tacos
Yield: 6 servings
Key Features
- Flavor Profile: Rich, savory, smoky, and cheesy.
- Texture: Tender beef with melted cheese inside a crispy taco shell.
- Meal Type: Mexican comfort food, street food, or a family dinner.
- Difficulty: Moderate (requires patience for braising the meat)
- Cooking Method: Slow braising, frying
Nutrition Facts
| Nutrient | Amount per Serving |
|---|---|
| Calories | 350 kcal |
| Protein | 24 g |
| Total Fat | 18 g |
| Saturated Fat | 8 g |
| Cholesterol | 45 mg |
| Sodium | 320 mg |
| Carbohydrates | 30 g |
| Fiber | 3 g |
| Sugars | 5 g |
| Vitamin A | 10% |
| Vitamin C | 15% |
| Calcium | 25% |
| Iron | 15% |
Directions (Step-by-Step Guide to Making Quesabirrias)
Making quesabirrias is a multi-step process, but the result is worth every minute of effort. The combination of tender, flavorful meat, melty cheese, and crispy tortillas makes for an unforgettable dish. Here’s a detailed step-by-step guide on how to make quesabirrias at home.
Step 1: Preparing the Chiles
The first step in making quesabirrias is preparing the dried chiles, which are key to giving the dish its rich, smoky flavor. For quesabirrias, the chiles you’ll need are guajillo chiles and ancho chiles. These two varieties of dried chiles are widely used in Mexican cooking, known for their deep, earthy flavors.
- Remove the Stems and Seeds: Begin by cutting off the stems and slicing open each chile. You’ll find the seeds inside, so carefully remove them to avoid bitterness. You can also use a spoon or your fingers to scrape out the seeds.
- Toast the Chiles: Heat a dry skillet or pan over medium heat. Once it’s warm, add the chiles to the pan. Toast them for about 30 seconds to 1 minute, gently turning them over. Be cautious not to burn the chiles – you want them to release their oils and aromatic flavors without becoming bitter.
- Soak the Chiles: After toasting, immediately place the chiles into a bowl of warm water. Let them soak for around 10 minutes, or until the chiles soften. This will help them blend smoothly when you make the sauce.
Step 2: Making the Consommé (Birria Broth)
While the chiles soak, it’s time to prepare the broth that will give the quesabirrias its signature rich, savory flavor.
- Blend the Chiles and Other Ingredients: After soaking, transfer the chiles into a blender. Add garlic, onion, tomatoes, a cinnamon stick, bay leaves, and cloves to the blender. These aromatics will create a complex, layered flavor profile for your consommé.
- Add Beef Broth: Pour in about 2 cups of beef broth (or water if you prefer). The broth is key to creating the consommé that the meat will cook in, adding even more depth of flavor. Season with salt and pepper to taste. Blend everything together until the mixture is smooth.
- Simmer the Consommé: In a large pot, add the beef short ribs (or chuck roast) and pour the chile mixture over the meat. The meat should be completely submerged. Bring the mixture to a simmer over medium heat. Cover the pot and let it cook for 2.5 to 3 hours. The goal here is to slow-cook the meat until it’s fall-apart tender and full of flavor.
- Strain the Broth: Once the meat is tender, remove it from the pot and set it aside to cool slightly. Strain the broth to remove the solid pieces of onion, garlic, and spices. This will leave you with a smooth, flavorful consommé that you can serve with your quesabirrias for dipping.
Step 3: Shredding the Beef
Once the beef has cooled enough to handle, it’s time to shred it. This is where the meat transforms into that tender, juicy filling for your quesabirrias.
- Shred the Meat: Using two forks, shred the beef into small pieces. You want the meat to be fine and juicy, so it can fill the tacos evenly.
- Keep the Consommé Handy: Keep the consommé you made earlier in a separate bowl. You’ll use this not only as a dipping sauce but also to moisten the meat if needed.
Step 4: Assembling the Quesabirrias
Now comes the fun part: assembling your quesabirrias! This is where you get to build the taco that’s loaded with cheesy goodness and tender meat.
- Heat the Tortillas: Start by warming your corn tortillas in a dry pan or on a griddle. You don’t want to make them too crispy yet, just warm enough to hold the fillings. Heating them also makes them more pliable for folding.
- Add the Cheese and Meat: Place a warm tortilla on a flat surface, and sprinkle Oaxaca cheese (or your preferred melty cheese) evenly across the center. Then, add a generous portion of the shredded beef on top of the cheese. Be sure not to overfill; you want to make sure the cheese has room to melt and bind everything together.
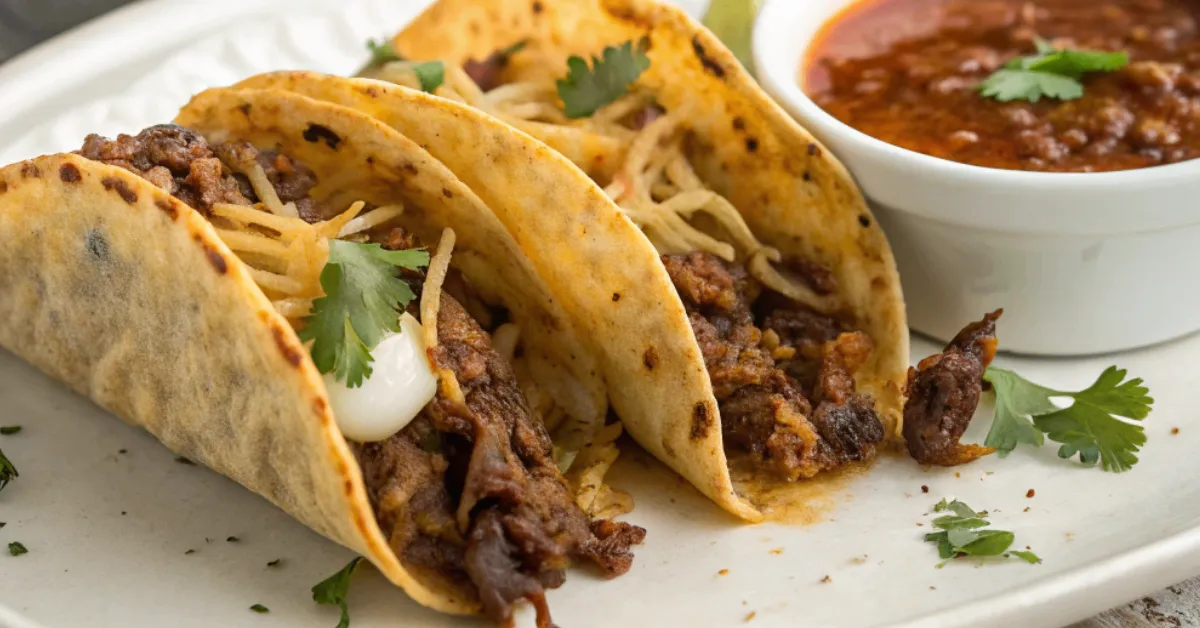
- Fry the Tacos: Heat a bit of oil or butter in a skillet over medium heat. Take the filled tortilla and fold it in half to form a taco. Place it in the hot skillet, pressing it down slightly to get a crispy, golden-brown crust. Flip the taco carefully after a few minutes so both sides are crispy and golden. The cheese inside should be melted, and the meat should be heated through.
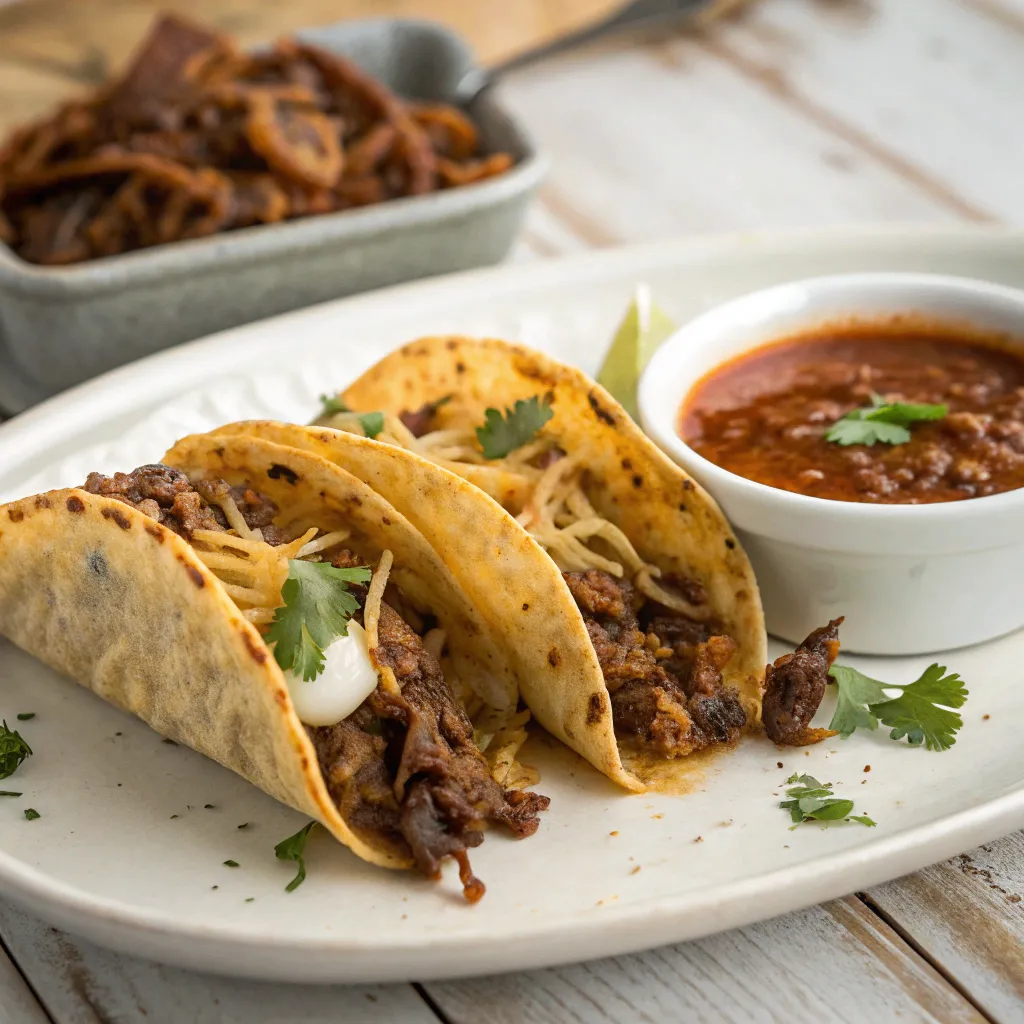
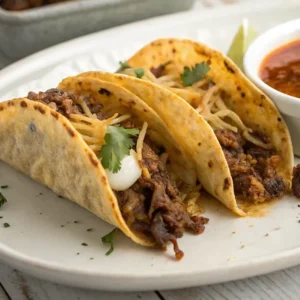
- Serve with Consommé: Once your quesabirrias are crispy and golden, remove them from the skillet and serve them immediately. Place them on a plate with a small bowl of the rich consommé for dipping. Garnish with fresh cilantro and a squeeze of lime for an added burst of freshness.

Step 5: Enjoy!
Your quesabirrias are now ready to enjoy! These tacos are perfect for dipping into the consommé, and the combination of flavors and textures will leave you craving more. Serve them at a family gathering, a taco night, or simply as a delicious weekend treat.
This detailed, step-by-step guide ensures that every aspect of making quesabirrias is clear and easy to follow. By carefully preparing the chiles, making the flavorful consommé, and assembling the tacos with love, you’ll be able to create an authentic and mouthwatering dish that your friends and family will absolutely love. Enjoy!
Pro Tips for a Perfect Quesabirria
Creating the perfect quesabirria requires a few tips and tricks to ensure every bite is packed with flavor and the perfect texture. Here are some pro tips to help you achieve taco perfection:
- Use the Right Cut of Meat:
While you can use a variety of meats for quesabirrias, beef short ribs or chuck roast are the best choices. They have the right amount of fat and marbling to stay tender during the long cooking process. This fat will melt into the broth, creating a richer, more flavorful consommé. If you’re using a leaner cut like sirloin, you might want to add some extra fat to the cooking liquid for the best flavor. - Toast Your Chiles for Maximum Flavor:
Don’t skip the step of toasting the dried chiles. Toasting the guajillo and ancho chiles in a dry pan for a minute helps release their oils and enhances their natural smokiness and depth. But be careful not to burn them—burnt chiles will make the sauce taste bitter. A light toast is all you need for the perfect flavor base. - Make Sure Your Tortillas Are Fresh:
Fresh, sturdy corn tortillas are essential for the crispy texture of quesabirrias. If the tortillas are too thin or not fresh, they can tear easily when dipping into the consommé or while frying. For the crispiest results, look for high-quality, freshly made tortillas at your local store or make your own. - Fry Until Golden and Crispy:
The key to that satisfying crunch in every bite is to fry the quesabirrias until they’re golden and crispy on both sides. Don’t rush this step. Use medium heat to avoid burning the tortillas and ensure they cook evenly. Once they’re crispy, the cheese inside should be perfectly melted, and the meat will stay juicy. - Serve Immediately for Maximum Freshness:
Quesabirrias are best served fresh and hot. If you let them sit for too long, the crispy texture of the taco shell will soften. Serve your tacos immediately with a side of consommé for dipping, and don’t forget the fresh lime and cilantro for garnish.
Why You’ll Love This Recipe
You’ll love quesabirrias because they combine the best of both worlds: tender, flavorful meat and gooey, melty cheese wrapped in a crispy taco shell. The addition of dipping consommé adds another layer of flavor and makes every bite an experience. It’s perfect for taco lovers looking to try something new and exciting, and it’s an ideal dish to impress your friends and family.
What Makes This Recipe Unique?
What sets quesabirrias apart from regular tacos is the combination of cheese and birria. The crispy, cheesy taco is unique in its texture and flavor – a perfect balance between the juicy, spicy beef and the creamy cheese. Plus, the consommé for dipping elevates it to a whole new level of deliciousness. It’s a flavorful explosion in every bite.
Frequently Asked Questions (FAQs)
1. Can I make quesabirrias with chicken instead of beef?
Yes, you can! While beef is traditional, quesabirrias can be made with chicken for a lighter version of the dish.
2. How do I store leftover quesabirrias?
Store the shredded meat and tortillas separately in an airtight container in the fridge. You can reheat them in a pan when ready to serve.
3. Can I make the consommé ahead of time?
Absolutely! You can prepare the consommé ahead of time and store it in the fridge for up to 3 days. Just reheat it when you’re ready to serve.
4. What other toppings can I add to quesabirrias?
In addition to cilantro and lime, you can top quesabirrias with diced onions, radishes, or avocado for an extra punch of freshness.
You’ll Also Love
- Birria Tacos – A simpler, equally delicious version of the classic.
- Mexican Street Corn (Elote) – Pair your quesabirrias with this iconic Mexican side dish.
- Salsa Verde – A tangy salsa that pairs perfectly with quesabirrias.
Conclusion
Quesabirrias are more than just tacos; they are an unforgettable culinary experience. With the perfect combination of crispy, cheesy tacos, tender beef, and rich consommé, this dish is sure to become a favorite in your kitchen. The best part? You can make them at home with just a few ingredients and a little time. Don’t forget to share your creations with #BeesRecipes on Instagram. We can’t wait to see your delicious take on this Mexican classic!
Quesabirrias: The Ultimate Guide to Mexico’s Most Addictive Tacos
Notes
Equipment
| Amount | Name | Notes |
|---|---|---|
| 1 | Large pot | For simmering meat and broth |
| 1 | Blender | To puree the chile sauce |
| 1 | Skillet or griddle | For frying the tacos |
| 2 | Forks | For shredding the beef |
| 1 | Ladle | To serve consommé |
Ingredients
Beef and Broth:| Amount | Unit | Name | Notes |
|---|---|---|---|
| 2.5 | lb | Beef chuck roast | Or short ribs, bone-in preferred |
| 3 | Guajillo chiles | Stemmed and seeded | |
| 2 | Ancho chiles | Stemmed and seeded | |
| 4 | cloves | Garlic | Whole, peeled |
| 1 | White onion | Cut in quarters | |
| 2 | Tomatoes | Roma, halved | |
| 1 | stick | Cinnamon | Optional but authentic |
| 2 | Bay leaves | Whole | |
| 1/2 | tsp | Ground cloves | |
| 1 | tsp | Cumin | Ground |
| 1 | tsp | Oregano | Preferably Mexican oregano |
| 4 | cups | Beef broth | Or water |
| Salt and pepper | To taste |
| Amount | Unit | Name | Notes |
|---|---|---|---|
| 12 | Corn tortillas | Fresh | |
| 2 | cups | Oaxaca cheese | Shredded, or mozzarella |
| Fresh cilantro | Chopped, for garnish | ||
| Lime wedges | For serving | ||
| Oil or lard | For frying tacos |
Instructions
-
Prepare the Chiles
Toast guajillo and ancho chiles in a dry pan for 30 seconds. Soak them in warm water for 10 minutes until soft. -
Make the Sauce
Blend soaked chiles with garlic, onion, tomatoes, cinnamon stick, bay leaves, cloves, cumin, oregano, and 2 cups of beef broth until smooth. -
Cook the Meat
Place the beef into a large pot and pour the blended sauce over it. Add remaining broth, season with salt and pepper. Simmer covered on low heat for 2.5 to 3 hours, or until the meat is fall-apart tender. -
Shred the Meat
Remove the beef and shred it using two forks. Strain the broth (consommé) and set aside for dipping. -
Assemble the Tacos
Dip tortillas in the consommé. Place them on a hot skillet, add cheese and shredded beef, then fold. Fry on both sides until crispy and cheese is melted. -
Serve
Serve hot with chopped cilantro, lime wedges, and a bowl of consommé for dipping.
Nutrition (per taco)
| Nutrient | Amount |
|---|---|
| Calories | 320 kcal |
| Protein | 20 g |
| Carbohydrates | 22 g |
| Fat | 18 g |
| Saturated Fat | 8 g |
| Cholesterol | 60 mg |
| Sodium | 450 mg |
Recipe Notes:
- For extra heat, add a chipotle chile in adobo to the blender.
- The consommé can be refrigerated and used as soup broth or ramen base.
There are no reviews yet. Be the first one to write one.