How Long to Cook Boneless Skinless Chicken Thighs in Oven: The Complete Guide
I still remember the first time I ruined a perfectly good batch of chicken thighs. There I was, standing in my kitchen at 6 PM on a Tuesday, staring at what could only be described as chicken-flavored shoe leather. My mistake? I followed some generic internet advice that said “cook until done” without actually telling me what that meant. After ten years of cooking professionally and testing countless batches, I’ve finally cracked the code on getting boneless skinless chicken thighs absolutely perfect every single time.
The short answer is 20-25 minutes at 425°F, but here’s the thing: that timing only works if you understand the variables. Thickness matters, your oven’s actual temperature (spoiler: it’s probably lying to you), and whether you’re using a cast iron skillet or a regular baking sheet all play into the final result. Let me walk you through everything I wish someone had told me years ago.
Essential Ingredients
- 1.5 to 2 pounds boneless skinless chicken thighs
- 2 tablespoons olive oil or avocado oil
- 1 teaspoon kosher salt
- 1/2 teaspoon black pepper
- 1 teaspoon garlic powder
- 1 teaspoon paprika (smoked or regular)
- 1/2 teaspoon onion powder
- Optional: 1/4 teaspoon cayenne pepper for heat
Alternative Ingredients
For the oil: You can swap olive oil for melted butter, coconut oil, or even a light coating of cooking spray if you’re watching calories. I’ve found that avocado oil gives the best browning at high heat, but honestly, whatever you have on hand works fine.
For the seasonings: This is where you can get creative. Italian seasoning works beautifully if you’re going for a Mediterranean vibe. Taco seasoning turns these into perfect burrito or taco filling. I’ve even used everything bagel seasoning in a pinch, and my family loved it.
Organic vs. conventional chicken: Look, I get that organic chicken can be pricey. When I’m doing meal prep for the whole week, I’ll sometimes splurge on organic chicken thighs because the flavor difference is noticeable. But conventional works perfectly fine too. Just make sure they’re similar in thickness so they cook evenly.
Step-by-Step Directions
Step 1: Prep your chicken (5 minutes)
Take your chicken thighs out of the package and pat them completely dry with paper towels. This is crucial. I learned this the hard way after years of wondering why my chicken never got that nice golden crust. Moisture is the enemy of browning. While you’re at it, trim off any excess fat or weird bits. Some thighs have random pieces of fat that don’t render well.
Step 2: Season generously (2 minutes)
In a small bowl, mix your salt, pepper, garlic powder, paprika, and onion powder. Drizzle the oil over your chicken thighs, then sprinkle the seasoning mix on both sides. Don’t be shy here. One mistake I see all the time is under-seasoning. You want to see a nice coating of spices on the surface.
Step 3: Preheat your oven properly (10 minutes)
Set your oven to 425°F and let it preheat for a full 10 minutes. I know it’s tempting to throw the chicken in as soon as the oven beeps, but trust me on this. A properly preheated oven makes all the difference. If you have a reliable meat thermometer with an oven-safe probe, now’s the time to insert it into the thickest part of one thigh.
Step 4: Choose your cooking vessel
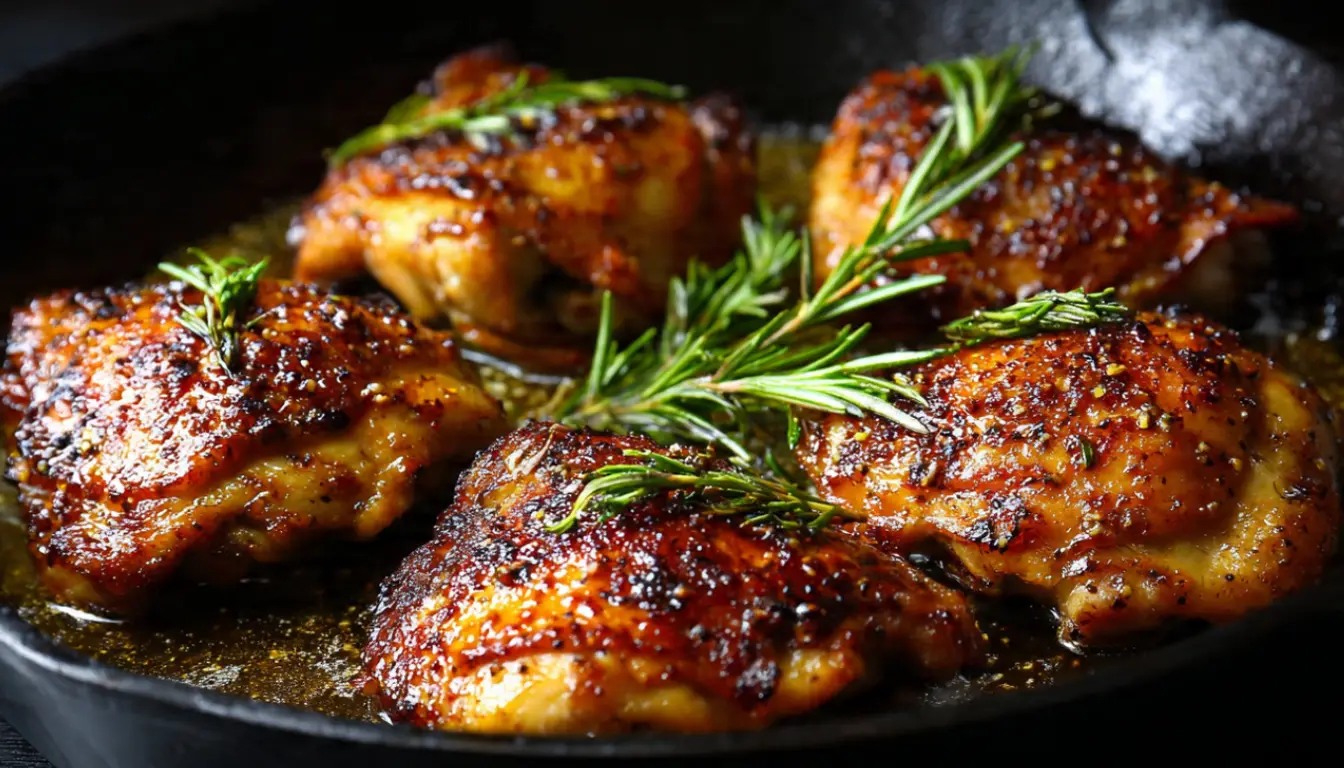
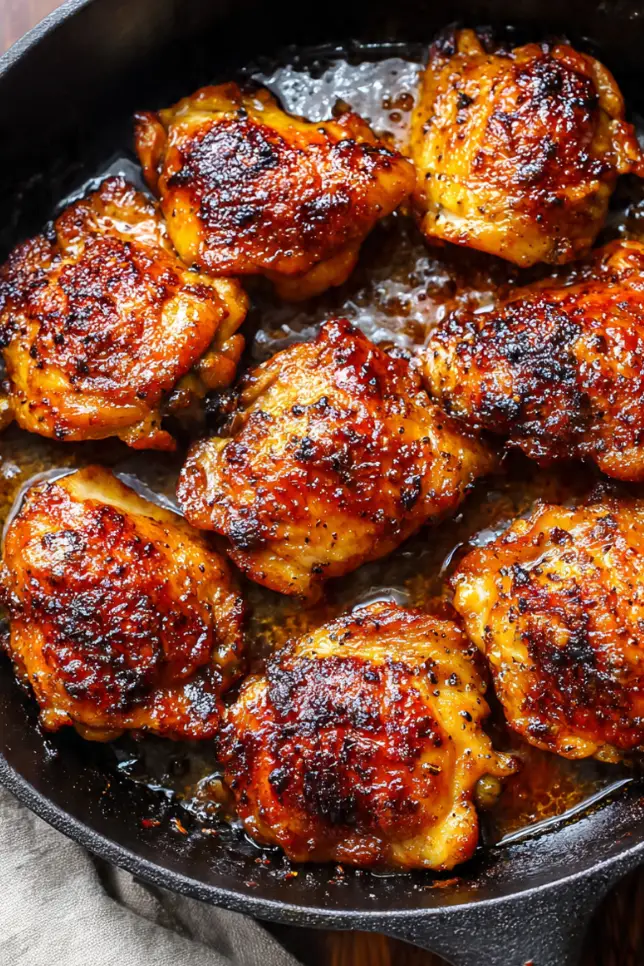
Here’s where things get interesting. A cast iron skillet gives you the absolute best sear and even cooking. The heavy metal holds heat beautifully and you get those gorgeous caramelized bits on the bottom. But a regular baking sheet lined with parchment paper works too, especially if you’re cooking for a crowd. I use my 12-inch Lodge cast iron for family dinners and switch to baking sheets when I’m doing meal prep for the week.
Step 5: Arrange and bake (20-25 minutes)
Place your seasoned thighs in your chosen pan, making sure they’re not touching. Overcrowding leads to steaming instead of roasting. Slide the pan into your preheated oven on the middle rack.
Now, here’s the real secret: the timing depends on thickness. Most boneless skinless chicken thighs are about 3/4 to 1 inch thick and will take 20-22 minutes at 425°F. If yours are thicker (some can be up to 1.5 inches), you’re looking at 25-28 minutes. Thinner pieces might only need 18-20 minutes.
The only way to know for sure is to use an instant-read meat thermometer. You’re aiming for an internal temperature of 165°F in the thickest part. I usually pull mine at 160°F because the carryover cooking brings them up to 165°F while they rest.
Step 6: Rest before serving (5 minutes)
This is non-negotiable. When you pull those thighs out of the oven, resist the urge to cut into them immediately. Let them rest on the pan or transfer them to a clean plate and tent with foil for 5 minutes. This allows the juices to redistribute. Cut into them too early and all that delicious moisture runs out onto your cutting board instead of staying in the meat.
Pro Tips
The thickness trick: I started buying chicken thighs from the butcher counter instead of pre-packaged because I can ask them to pound the thicker ones to an even thickness. This was a game-changer for getting consistent results.
The flip debate: You don’t need to flip boneless skinless chicken thighs halfway through cooking. The hot air circulates fine on its own. However, if you want extra crispy skin (wait, these are skinless, never mind), or if you’re using a marinade that tends to burn, a quick flip at the 12-minute mark doesn’t hurt.
Instant Pot shortcut: When I’m truly pressed for time, I’ll use my Instant Pot on the pressure cook setting for 8 minutes with a quick release. Then I transfer them to a hot cast iron skillet for 2-3 minutes per side to get some color. Total time? About 20 minutes start to finish.
Batch cooking wisdom: These reheat beautifully, which is why I always make extra. I store them in airtight meal prep containers and they last 4-5 days in the fridge. They’re perfect for quick lunch salads, grain bowls, or those nights when cooking feels impossible.
The broiler finish: Want restaurant-quality browning? After your thighs hit 165°F, switch your oven to broil and give them 1-2 minutes. Watch them like a hawk though. I’ve turned my back for 30 seconds and come back to charcoal.
Frequently Asked Questions
Can I use frozen chicken thighs?
Yes, but it’s best to thaw them first. Frozen chicken thighs release a lot of water while cooking, which prevents proper browning. Thaw them overnight in the refrigerator and pat them dry before seasoning.
What if my chicken thighs are different sizes?
Remove smaller thighs earlier since they cook faster. Pieces should be taken out once they reach 165°F. Smaller thighs may be done around 18 minutes, while larger ones might take up to 25 minutes.
How do I know if chicken thighs are done without a thermometer?
Slice into the thickest part of the chicken. The juices should run clear and the meat should be opaque all the way through. A thermometer is still the most accurate method.
Can I marinate chicken thighs before baking?
Yes. Marinades like soy sauce, garlic, and ginger work wonderfully. Just pat the chicken dry before baking so the skin or surface browns nicely.
Can I cook chicken thighs at a lower temperature?
Yes. Bake them at 375°F for about 30–35 minutes. They’ll stay juicy but won’t develop as much browning as when cooked at higher heat.
Recipe Info
| Prep Time | Cook Time | Total Time | Servings | Yield |
|---|---|---|---|---|
| 7 minutes | 20-25 minutes | 27-32 minutes | 4-6 | 1.5-2 lbs |
Why You’ll Love This Recipe
First off, it’s nearly impossible to overcook chicken thighs. Unlike chicken breasts that turn into sawdust if you look at them wrong, thighs have enough fat to stay juicy even if you go a few minutes over. This makes them incredibly forgiving for new cooks or those nights when you’re distracted by kids, phone calls, or the latest episode of whatever you’re binging.
They’re also budget-friendly. Boneless skinless chicken thighs cost significantly less than chicken breasts in most grocery stores, and you can often find them on sale. I stock up when they’re buy-one-get-one and freeze the extras.
The versatility is unmatched. These work in everything from Asian stir-fries to Mexican-inspired bowls to Mediterranean salads. I’ve served them hot, cold, shredded, sliced, and chopped. They’ve never let me down.
What Makes This Recipe Unique
Most chicken thigh recipes online give you a specific time without explaining the variables. They assume everyone’s oven runs true to temperature (hint: most don’t), that all chicken thighs are the same size (they’re not), and that you have some magical internal chicken timer in your head (you don’t).
This method teaches you the principles so you can adapt to your specific situation. Got a wonky oven that runs hot? Adjust your time. Using particularly thick thighs from a specialty butcher? You’ll know to add a few minutes. Cooking at high altitude? The principles still apply, you just might need to adjust.
Key Features
✓ Foolproof timing guidance for different thicknesses
✓ Works with any seasoning blend you prefer
✓ Perfect for meal prep and batch cooking
✓ Minimal cleanup, especially with parchment paper
✓ Adaptable to cast iron, baking sheets, or roasting pans
✓ Great for beginners and experienced cooks alike
✓ Naturally gluten-free and dairy-free
✓ High in protein, perfect for fitness enthusiasts
You’ll Also Love
If these oven-baked chicken thighs become part of your regular rotation (and they will), here are some other recipes that pair perfectly:
Sheet Pan Roasted Vegetables – Throw broccoli, bell peppers, and red onions on the same pan for a complete meal. The vegetables caramelize beautifully at 425°F and everything’s done at the same time.
Chicken Thigh Buddha Bowls – Use leftover chicken thighs over quinoa or rice with roasted sweet potatoes, avocado, and tahini dressing. This is my go-to lunch four days a week.
Crispy Chicken Thigh Tacos – Shred the cooked chicken, crisp it up in a skillet with taco seasoning, and pile it into tortillas. Add all your favorite toppings and you’ve got taco Tuesday sorted.
Asian-Inspired Chicken Lettuce Wraps – Dice the cooked thighs and toss with hoisin sauce, fresh ginger, and water chestnuts. Serve in butter lettuce cups for a light but satisfying dinner.
Conclusion
After a decade of cooking chicken thighs professionally and at home, I can confidently say that mastering this basic technique will change your weeknight cooking game. The beauty of boneless skinless chicken thighs is that they’re forgiving, affordable, and versatile enough to work with whatever flavors you’re craving.
Remember: 425°F for 20-25 minutes, but always verify with a meat thermometer for that perfect 165°F internal temperature. Don’t skip the resting time, and for the love of all that’s delicious, pat them dry before seasoning.
Now you’ve got the method, the timing, and the troubleshooting tips you need. No more guessing, no more rubbery or dry chicken. Just perfectly cooked, juicy chicken thighs every single time. And honestly? Once you nail this technique, you’ll wonder why you ever bothered with chicken breasts in the first place.
Happy cooking, and if you try this recipe, let me know how it turns out. I’m always curious to hear about your variations and what seasonings you end up loving.
Perfect Oven-Baked Boneless Skinless Chicken Thighs
Juicy, perfectly cooked chicken thighs every single time with this foolproof method.
Ingredients
- 1.5-2 lbs boneless skinless chicken thighs
- 2 tbsp olive oil or avocado oil
- 1 tsp kosher salt
- 1/2 tsp black pepper
- 1 tsp garlic powder
- 1 tsp paprika (smoked or regular)
- 1/2 tsp onion powder
- 1/4 tsp cayenne pepper (optional)
Instructions
- Prep the chicken Pat chicken thighs completely dry with paper towels. Trim any excess fat. This step is crucial for proper browning.
- Season the chicken Mix salt, pepper, garlic powder, paprika, and onion powder in a small bowl. Drizzle oil over chicken thighs, then coat both sides generously with seasoning mix.
- Preheat oven Preheat oven to 425°F for a full 10 minutes to ensure proper temperature.
- Arrange chicken Place seasoned thighs in a cast iron skillet or on a parchment-lined baking sheet, making sure they don’t touch. Insert a meat thermometer into the thickest thigh if using.
- Bake to perfection Bake for 20-25 minutes at 425°F until internal temperature reaches 165°F. Thicker pieces may need 25-28 minutes, while thinner ones cook in 18-20 minutes.
- Rest before serving Remove from oven and let rest for 5 minutes before slicing. This allows juices to redistribute throughout the meat.
Pro Tips
Always use a meat thermometer for best results. Pat the chicken completely dry before seasoning for maximum browning. For extra crispy edges, finish with 1-2 minutes under the broiler. These thighs store beautifully in meal prep containers for 4-5 days in the fridge.