Cool Whip Candy – Easy No-Bake Chocolate Treat
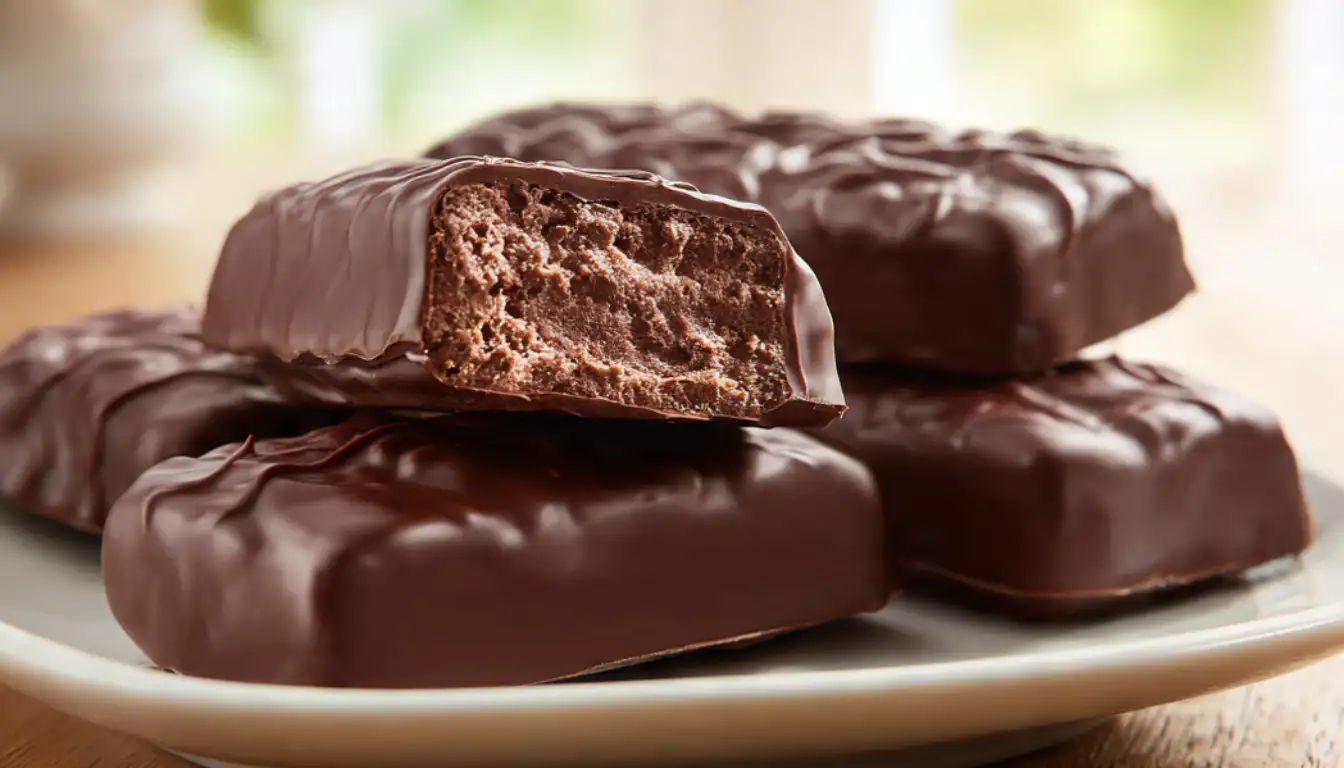
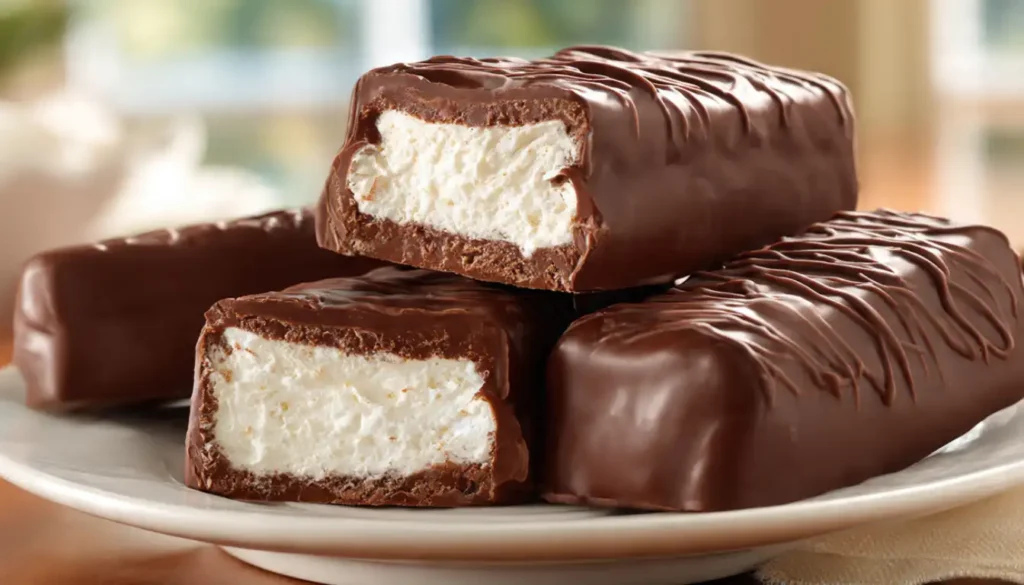
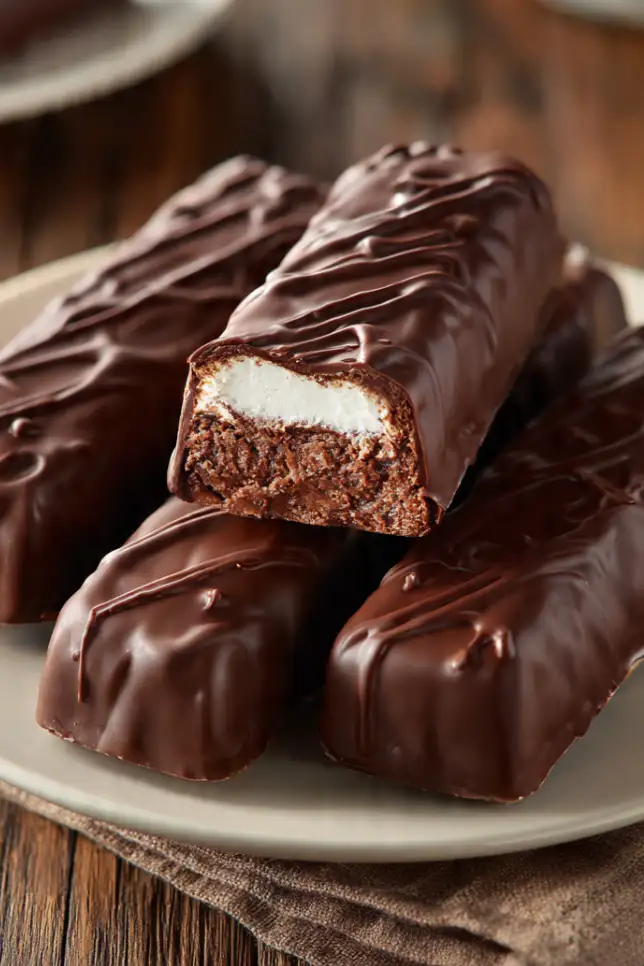
The first time I made these homemade chocolate candy bars, I couldn’t believe how much they tasted like those fancy candy bars from the store. You know the ones – light, fluffy nougat filling covered in smooth chocolate. But here’s the kicker: mine cost a fraction of the price and I knew exactly what went into them.
I stumbled onto this recipe during a particularly rough week when I was trying to stick to my keto meal plan but desperately craving chocolate. I had some egg whites left over from making custard, and I thought, “What if I could turn these into something that tastes indulgent but won’t wreck my macros?” Three hours later, I was biting into the best homemade candy bar I’d ever tasted.
These bars have become my secret weapon for meal prep. I make a batch every Sunday, store them in the freezer in airtight containers, and grab one whenever I need a sweet fix. They’re perfect for satisfying chocolate cravings without the guilt, and honestly, they taste better than most store-bought options.
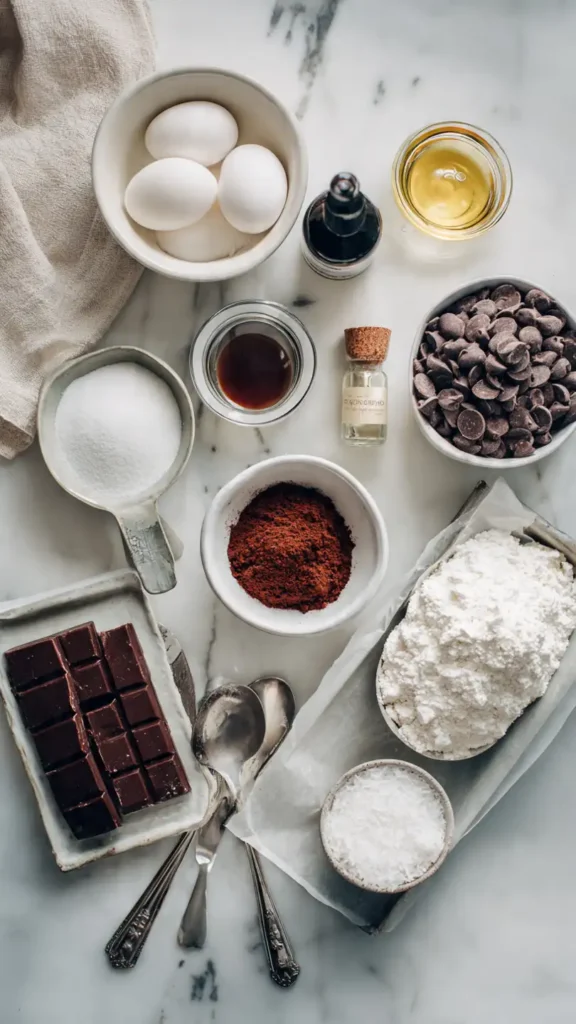
Essential Ingredients
Here’s everything you need to create these incredible candy bars:
For the Nougat Filling:
- 1/4 cup egg whites (about 2 large eggs) – Creates that signature light, fluffy texture
- 2 tbsp powdered erythritol or your favorite low-calorie sweetener – Keeps it sugar-free
- 1 tsp vanilla extract – Essential for that classic candy bar flavor
- 3 tbsp unsweetened cocoa powder – Gives the filling rich chocolate flavor
- 2 tbsp sugar-free chocolate syrup – Adds moisture and deeper chocolate taste
- Pinch of salt – Enhances all the flavors
For the Chocolate Coating:
- 8 oz sugar-free chocolate chips (or your favorite dark chocolate) – I use Lily’s stevia-sweetened chips
- 1 tbsp coconut oil – Makes the chocolate coating smooth and glossy
The quality of your chocolate really matters here. I’ve tried this with cheap chocolate and premium brands, and trust me, you can taste the difference. If you’re not worried about keeping it keto, regular semi-sweet chocolate chips work beautifully too.
Alternative Ingredients
Not everyone keeps specialty ingredients on hand, and that’s totally fine. Here are swaps that actually work:
For the sweetener: Any powdered sweetener works – monk fruit, Swerve, or even regular powdered sugar if you’re not counting carbs. I’ve used them all. Just taste your filling before freezing and adjust sweetness to your preference.
For the chocolate coating: You can use any chocolate you love. Dark chocolate (70% cacao or higher) gives a sophisticated taste. Milk chocolate makes it sweeter and more like commercial candy bars. I’ve even used sugar-free white chocolate for a fun variation.
For coconut oil: If you don’t have it or don’t like the taste, use a tablespoon of butter or even a tiny bit of vegetable oil. The goal is just to thin the chocolate slightly for easier coating.
Budget-friendly version: Skip the specialty sugar-free chocolate and use regular chocolate chips from the grocery store. You’ll add some carbs, but you’ll save money. I did this for months before investing in the fancier ingredients.
For the chocolate syrup: You can substitute with 1 tablespoon of melted chocolate mixed with a bit of water or milk. It won’t be quite as smooth, but it works.
Step-by-Step Directions
I’m going to walk you through this exactly how I make them. I’ve messed up enough batches to know all the tricks.
Step 1: Prepare your pan Line a loaf pan (8×4 inch works perfectly) with parchment paper. Let the paper hang over the edges – you’ll use this to lift the whole thing out later. I learned this the hard way after trying to cut bars while they were still in the pan. What a mess.
Step 2: Whip the egg whites Pour your egg whites into a completely clean, dry mixing bowl. This is crucial – even a drop of water or a speck of grease will prevent them from whipping properly. I use my stand mixer for this (my KitchenAid has been a lifesaver for recipes like this), but a hand mixer works too.
Start on medium speed until the eggs get foamy, about 1-2 minutes. Then crank it up to high. You want stiff peaks – when you lift the beater, the peaks should stand straight up without flopping over. This usually takes 5-7 minutes total.
Step 3: Add sweetener and cocoa With the mixer still running on medium-high, gradually add your powdered sweetener one tablespoon at a time. Let it incorporate fully before adding more. The mixture will get glossier and even stiffer.
Sift your cocoa powder into a small bowl (this prevents lumps). With the mixer on low, gradually add the cocoa powder. Then add the chocolate syrup, vanilla, and salt. Mix just until everything is combined and you have a beautiful chocolate mousse-like mixture.
Step 4: Freeze the filling Pour this fluffy chocolate mixture into your prepared loaf pan. Use a spatula to spread it evenly and smooth the top. This is your nougat filling.
Pop it in the freezer for at least 2-3 hours until it’s completely firm. I usually make this in the morning and let it freeze while I do other things. It needs to be rock-solid before you can cut it.
Step 5: Cut into bars Once frozen solid, lift the whole block out using the parchment paper edges. Place it on a cutting board. Using a sharp knife (I warm mine under hot water first), cut into bars. I usually get about 8-10 bars depending on how big I make them.
Here’s a pro tip: work quickly and keep the bars cold. If they start to soften, stick them back in the freezer for 10 minutes.
Step 6: Prepare the chocolate coating While your bars are refreezing (you want them super cold before coating), melt your chocolate. I use a double boiler – just a heatproof bowl set over a pot of simmering water. Add the chocolate chips and coconut oil, stirring constantly until smooth and glossy.
Don’t let any water get in your chocolate or it will seize up and get grainy. I learned this lesson after ruining an entire batch.
Step 7: Coat the bars This is the fun part. Take a few bars out of the freezer at a time (leave the rest frozen). Using two forks, dip each bar into the melted chocolate, making sure it’s completely coated. Let the excess drip off.
Place the coated bars on a parchment-lined baking sheet. If you want to get fancy, drizzle extra chocolate on top or sprinkle with sea salt while the chocolate is still wet.
Step 8: Final freeze Once all bars are coated, freeze them again for at least 30 minutes to set the chocolate. Then transfer them to airtight meal prep containers or freezer bags for storage.
Pro Tips
After making these probably a hundred times, here’s what I’ve learned:
Temperature control is everything. Keep those bars frozen solid when coating them. If they start to melt, the chocolate won’t set properly and you’ll have a mess.
Use a food processor for smoother filling. After whipping the egg whites and adding all ingredients, I sometimes pulse the mixture in my food processor for 10 seconds. It makes an incredibly smooth, uniform texture.
Double coat for professional results. For bars that look bakery-quality, do a thin first coat of chocolate, freeze for 15 minutes, then do a second coat. The chocolate will be thicker and more even.
Flavor variations are endless. I’ve added peppermint extract for mint chocolate bars, orange extract for chocolate-orange, and even instant espresso powder for mocha bars. Get creative.
Storage containers matter. I use glass meal prep containers with tight-fitting lids. They prevent freezer burn and keep the bars fresh for months. I can grab one for a quick snack anytime.
Make them pretty. Before the chocolate sets, I sometimes press chopped nuts, shredded coconut, or crushed freeze-dried raspberries on top. It makes them look like something from a fancy chocolate shop.
The stand mixer makes a difference. While you can use a hand mixer, I finally invested in a KitchenAid stand mixer last year and it’s been incredible for recipes like this. The consistent speed and hands-free operation makes perfect peaks every time.
FAQs
Why didn’t my egg whites whip up properly? This usually means there was grease or water in your bowl, or you got even a tiny bit of yolk in the whites. Make sure everything is perfectly clean and dry. I wipe my bowl with vinegar before starting – it removes any residual grease.
Can I make these without eggs? You could try using aquafaba (the liquid from a can of chickpeas) as an egg white substitute. Use 6 tablespoons of aquafaba and whip it the same way. I haven’t tried it myself, but I’ve heard it works.
How long do these last? In the freezer in airtight containers, they’ll keep for up to 3 months. In the fridge, about 2 weeks. They’re best eaten straight from the freezer – that’s when the texture is perfect.
Are these really keto-friendly? Yes! Using sugar-free chocolate and erythritol, each bar has about 2-3g net carbs. Way better than store-bought candy bars which can have 30g+ of carbs.
Can I use a different pan size? Sure! A square 8×8 pan works too – you’ll just get different shaped bars. The important thing is that the filling is at least 1 inch thick so you get that nice candy bar ratio of filling to coating.
The chocolate coating is too thick. Help! Add a tiny bit more coconut oil, one teaspoon at a time, until it reaches the consistency you want. It should be thin enough to coat easily but not so thin it runs right off.
Can I make these ahead for a party? Absolutely! These are perfect make-ahead treats. I made 30 bars for my sister’s baby shower last month. Just store them in the freezer and put them out about 5 minutes before serving.
Recipe Info
| Detail | Information |
|---|---|
| Prep Time | 20 minutes |
| Freeze Time | 3-4 hours |
| Coating Time | 15 minutes |
| Total Time | 4 hours |
| Servings | 8-10 bars |
| Yield | 8-10 candy bars |
Why You’ll Love This Recipe
Listen, I’ve tried dozens of homemade candy recipes, and this one is special. The texture is incredible – light and airy inside with that satisfying chocolate snap when you bite through the coating. It’s like eating a cloud wrapped in chocolate.
These bars are perfect for anyone following a keto diet, watching their sugar intake, or just wanting a healthier dessert option. Each bar has about 90 calories and packs 3g of protein from the egg whites. Compare that to a regular candy bar with 250+ calories and zero nutrition.
The best part? You can customize them endlessly. I’ve made peanut butter versions (add 2 tablespoons of peanut butter powder to the filling), mint chocolate (add peppermint extract), and even a cookies and cream version (crushed sugar-free cookies folded in).
Plus, making these is oddly therapeutic. There’s something satisfying about creating something that looks and tastes professional right in your own kitchen.
What Makes This Recipe Unique
Most homemade candy bar recipes require complicated sugar syrups, candy thermometers, and precise temperatures. Not this one. If you can whip egg whites and melt chocolate, you can make these.
The technique comes from classic French meringue methods, but instead of baking the meringue, we’re folding in cocoa and chocolate to create a mousse-like filling, then freezing it solid. The frozen texture mimics nougat perfectly without any of the complicated candy-making techniques.
I haven’t found another recipe that uses this exact method. Most “healthy candy bar” recipes use dates, nuts, or protein powder as a base. Those are fine, but they don’t have that authentic candy bar texture. This recipe actually tastes like the real thing.
Key Features
- No baking required: Just whipping, freezing, and coating
- Low-carb and keto-friendly: Perfect for low-carb meal plans
- High protein: Each bar contains 3-4g of protein
- Sugar-free option: Use sugar-free chocolate and sweeteners
- Make-ahead friendly: Stores for months in the freezer
- Customizable flavors: Endless variation possibilities
- Budget-friendly: Costs less than half of store-bought candy bars
- No special equipment needed: Just a mixer and a loaf pan
- Portion-controlled: Pre-portioned bars prevent overeating
Nutrition Facts
| Nutrient | Per Bar (using sugar-free chocolate) |
|---|---|
| Calories | 95 |
| Protein | 3g |
| Carbohydrates | 8g |
| Fat | 7g |
| Sugar | 0.5g |
| Fiber | 2g |
| Net Carbs | 2g |
Nutrition values are approximate and based on making 10 bars with sugar-free chocolate
You’ll Also Love
If you’re into homemade healthy treats, try these recipes:
- Keto Peanut Butter Cups
- Sugar-Free Chocolate Fudge
- No-Bake Protein Bars
- Healthy Almond Joy Bars
- Coconut Cream Chocolate Truffles
Conclusion
I can’t tell you how many times these candy bars have saved me from making a late-night run to the convenience store. They satisfy every chocolate craving while keeping me on track with my health goals.
The beauty of this recipe is how simple it is despite looking (and tasting) impressive. You’re basically making a chocolate meringue mousse, freezing it, and coating it in chocolate. That’s it. No candy thermometers, no complicated techniques, no mysterious ingredients.
I keep a batch in my freezer at all times now. They’re perfect for when friends come over (everyone asks for the recipe), when I need a quick dessert, or when I just want something sweet after dinner. At about $1 per bar to make, they’re way cheaper than buying fancy keto candy bars from health food stores.
Make a batch this weekend. Start simple with the basic chocolate version, then experiment with flavors once you’ve got the technique down. I have a feeling these are going to become a regular part of your meal prep routine, just like they are for mine.
The first bite will convince you. That perfect combination of light, fluffy filling and rich chocolate coating is addictive in the best way possible.
Happy candy making!
Linda