Turkey Stuffing Balls Recipe
Listen, I’m going to tell you about one of those happy accidents that turned into a Thanksgiving staple in my house. About five years ago, I had leftover stuffing that just wouldn’t fit in the bird. I was staring at this massive bowl of perfectly seasoned bread cubes, and my food processor was sitting right there on the counter. Something clicked. What if I could turn this into something entirely different?
That’s how my turkey stuffing balls were born, and honestly, they’ve become more popular than the actual turkey at my holiday table. People fight over these things. I’m not exaggerating when I say my nephew once hid three of them in his jacket pocket to take home (kids these days, right?).
Essential Ingredients
Here’s what you’ll need to make about 20 stuffing balls:
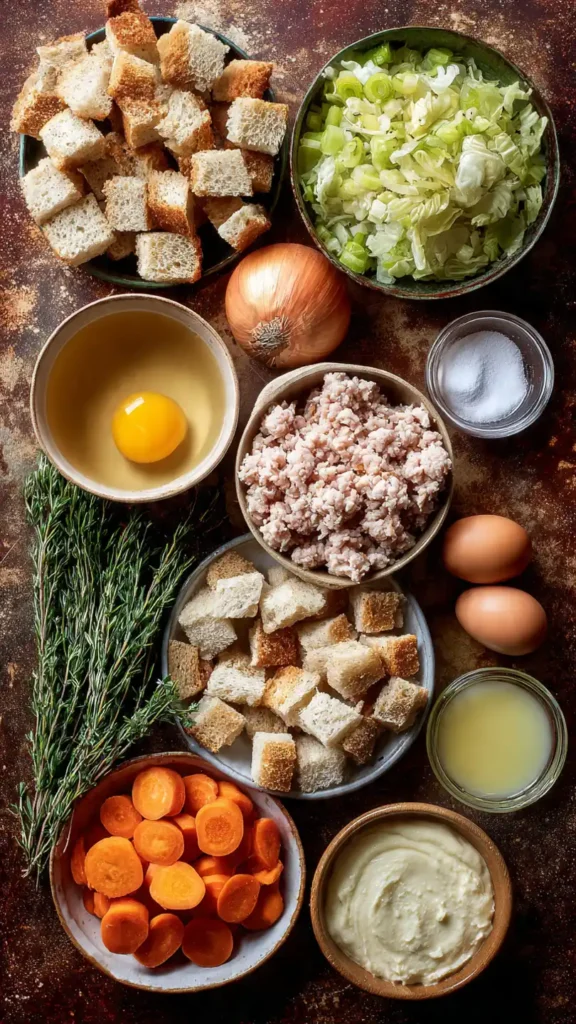
- 8 cups day-old bread cubes (I use a mix of white and whole wheat)
- 1 pound ground turkey
- 1 large onion, finely diced
- 3 celery stalks, chopped small
- 4 tablespoons butter
- 2 cups chicken or turkey stock
- 2 large eggs, beaten
- 2 teaspoons dried sage
- 1 teaspoon dried thyme
- 1 teaspoon poultry seasoning
- 1/2 teaspoon black pepper
- 1 teaspoon salt
- 1/4 cup fresh parsley, chopped
- Optional: 1/2 cup dried cranberries
The bread is crucial here. You want it dried out, not fresh. Leave your cubed bread out overnight, or if you’re in a rush like I usually am, spread it on a baking sheet and toast it in a 300°F oven for about 15 minutes.
Alternative Ingredients
Look, not everyone has the same pantry situation, and that’s completely fine. I’ve made these balls (that sounds weird, but you know what I mean) with all sorts of substitutions over the years.
Bread options: Sourdough works beautifully and adds a nice tang. Cornbread makes these Southern-style delicious. I’ve even used leftover dinner rolls when I was desperate. Just avoid anything too soft or it’ll turn mushy.
Meat alternatives: Ground chicken works great. Turkey sausage adds extra flavor if you remove the casings first. For my vegetarian friends, I’ve swapped in plant-based ground meat with good results, though you might want to add a bit more butter for moisture.
Stock substitutes: Vegetable stock is fine. In a pinch, I’ve used Better Than Bouillon (keep a jar of this stuff in your fridge, trust me) mixed with water. Even plain water with extra butter works if you’re really stuck.
Herb flexibility: Fresh herbs are always better if you have them. Double the amount if using fresh instead of dried. No sage? Rosemary works. No thyme? Add more parsley. The poultry seasoning you can find at any grocery store does most of the heavy lifting anyway.

Step-by-Step Directions
Step 1: Prep your bread
Get those bread cubes good and dry. This isn’t the time for fresh, soft bread. You want something that can soak up liquid without turning into paste. I learned this the hard way when I tried making these with fresh bread once, and they basically dissolved into mush. Not pretty.
Step 2: Cook your aromatics
Melt the butter in your largest skillet over medium heat. I use my cast iron skillet for this because it distributes heat evenly and gives everything a nice color. Toss in your diced onion and celery, and cook them down until they’re soft and translucent, about 8-10 minutes. Your kitchen should smell amazing at this point.
Step 3: Brown the turkey
Push your veggies to the side and add the ground turkey to the same pan. Break it up with a wooden spoon and cook until it’s no longer pink, maybe 6-7 minutes. Season this with a pinch of salt and pepper as it cooks.
Step 4: Combine everything
Here’s where it gets real. Transfer your bread cubes to the biggest mixing bowl you own (and I mean BIG). Pour in your cooked turkey and veggie mixture. Add all your herbs and seasonings. Now, slowly pour in the chicken stock while mixing everything together. You want the bread moist but not soggy. Add your beaten eggs and mix thoroughly.
This is where I sometimes use my stand mixer with the paddle attachment if I’m making a huge batch for meal prep. Makes life so much easier, but you can absolutely do this by hand.
Step 5: Form the balls
Preheat your oven to 375°F. Line a large baking sheet with parchment paper (seriously, don’t skip this or you’ll be scrubbing for days).
Grab about 1/3 cup of the mixture and pack it firmly into a ball with your hands. I wet my hands slightly between balls to prevent sticking. Place each ball on your prepared baking sheet, spacing them about 2 inches apart.
Step 6: Bake
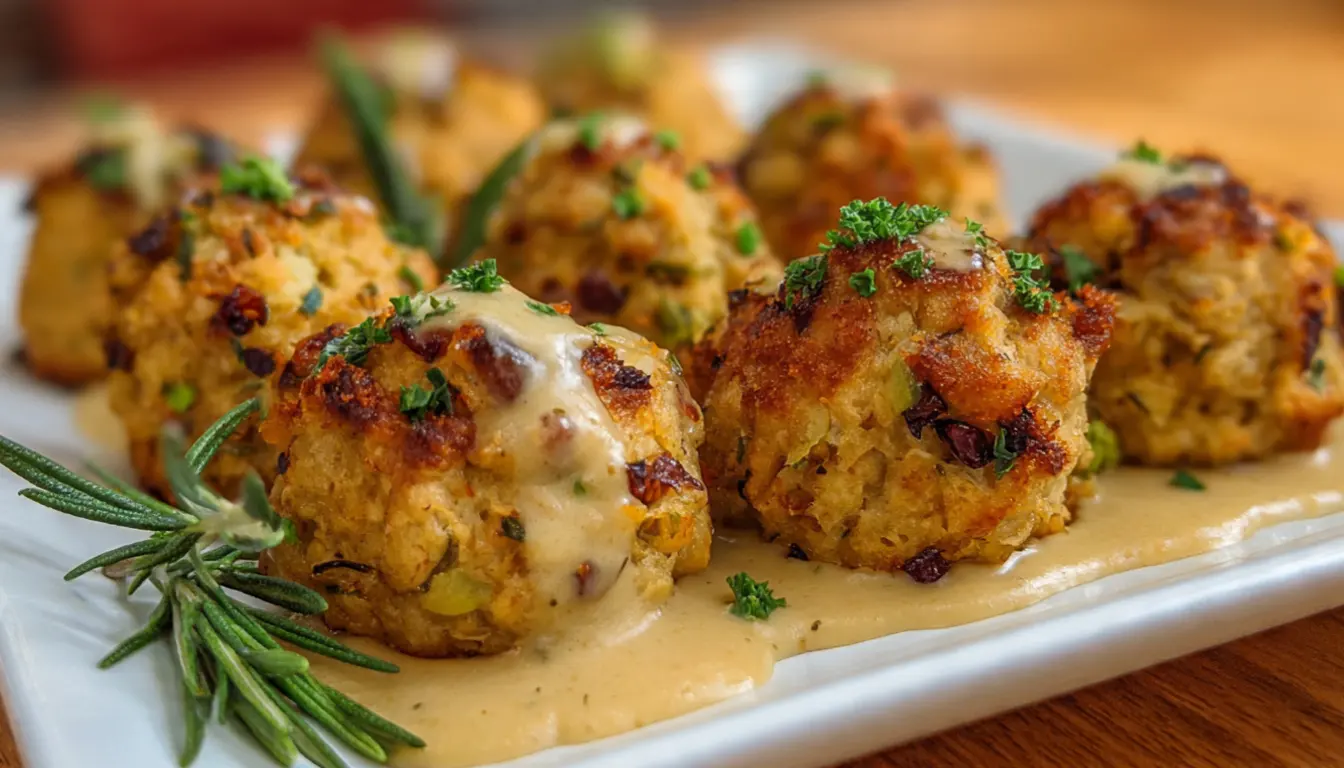
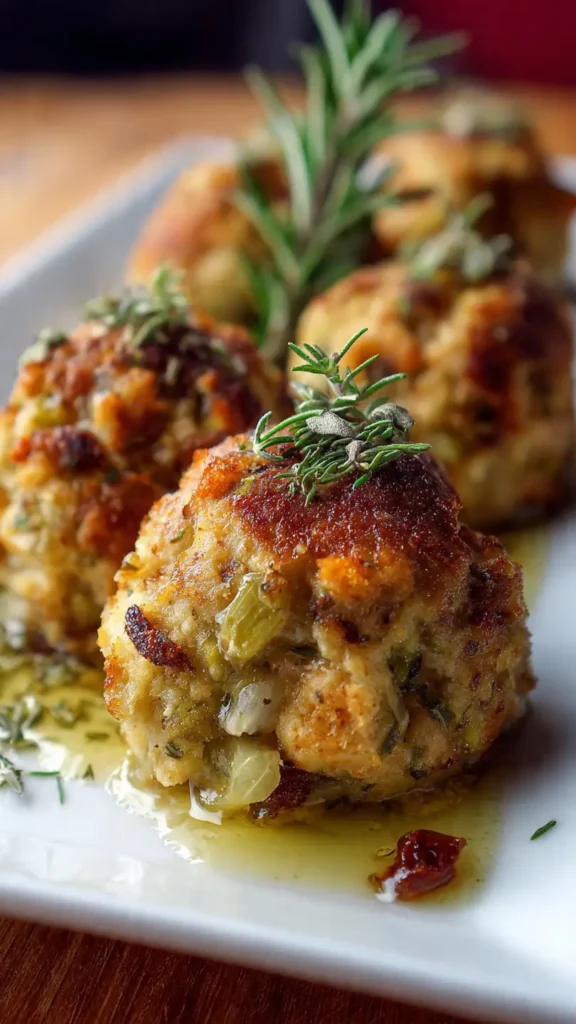
Bake for 25-30 minutes, until the outsides are golden brown and crispy. I usually rotate the pan halfway through for even browning. You want them firm enough to hold together when you pick them up, with a nice crunchy exterior.
Step 7: Optional finishing touch
Some people (like me) like to brush these with melted butter when they come out of the oven. It’s not necessary, but it makes them extra rich and gives them a gorgeous shine.
Pro Tips
After making these probably 50+ times, I’ve learned a few things that make a real difference:
The moisture balance is everything. Your mixture should hold together when squeezed but not be wet or dripping. If it’s too dry, add stock a tablespoon at a time. Too wet? Add more bread cubes or some panko breadcrumbs.
Make them ahead. These are perfect for meal planning. I form the balls, freeze them on a baking sheet, then transfer to freezer bags. They’ll keep for up to 3 months. Bake straight from frozen, just add 10 extra minutes to the cooking time.
Size matters. Don’t make them too big or the centers won’t cook through properly. Think golf ball to tennis ball size. I usually go somewhere in between.
Customize the flavors. I’ve added chopped pecans, swapped cranberries for dried apricots, mixed in crumbled bacon (game-changer), and even stuffed a cube of cheese in the center for a surprise.
Storage containers matter. If you’re doing meal prep, invest in good quality food storage containers. I use glass ones with snap lids because they don’t absorb odors and keep these fresh for up to 5 days in the fridge.
FAQs
Can I freeze turkey stuffing balls?
Yes, you can freeze them baked or unbaked for up to 3 months.
Why are my stuffing balls falling apart?
The mixture is likely too dry. Add more stock or egg.
Can I make stuffing balls vegetarian?
Yes, use plant-based meat or skip the turkey entirely.
Can I air fry stuffing balls?
Yes, cook at 375°F for 18 to 20 minutes.
How do I reheat them?
Use the oven at 350°F for best crispiness.
Recipe Info
| Detail | Info |
|---|---|
| Prep Time | 20 minutes |
| Cook Time | 30 minutes |
| Total Time | 50 minutes |
| Servings | 20 stuffing balls |
| Yield | Serves 8-10 people |
Why You’ll Love This Recipe
First off, these solve the eternal Thanksgiving problem of stuffing space. You can only fit so much in a turkey, right? With these balls, you’re not limited. Make as many as you want.
They’re also way more practical for serving. No scooping, no mess, everyone gets their own perfect portion. At potlucks, people can just grab one or two without a serving spoon.
The crispy exterior is something you just don’t get with traditional stuffing. That golden, crunchy outside paired with the soft, savory inside? That’s texture heaven right there.
And here’s the thing nobody talks about: these are actually easier to make than traditional stuffing. You’re not wrestling with a turkey cavity. You’re not worrying about food safety and internal temperatures. You just form balls and bake them.
What Makes This Recipe Unique
Most stuffing ball recipes you’ll find online are basically just stuffing scooped into muffin tins. That’s fine, but these are different. The addition of ground turkey mixed throughout creates this almost meatball-like texture that’s way more substantial.
The technique of cooking the aromatics first, then combining everything in stages, builds layers of flavor you just don’t get from dumping everything in a bowl at once.
I also dry out my bread more than most recipes call for. This prevents that soggy, falling-apart situation that happens with a lot of stuffing balls. Mine hold together beautifully, even after freezing and reheating.
Key Features
Crispy exterior, tender interior: That textural contrast is what makes people keep coming back for more. It’s like the difference between a good meatball and a great one.
Holds together perfectly: No crumbling, no falling apart on the plate. These stay intact from oven to mouth.
Versatile serving options: Serve them as a side dish, appetizer, or even as the protein for a lighter meal with a salad.
Freezer-friendly: Make a huge batch and have homemade stuffing ready whenever you need it.
Customizable: This recipe is a template. Add what you like, skip what you don’t.
Nutrition Facts
Per stuffing ball (approximate):
| Nutrient | Amount |
|---|---|
| Calories | 145 |
| Total Fat | 6g |
| Saturated Fat | 2.5g |
| Cholesterol | 45mg |
| Sodium | 285mg |
| Total Carbohydrates | 15g |
| Dietary Fiber | 1g |
| Sugars | 2g |
| Protein | 7g |
Nutrition information is approximate and will vary based on specific ingredients used.
You’ll Also Love
If these stuffing balls are hitting the spot, you’ll probably want to check out my turkey meatball recipe (basically these but without the bread, more protein-focused). My cranberry sauce with orange zest pairs perfectly with these balls.
For more Thanksgiving sides, my roasted Brussels sprouts with bacon and my make-ahead mashed potatoes are total crowd-pleasers. And if you’re into meal prepping like I am, my freezer-friendly turkey chili uses similar ingredients.
Conclusion
You know what I love most about this recipe? It takes something traditional and makes it better. More practical. More flavorful. More fun to eat.
I’ve been making these for five years now, and they’ve evolved into something I’m genuinely proud to serve. My original happy accident has turned into a recipe that people actually request. My sister-in-law texts me every November asking if I’m bringing “those ball things” to Thanksgiving.
Whether you’re looking for a new way to serve stuffing, trying to maximize your holiday menu options, or just want something delicious to meal prep for the week, these turkey stuffing balls deliver. They’re comfort food with a crispy twist, and once you make them, regular stuffing might feel a bit boring in comparison.
Give them a try. Start with this basic recipe, then make it your own. That’s how the best recipes happen anyway.
Happy cooking!
Linda
Bee’s Recipes
Turkey Stuffing Balls
A crispy, flavorful twist on classic stuffing made with turkey and herbs.
Ingredients
- 8 cups day-old bread cubes
- 1 lb ground turkey
- 1 onion, diced
- 3 celery stalks
- 4 tbsp butter
- 2 cups stock
- 2 eggs
- Herbs and seasoning
Instructions
- Dry bread cubes.
- Cook onion and celery.
- Brown turkey.
- Mix everything together.
- Form balls.
- Bake at 375°F for 25-30 minutes.