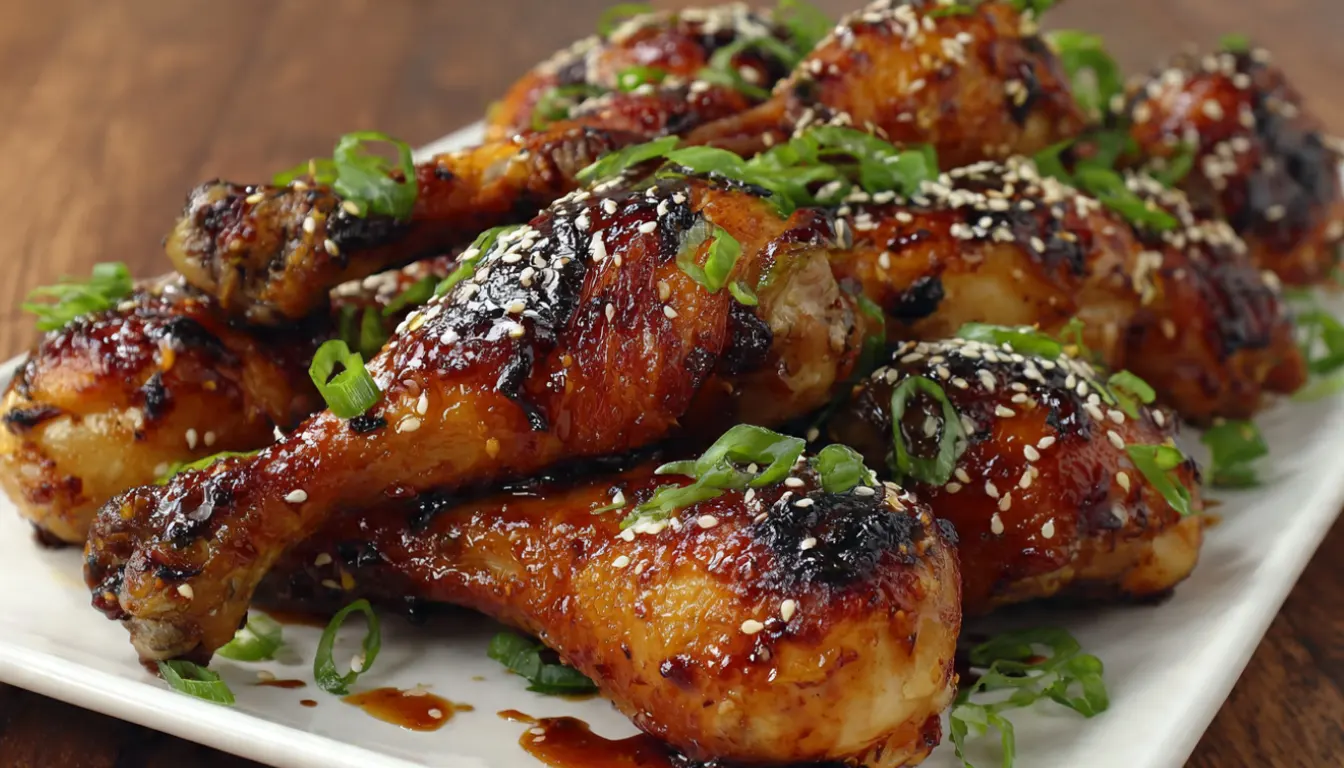
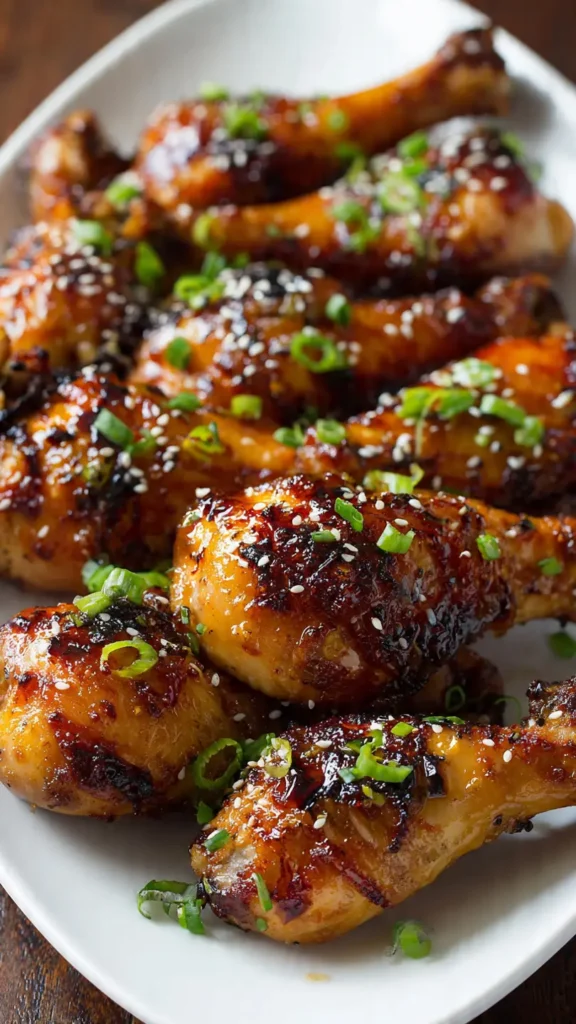
Honey Garlic Baked Chicken Drumsticks
Crispy, sticky, and bursting with flavor, these honey garlic baked chicken drumsticks are the kind of recipe that makes weeknight dinners feel special. After making variations of this recipe for nearly a decade, I can confidently say this version strikes the perfect balance between sweet and savory, with a glaze that caramelizes beautifully in the oven.
Introduction
There’s something magical about watching chicken drumsticks transform in the oven. The skin crisps up, the honey caramelizes into a gorgeous amber coating, and your kitchen fills with that incredible garlic aroma that makes everyone suddenly very interested in what’s for dinner.
I started making this recipe back when I was trying to find budget-friendly meals that didn’t taste budget-friendly. Drumsticks were always the cheapest option at the grocery store, but I got tired of the same old BBQ sauce routine. This honey garlic version changed everything. It’s become my go-to for meal prep Sunday, game day gatherings, and those nights when I need something that looks impressive but comes together in about 40 minutes.
What makes this recipe work so well is the two-step cooking process. You’ll start at a lower temperature to render the fat and cook the chicken through, then crank up the heat at the end to get that sticky, caramelized exterior. Trust me on this one. I learned the hard way that starting with high heat gives you burned garlic and raw chicken.
Essential Ingredients
For the Chicken:
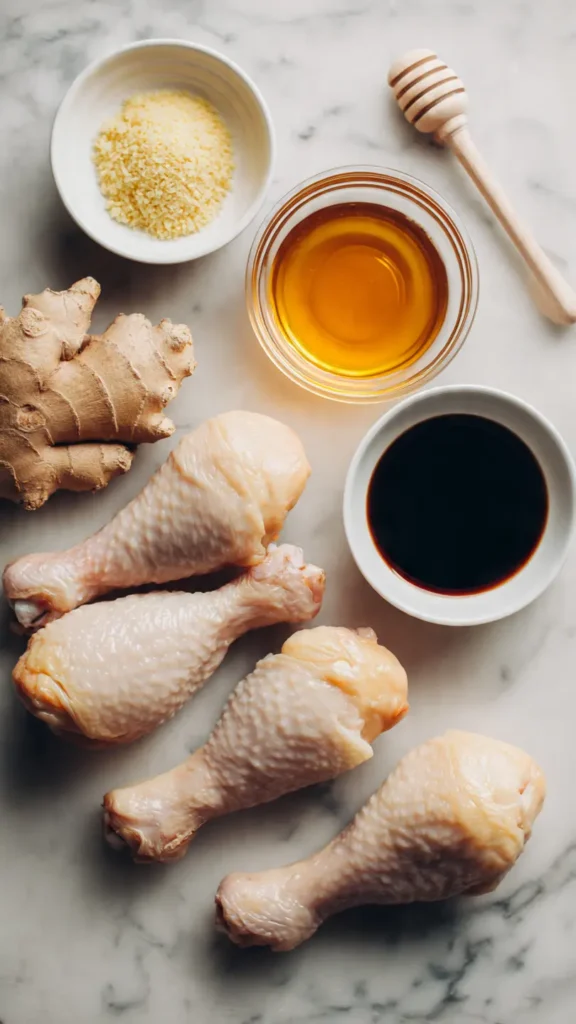
- 3 pounds chicken drumsticks (about 10-12 pieces)
- 2 tablespoons olive oil
- 1 teaspoon salt
- 1/2 teaspoon black pepper
- 1/2 teaspoon garlic powder
- 1/2 teaspoon smoked paprika
For the Honey Garlic Glaze:
- 1/2 cup honey
- 1/3 cup soy sauce (low sodium preferred)
- 6 cloves garlic, minced
- 2 tablespoons rice vinegar
- 1 tablespoon sesame oil
- 1 teaspoon fresh ginger, grated
- 1/4 teaspoon red pepper flakes (optional)
- 1 tablespoon cornstarch
- 2 tablespoons water
For Garnish:
- 2 green onions, sliced
- 1 tablespoon sesame seeds
- Fresh cilantro (optional)
Alternative Ingredients
Don’t have everything on hand? Here’s what you can swap:
Honey: Maple syrup works beautifully if you want a deeper flavor, or agave nectar for a milder sweetness.
Soy Sauce: Tamari for gluten-free, coconut aminos for soy-free, or even Worcestershire sauce in a pinch (though the flavor profile shifts a bit).
Fresh Garlic: Garlic paste or 2 teaspoons of jarred minced garlic. I use my food processor to mince a whole jar at once and keep it in the fridge.
Rice Vinegar: Apple cider vinegar or white wine vinegar both work. Just go easy, as they’re sharper than rice vinegar.
Sesame Oil: You can skip it entirely, though it adds a nice nutty depth. Peanut oil is the closest substitute.
Fresh Ginger: 1/2 teaspoon ground ginger, though fresh really is better here.
Step-by-Step Directions
1. Prep the Chicken
Pat your drumsticks completely dry with paper towels. This is crucial for crispy skin. In a large bowl, toss them with olive oil, salt, pepper, garlic powder, and smoked paprika until evenly coated.
2. Arrange on Baking Sheet
Line a rimmed baking sheet with aluminum foil (makes cleanup so much easier) and place a wire rack on top if you have one. Arrange drumsticks so they’re not touching. If you don’t have a rack, that’s fine. Just flip them halfway through cooking.
3. Initial Bake
Preheat your oven to 375°F. Bake the drumsticks for 30 minutes. This lower temperature lets them cook through without burning.
4. Make the Glaze
While the chicken bakes, combine honey, soy sauce, minced garlic, rice vinegar, sesame oil, ginger, and red pepper flakes in a small saucepan over medium heat. Bring to a simmer.
Mix cornstarch with water to create a slurry, then whisk it into the sauce. Let it simmer for 2-3 minutes until it thickens enough to coat the back of a spoon. Remove from heat.
5. First Glaze Application
After 30 minutes, remove the chicken from the oven. Using a basting brush or spoon, coat each drumstick generously with about half the glaze. Increase oven temperature to 425°F.
6. Final Bake
Return chicken to the oven for 10 minutes. Remove and apply another coating of glaze. Bake for a final 5-10 minutes, watching carefully. You want the glaze caramelized and slightly charred at the edges, but not burned.
7. Rest and Serve
Let the drumsticks rest for 5 minutes (if you can resist). The internal temperature should read 165°F on a meat thermometer. Garnish with green onions, sesame seeds, and cilantro if using.
Pro Tips
Get the Skin Crispy: Drying the chicken thoroughly before seasoning is non-negotiable. Moisture is the enemy of crispy skin. I sometimes let seasoned drumsticks sit uncovered in the fridge for an hour before baking.
Don’t Overcrowd: If your baking sheet is packed, the chicken will steam instead of roast. Use two sheets if needed.
Save Some Glaze: Reserve about 1/4 cup of the glaze before brushing it on raw chicken. Use this reserved portion for drizzling at the table. Food safety matters.
Check Temperature, Not Time: Ovens vary wildly. Use a meat thermometer inserted into the thickest part of the drumstick (avoiding bone). 165°F is your target.
Meal Prep Magic: These hold up incredibly well in meal prep containers. I make a double batch every Sunday and portion them with rice and steamed broccoli. They last 4-5 days in the fridge.
Air Fryer Adaptation: Preheat your air fryer to 380°F. Cook drumsticks for 20 minutes, flip, then cook another 10 minutes before glazing. Finish at 400°F for 5 minutes after glazing.
Instant Pot Option: Season drumsticks, then pressure cook on high for 10 minutes with 1/2 cup water. Quick release, brush with glaze, then broil for 3-5 minutes until caramelized.
FAQs
Can I use chicken thighs instead of drumsticks?
Yes, chicken thighs work very well and stay juicy. Adjust cooking time slightly if needed.
How do I make the chicken extra crispy?
Pat the chicken dry and use a wire rack during baking to allow air circulation.
Can I make this recipe in an air fryer?
Yes, cook at 380°F for about 30 minutes, then glaze and finish at higher heat.
Can I prepare the glaze ahead of time?
Yes, the glaze can be made up to 3 days in advance and stored in the refrigerator.
How do I prevent the glaze from burning?
Apply glaze during the final cooking stage and monitor closely at high heat.
Recipe Info Table
| Detail | Information |
|---|---|
| Prep Time | 15 minutes |
| Cook Time | 45 minutes |
| Total Time | 1 hour |
| Servings | 4-6 people |
| Yield | 10-12 drumsticks |
| Difficulty | Easy |
| Method | Baking |
| Cuisine | Asian-Inspired American |
Why You’ll Love This Recipe
This isn’t your typical oven-baked chicken. The honey garlic glaze creates this incredible sticky coating that’s simultaneously sweet, savory, and just a little bit spicy if you add the red pepper flakes. Every bite has that satisfying contrast between crispy skin and tender, juicy meat.
What I really love is how forgiving this recipe is. Drumsticks are hard to mess up compared to chicken breasts, which turn to cardboard if you blink wrong. The dark meat stays moist even if you slightly overcook it. Plus, there’s something primal and satisfying about eating chicken with your hands.
For meal prep enthusiasts (that’s me, every Sunday), this is gold. Make a big batch, and you’ve got protein sorted for most of the week. They’re delicious cold, at room temperature, or reheated. I’ve eaten them straight from the fridge standing in front of the refrigerator more times than I’d like to admit.
Budget-wise, drumsticks are almost always on sale somewhere. I regularly find them for $0.99 per pound. Compare that to chicken breasts at $4-5 per pound, and you’re looking at serious savings for a family.
What Makes This Recipe Unique
Most honey garlic chicken recipes either bake the sauce onto the chicken from the start (resulting in burned garlic) or rely entirely on stovetop cooking. This two-temperature method is the secret. You get fully cooked chicken with crispy skin, then that final blast of high heat caramelizes the glaze without burning.
The glaze itself is thickened with cornstarch, which creates a coating that actually sticks to the chicken instead of pooling on the plate. I developed this technique after watching too many thin sauces just slide right off.
Another difference is the seasoning underneath the glaze. That base layer of smoked paprika and garlic powder isn’t just for show. It creates a flavor foundation so the chicken tastes good even before the glaze goes on.
Key Features
✓ Budget-Friendly: Drumsticks are one of the most economical cuts of chicken
✓ Meal Prep Ready: Lasts 4-5 days in proper meal prep containers
✓ Kid-Approved: Even picky eaters love the sweet glaze
✓ Minimal Cleanup: One baking sheet and one saucepan
✓ Flexible: Works in conventional oven, air fryer, or Instant Pot
✓ No Marinating: Unlike many chicken recipes, this doesn’t require hours of marinating
✓ Crowd-Pleaser: Perfect for parties, potlucks, or game day
✓ Customizable Heat: Adjust red pepper flakes to your preferred spice level
Nutrition Facts Table
Per serving (2 drumsticks with glaze)
| Nutrient | Amount |
|---|---|
| Calories | 380 |
| Total Fat | 18g |
| Saturated Fat | 4g |
| Cholesterol | 145mg |
| Sodium | 720mg |
| Total Carbohydrates | 24g |
| Dietary Fiber | 0g |
| Sugars | 21g |
| Protein | 32g |
| Vitamin A | 4% DV |
| Vitamin C | 2% DV |
| Calcium | 3% DV |
| Iron | 12% DV |
Nutrition information is approximate and based on standard ingredient measurements.
You’ll Also Love
If these honey garlic drumsticks hit the spot, try these related recipes:
Korean BBQ Chicken Thighs – Similar sweet and savory profile with a gochujang kick
Orange Glazed Chicken Wings – Another sticky, glazed chicken option perfect for gatherings
Teriyaki Chicken Drumsticks – Less sweet, more umami-forward
Asian-Style Chicken Lettuce Wraps – Uses similar flavor profiles in a lighter preparation
Garlic Butter Roasted Chicken – If you love the garlic element but want something less sweet
Conclusion
After years of making chicken every possible way, I keep coming back to this recipe. It’s reliable, delicious, and makes weeknight cooking feel less like a chore and more like something I actually enjoy doing. The fact that my family requests it constantly doesn’t hurt either.
The beauty of this honey garlic combination is that it walks that perfect line between familiar and special. It’s not so exotic that kids turn their noses up, but it’s flavorful enough that adults genuinely look forward to it.
Whether you’re batch cooking for the week, feeding a crowd, or just trying to make Tuesday night dinner a little more exciting, this recipe delivers. Give it a try, and don’t be surprised when these drumsticks become a regular in your rotation.
Have you made honey garlic chicken before? I’d love to hear what variations you’ve tried. Drop your tips and tricks in the comments below!
Honey Garlic Baked Chicken Drumsticks
Crispy, sticky drumsticks coated in a rich honey garlic glaze that caramelizes perfectly in the oven.
Ingredients
- 3 lbs chicken drumsticks
- 2 tbsp olive oil
- 1 tsp salt
- 1/2 tsp black pepper
- 1/2 tsp garlic powder
- 1/2 tsp smoked paprika
- 1/2 cup honey
- 1/3 cup soy sauce
- 6 cloves garlic
- 2 tbsp rice vinegar
- 1 tbsp sesame oil
- 1 tsp ginger
- 1 tbsp cornstarch + 2 tbsp water
Instructions
- Season and prep the chicken.
- Bake at 375°F for 30 minutes.
- Prepare the honey garlic glaze.
- Brush glaze and increase heat.
- Bake again until caramelized.
- Rest, garnish, and serve.
Notes
Dry chicken well for crispy skin. Do not overcrowd the pan. Reserve some glaze for serving. Store leftovers up to 4 days in the fridge.