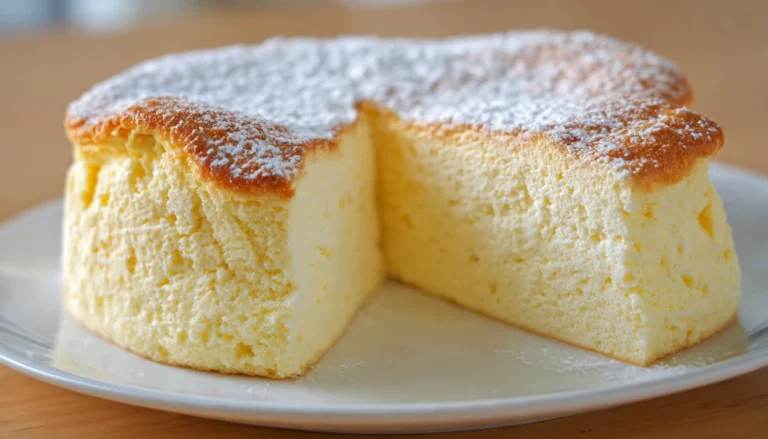
Chocolate Chip Brownie Basque Cheesecake: The Recipe That Changed How I Think About Dessert
I burned my first Basque cheesecake on purpose, and I still couldn’t believe how good it tasted.
That sounds strange, I know. But the whole point of a Basque cheesecake is that deeply caramelized, almost scorched top that most bakers would panic over. I’d been making traditional cheesecakes for years, carefully watching the oven, using a water bath, worrying about cracks. Then I made my first Basque and thought “wait, that’s it? That’s all?” It felt like cheating in the best possible way.
Now take that already-brilliant recipe and swirl in a fudgy brownie batter and a handful of chocolate chips. That’s what we’re making today, and I promise it’s going to become one of those recipes you make for every single occasion because it’s honestly that good.
What Is a Basque Cheesecake Anyway?
If you haven’t heard of it yet, Basque cheesecake (also called “burnt cheesecake”) comes from San Sebastian in the Basque region of Spain. It bakes at a high temperature, which gives it that beautifully dark exterior and a soft, almost molten center. No water bath, no crust, no fussing.
The first time I explained this to my sister she said “so you just… burn it on purpose and that’s the recipe?” Yes. Exactly. And it’s incredible.
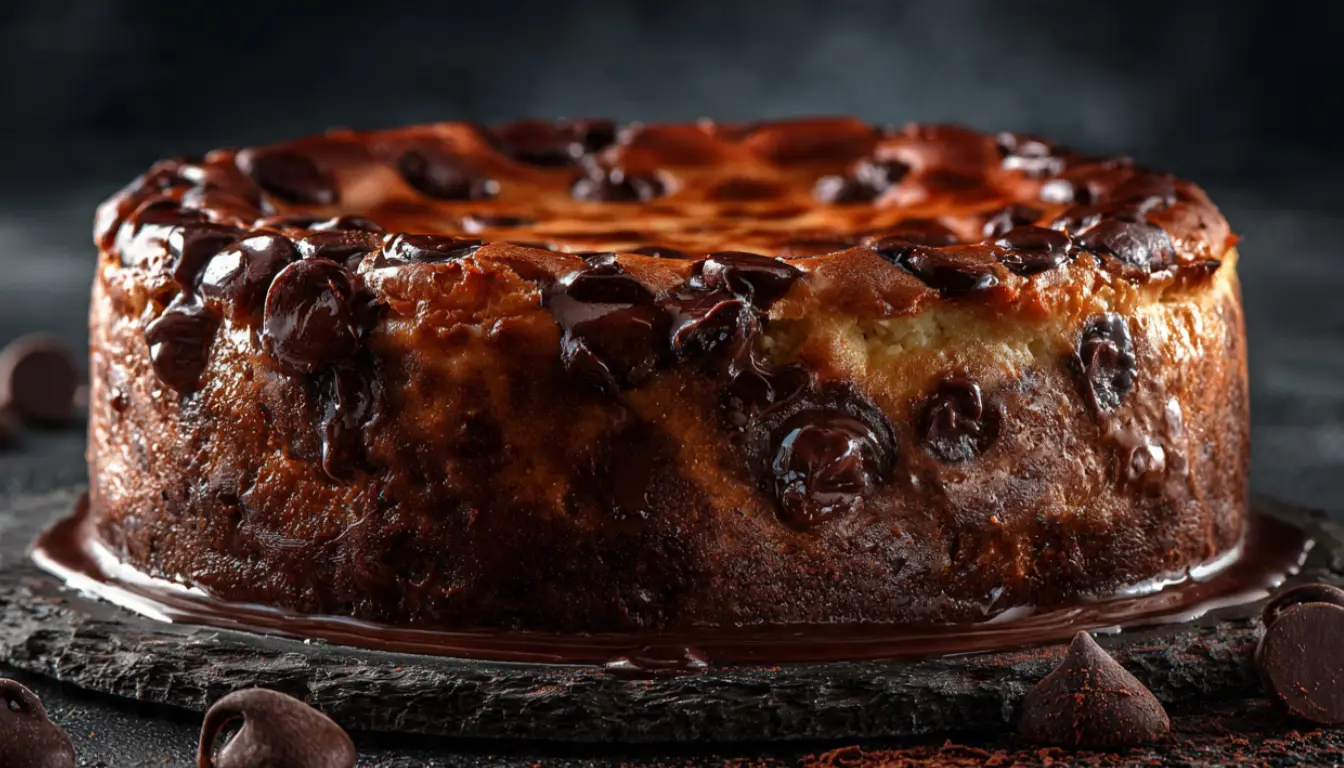
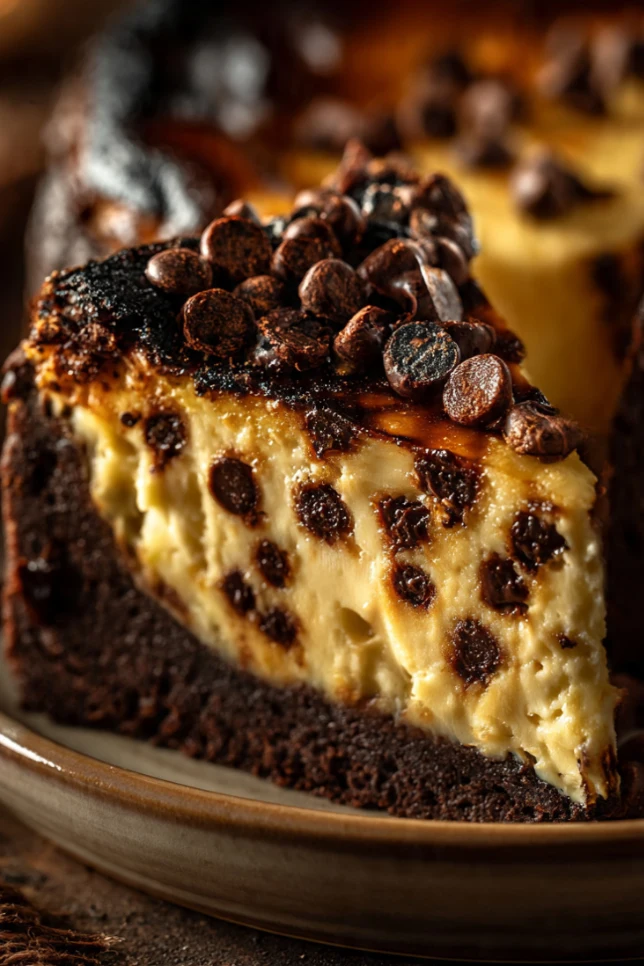
Adding brownie batter to the mix creates layers of flavor you can’t get anywhere else. The top is caramelized and slightly bitter from the cream cheese. Below that you get ribbons of dense, fudgy brownie. Then the center is creamy and just barely set. Every single bite is different, and I genuinely think this is one of the most impressive desserts you can bring to a dinner party without it being complicated.
Essential Ingredients
For the Basque Cheesecake Layer:
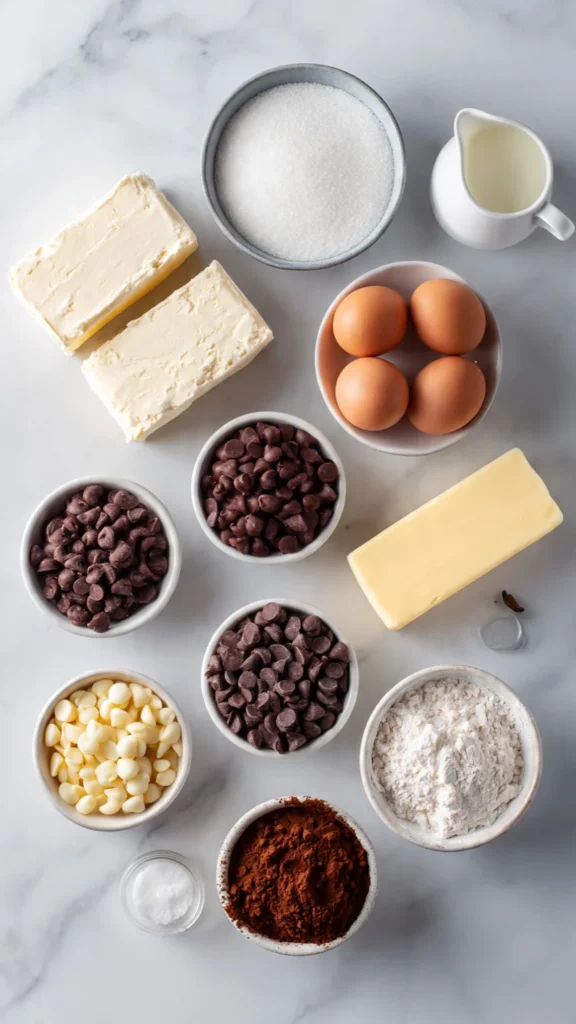
- 900g (32 oz) full-fat cream cheese, room temperature
- 300g (1.5 cups) granulated sugar
- 4 large eggs, room temperature
- 300ml (1.25 cups) heavy cream
- 1 teaspoon vanilla extract
- 3 tablespoons all-purpose flour
- 1/4 teaspoon salt
For the Brownie Swirl:
- 115g (1/2 cup) unsalted butter
- 200g (1 cup) dark chocolate chips, divided (I use Ghirardelli semi-sweet or Callebaut)
- 150g (3/4 cup) granulated sugar
- 2 large eggs
- 1 teaspoon vanilla extract
- 60g (1/2 cup) all-purpose flour
- 2 tablespoons unsweetened cocoa powder
- 1/4 teaspoon salt
- 100g (1/2 cup) milk chocolate chips, for topping
Alternative Ingredients
Room temperature cream cheese is non-negotiable here. Cold cream cheese will leave lumps in your batter no matter how long you mix it, and lumps in a cheesecake are just sadness. If you forgot to take it out early, cut it into small cubes and microwave in 10-second intervals until it’s soft but not melted.
For the chocolate, you can absolutely swap the dark chocolate chips for milk chocolate if you want something sweeter, but I find the slight bitterness of dark chocolate (I go for 60-70% cacao) balances the richness of the cheesecake layer beautifully. Budget pick: store brand semi-sweet chips work fine. Splurge pick: Callebaut dark chocolate callets will give you a noticeably deeper flavor.
Heavy cream can be swapped for heavy whipping cream with no issue. Sour cream works too, though it adds a bit more tang.
No all-purpose flour in the house? You can use a tablespoon of cornstarch instead in the cheesecake layer. It won’t affect the texture much at all.
Tools That Make This Easier
You really only need a few things. A 9-inch (23cm) springform pan is essential here. I use mine constantly. The removable sides make it possible to release the cheesecake without destroying it.
A stand mixer (KitchenAid is what I’ve used for years) makes the cheesecake batter incredibly smooth, but a hand mixer works fine too. What you want to avoid is overmixing, which incorporates too much air and leads to cracking. Mix on low to medium speed and stop as soon as everything is combined.
For the brownie batter you just need a saucepan and a wooden spoon. No electric mixer needed.
Parchment paper is mandatory. Cut a large sheet, scrunch it up, and press it into the pan so it comes up the sides. The wrinkles are part of the aesthetic and they also stop the cheesecake from sticking.
Step-by-Step Directions
Step 1: Preheat and prep
Preheat your oven to 220°C (425°F). Line your 9-inch springform pan with a large sheet of parchment paper, pressing it up the sides. It should overhang by a few inches. Set aside.
Step 2: Make the brownie batter
In a small saucepan over low heat, melt the butter and half the dark chocolate chips together, stirring constantly. Remove from heat and let it cool for 5 minutes. Whisk in the sugar, then the eggs one at a time, then the vanilla. Fold in the flour, cocoa powder, and salt until just combined. Don’t overmix. Set aside.
Step 3: Make the cheesecake batter
Beat the softened cream cheese on medium speed until completely smooth, about 2 minutes. Add the sugar and beat until combined. Add the eggs one at a time, mixing on low between each addition. Pour in the heavy cream and vanilla, then add the flour and salt. Mix until smooth. The batter should be pourable and creamy.
Step 4: Layer and swirl
Pour about two-thirds of the cheesecake batter into the prepared pan. Drop spoonfuls of the brownie batter across the top. Pour the remaining cheesecake batter over that. Drop the rest of the brownie batter in dollops. Use a skewer or knife to swirl everything together with a few figure-eight motions. Don’t over-swirl or you’ll lose the contrast between layers. Scatter the milk chocolate chips across the top.
Step 5: Bake
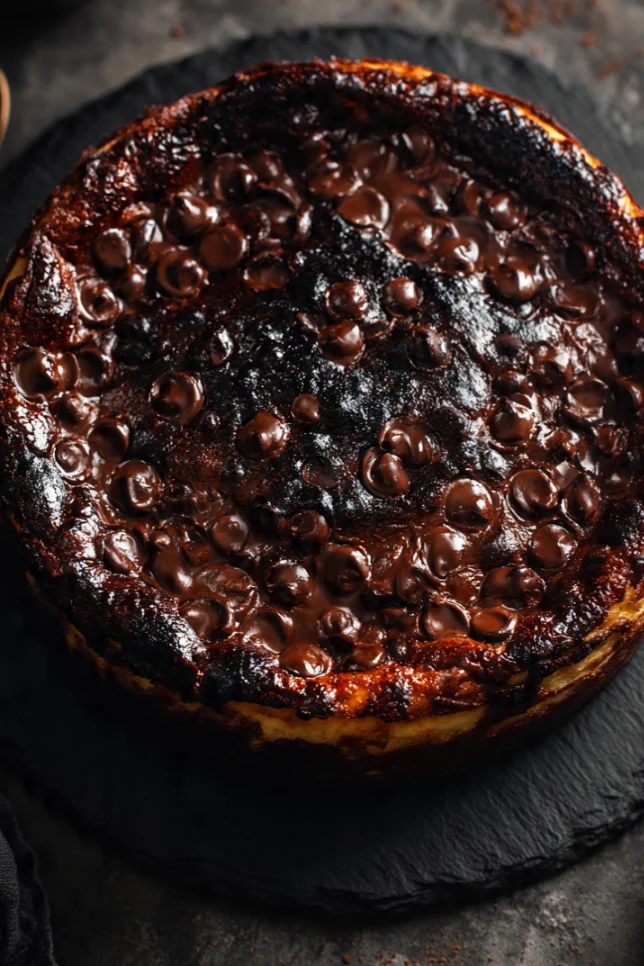
Bake at 220°C (425°F) for 50 to 55 minutes. The top should be very dark (deep brown, almost burnt looking in spots) and the center should still have a significant jiggle to it when you shake the pan. This is correct. Don’t keep baking because the center looks undone. It firms up as it cools.
Step 6: Cool completely
Let it cool in the pan at room temperature for at least 1 hour, then refrigerate for a minimum of 4 hours, ideally overnight. The texture improves dramatically the longer it chills. I know it’s hard to wait.
Pro Tips
The jiggle test is your best friend. When you pull it from the oven, the outer 2 inches should be set and the entire center (maybe half the cheesecake) should wobble like Jell-O. If the whole thing is solid, it’s overbaked.
Use the best cream cheese you can find. Philadelphia works perfectly. Store brand cream cheese often has more water content, which can make the texture less dense and creamy.
Don’t rush the cooling. I made this mistake early on: I tried to speed up the process by putting it in the freezer. The texture turned grainy. Just be patient and refrigerate overnight.
If you want a cleaner swirl pattern (more visual drama for photos), put the brownie batter in a piping bag or a zip-lock bag with the corner snipped off. Pipe it in spirals rather than dropping it in spoonfuls.
For storage, wrap leftovers tightly or keep them in an airtight food storage container in the refrigerator. It keeps well for up to 5 days, and honestly the flavor deepens by day two.
Why You’ll Love This Recipe
It looks impressive but it isn’t fussy. Most cheesecakes need water baths, careful cooling, and hours of anxiety watching for cracks. This one is supposed to look dramatic and burnished on top, and the interior can be slightly imperfect and it still tastes phenomenal.
It’s also endlessly adaptable. You can add a tablespoon of espresso powder to the brownie batter for a mocha version. You can swap chocolate chips for crushed Oreos on top. You can add a swirl of peanut butter into the cheesecake layer. The base recipe holds up to a lot of creative variation.
What Makes This Recipe Unique
Most brownie cheesecake recipes layer one on top of the other, and you end up with two separate things that don’t really interact. What makes this Basque version different is that the batter for the cheesecake and the brownie are both pourable, which means they actually marble together during baking. You get genuine integration of flavors rather than a stacked dessert.
The high-heat baking also caramelizes the chocolate chips on top, which turns them into something between a chip and a candy. It’s a small thing but it completely transforms the texture of the top layer.
Key Features
- No water bath needed
- No crust to make or prebake
- Combines two beloved desserts in one pan
- Works for dinner parties or casual baking
- Can be made ahead (actually tastes better the next day)
- Uses simple pantry staples with no specialty baking equipment beyond a springform pan
FAQs
Can I make this without a springform pan? You can use a regular 9-inch cake pan lined generously with parchment, but removing it cleanly will be tricky. I’d strongly recommend getting a springform pan if you plan to make cheesecakes regularly.
My top isn’t getting dark. What’s wrong? Every oven is different. If the top isn’t browning by the 40-minute mark, move the pan to the upper third of your oven. You can also switch to broil for the last 2 to 3 minutes, watching it closely.
Can I freeze this cheesecake? Yes. Wrap individual slices tightly in plastic wrap and then foil, then store in a freezer-safe container. Thaw in the refrigerator overnight. The texture is very slightly softer after freezing but still delicious.
The center is really jiggly. Is it underbaked? Not if the edges are set and the top is deeply caramelized. Basque cheesecake is meant to have a soft, almost custard-like center. It will firm up significantly after chilling.
Can I use a food processor to make the cheesecake batter? A food processor actually works really well for cream cheese-based batters because it breaks down the cheese so smoothly. Just don’t overprocess once the eggs are in.
You’ll Also Love
- Classic Basque Burnt Cheesecake (the original, unfussy and perfect)
- Fudgy One-Bowl Brownies with Chocolate Chips
- New York Style Cheesecake with Sour Cream Topping
- Chocolate Lava Cake for Two (easy weeknight dessert)
- Oreo Brownie Bars (no-bake version for summer)
Conclusion
If there’s one thing I want you to take away from this recipe, it’s that you can stop being afraid of the dark top. Pull it out when it looks scary. Let it cool completely. Cut into it the next day and watch everyone at the table go quiet for a moment because they’re too busy eating to say anything.
That reaction is worth every minute of the wait.
Drop a comment below if you try it, and let me know whether you went full dark chocolate or mixed it up with milk chocolate chips. I love seeing how other people make this recipe their own.
Happy baking, Linda
Chocolate Chip Brownie Basque Cheesecake
A creamy Basque burnt cheesecake swirled with rich brownie batter and loaded with chocolate chips. The perfect fusion of two classic desserts in one unforgettable slice.
Ingredients
Basque Cheesecake Layer
- 900g full-fat cream cheese
- 300g granulated sugar
- 4 large eggs
- 300ml heavy cream
- 1 tsp vanilla extract
- 3 tbsp all-purpose flour
- 1/4 tsp salt
Brownie Swirl
- 115g unsalted butter
- 200g dark chocolate chips, divided
- 150g granulated sugar
- 2 large eggs
- 1 tsp vanilla extract
- 60g all-purpose flour
- 2 tbsp cocoa powder
- 1/4 tsp salt
- 100g milk chocolate chips
Instructions
- Preheat and Prep Preheat oven to 425°F (220°C). Line a 9-inch springform pan with parchment paper.
- Make the Brownie Batter Melt butter and half the dark chocolate chips together. Whisk in sugar, eggs, and vanilla. Fold in flour, cocoa powder, and salt.
- Prepare Cheesecake Batter Beat cream cheese until smooth. Add sugar, eggs, cream, vanilla, flour, and salt until creamy and lump-free.
- Layer and Swirl Pour two-thirds of cheesecake batter into pan. Add brownie batter dollops, remaining cheesecake batter, then remaining brownie batter. Swirl gently with a knife.
- Add Chocolate Chips Scatter milk chocolate chips across the surface.
- Bake Bake for 50 to 55 minutes until the top is dark and caramelized while the center remains jiggly.
- Cool Allow cheesecake to cool at room temperature for 1 hour.
- Chill Refrigerate for at least 4 hours or overnight before slicing.
Notes
Use room-temperature cream cheese for the smoothest texture. Do not overbake; the center should wobble when removed from the oven. Store covered in the refrigerator for up to 5 days. The flavor becomes even richer on the second day.