Creamy Lemon Cheesecake Dump Cake
You know those desserts that look like they took hours but actually come together in about 15 minutes? This is one of them. I stumbled onto dump cakes about five years ago when my sister called me in a panic because she’d volunteered to bring dessert to a potluck and completely forgotten until that morning. I talked her through this recipe over the phone, and she’s been making it ever since (though she finally admits I taught it to her now).
The brilliant thing about dump cakes is right there in the name. You literally dump ingredients into a pan and bake. No mixing bowls cluttering your counter, no stand mixer taking up half your kitchen, just layers of deliciousness that somehow transform into the most incredible dessert. This lemon cheesecake version is my absolute favorite because it tastes fancy enough for a dinner party but requires almost zero skill.
Here’s the thing, though. I’ve made this recipe probably 50 times now, and I’ve learned some tricks that make the difference between a good dump cake and one that makes people ask for the recipe immediately. Let me walk you through exactly how I do it.
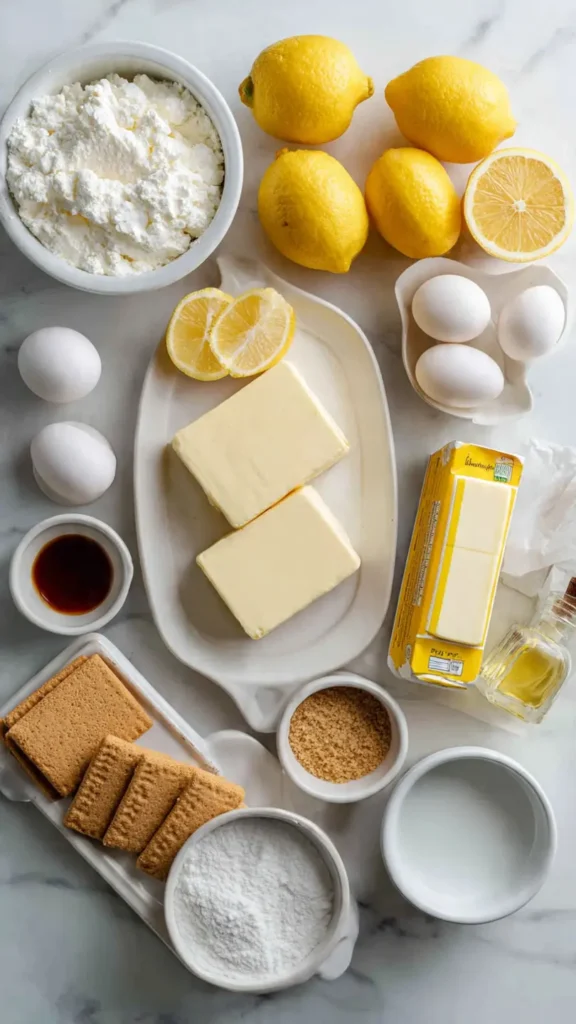
Essential Ingredients
For the Cheesecake Layer:
- 16 oz cream cheese, softened (two 8oz blocks)
- 1/2 cup granulated sugar
- 2 large eggs
- 1/4 cup fresh lemon juice (about 2 lemons)
- 1 tablespoon lemon zest
- 1 teaspoon vanilla extract
For the Cake Layer:
- 1 box (15.25 oz) lemon cake mix
- 1/2 cup (1 stick) unsalted butter, melted
- 1/3 cup water
For the Topping:
- 1 cup graham cracker crumbs
- 3 tablespoons butter, melted
- Optional: powdered sugar for dusting
Alternative Ingredients
Listen, I get it. Sometimes you’re working with what’s in your pantry, or you’ve got dietary needs to consider. I’ve tested plenty of variations on this recipe over the years.
Cream Cheese Substitutes: Greek yogurt cream cheese works beautifully if you want to cut some calories. I’ve also used Neufchâtel (the lighter cream cheese) with good results. Just don’t try regular yogurt, it’s too thin and your cheesecake layer will be runny.
Lemon Alternatives: No fresh lemons? Bottled lemon juice works in a pinch, though you’ll lose some of that bright, fresh flavor. I’ve also made this with lime juice when I had a bunch of limes to use up, and honestly, it was fantastic. Orange works too, but reduce the juice to 3 tablespoons because oranges are less acidic.
Cake Mix Options: Yellow cake mix is my second choice if you can’t find lemon. I’ve even used vanilla cake mix and just added extra lemon zest. White cake mix works too. Just avoid chocolate, trust me on that one.
Butter: I know some people swear by using margarine in dump cakes, but I’m firmly in the butter camp. The flavor is so much better. If you must use margarine, make sure it’s the stick kind, not the spreadable stuff.
Graham Crackers: Vanilla wafer crumbs or even crushed shortbread cookies make excellent substitutes. I’ve used gingersnaps around the holidays, and the spice plays really nicely with the lemon.
Step-by-Step Directions
Step 1: Prep Your Pan Preheat your oven to 350°F. Grab a 9×13 inch baking dish (I use a non-stick pan, which makes cleanup so much easier). Don’t grease it. I know that sounds wrong, but trust me, the butter in the recipe provides all the fat you need.
Step 2: Make the Cheesecake Layer This is the only part that requires any actual mixing, and even then, it’s minimal. Make sure your cream cheese is really soft. I usually leave mine on the counter for about an hour before I start. If you forget (like I often do), you can microwave it for 10-15 seconds, but watch it carefully.
In a medium bowl, beat the cream cheese and sugar together until smooth. I use a hand mixer for this, but a food processor works great too if you’ve got one handy. Add the eggs one at a time, beating after each addition. Then stir in the lemon juice, zest, and vanilla. The mixture should be smooth and pourable but not runny.
Pour this directly into your ungreased 9×13 pan and spread it evenly. It’ll be a thin layer, and that’s exactly what you want.
Step 3: Add the Cake Mix Here’s where the dump cake magic happens. Sprinkle the dry cake mix evenly over the cheesecake layer. Don’t mix it in, just sprinkle. I know it looks weird. Do it anyway.
Drizzle the melted butter over the cake mix, trying to cover as much of the surface as possible. Then drizzle the water over everything. You’ll have some dry spots, and that’s fine. They’ll hydrate during baking.
Step 4: Top It Off Mix your graham cracker crumbs with the 3 tablespoons of melted butter until the crumbs are evenly moistened. Sprinkle this over the top of everything. This creates a slightly crispy, cookie-like topping that’s honestly my favorite part.
Step 5: Bake Slide the pan into your preheated oven and bake for 45-50 minutes. You’re looking for the edges to be golden brown and the center to be set but still slightly jiggly. It’ll firm up as it cools. I learned this the hard way after overbaking my first few attempts and ending up with a dry cake layer.
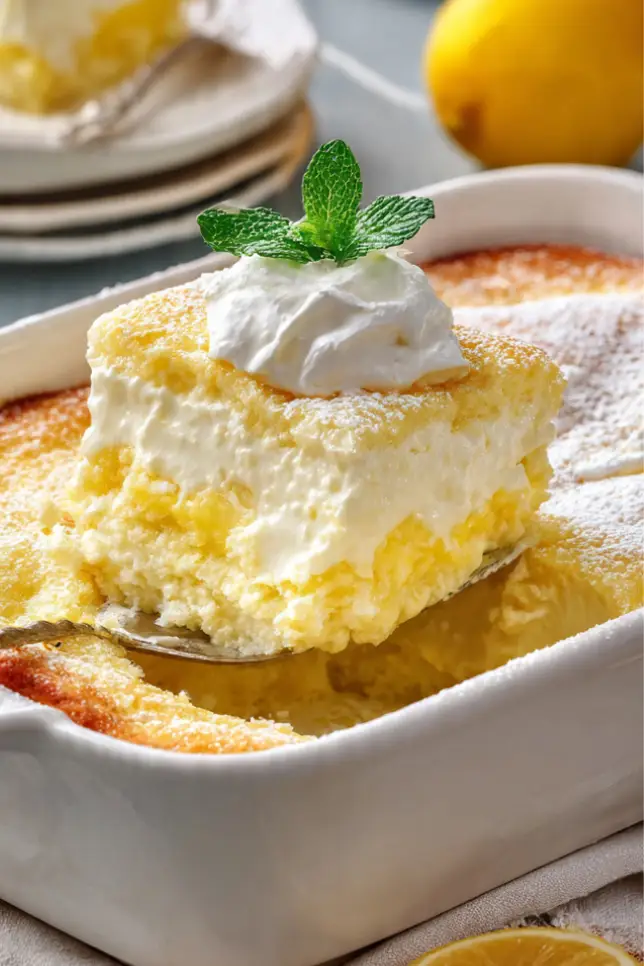
Step 6: Cool and Serve This is the hardest part. Let the cake cool completely, at least 2 hours. I usually make it in the morning and serve it after dinner. Or, if you’ve got the patience of a saint, refrigerate it overnight. It’s even better cold.
Dust with powdered sugar right before serving if you want it to look extra pretty.
Pro Tips
After making this recipe more times than I can count, here’s what I’ve learned:
Temperature Matters: That cream cheese really needs to be soft. Cold cream cheese means lumpy cheesecake layer, and nobody wants that.
Don’t Overmix: When you’re making the cheesecake mixture, mix just until smooth. Overbeating incorporates too much air, and you’ll get cracks on top.
The Dry Spots Are Your Friends: I used to panic about those dry spots in the cake mix layer. Don’t. They create pockets of concentrated lemon flavor that are absolutely delicious.
Storage is Easy: This keeps for up to 5 days in the refrigerator. I usually cover it with plastic wrap or transfer slices to meal prep containers if I’m taking it to work. It also freezes beautifully for up to 3 months. Just thaw overnight in the fridge before serving.
Make it Ahead: This is actually better the next day. The flavors meld together, and the texture improves. Perfect for meal planning when you’re hosting.
Serving Size Matters: Cut this into 12 squares for generous servings or 16 for more reasonable portions. I usually do 12 because, well, it’s that good.
FAQs
Can I make lemon cheesecake dump cake ahead of time?
Yes, this dessert tastes even better the next day after chilling.
Why is my dump cake dry in some spots?
This is normal and creates delicious texture variations.
Can I use bottled lemon juice?
Yes, but fresh lemon juice gives better flavor.
How should I store leftovers?
Keep refrigerated up to 5 days or freeze for longer storage.
Can I change the cake mix flavor?
Yes, vanilla or yellow cake mix works great.
Why You’ll Love This Recipe
Look, I’m not going to oversell this. But if you need a dessert that impresses people without requiring any actual baking skills, this is it. I’ve served this to my food blogger friends (who are way more accomplished than me), and they genuinely couldn’t believe how simple it was.
It’s also forgiving. Forget to soften your cream cheese completely? Still works. Don’t have quite enough graham crackers? Still works. Accidentally use salted butter instead of unsalted? (Yeah, I’ve done that.) Still works.
And the lemon flavor is so bright and fresh. It’s not the artificial lemon taste you get from some desserts. Between the fresh juice, the zest, and the lemon cake mix, you get layers of citrus that taste complex even though the prep was simple.
What Makes This Recipe Unique
Most dump cake recipes are fruit-based. You dump a can of pie filling, sprinkle cake mix, and call it a day. Those are fine, but this cheesecake version is something special. You get the tangy creaminess of cheesecake, the light fluffy texture of cake, and that crunchy graham cracker topping all in one bite.
The other thing is, this actually slices cleanly. A lot of dump cakes are more of a spoon-it-onto-a-plate situation. This one you can cut into proper squares and serve on nice plates. It looks intentional, not like a happy accident.
Key Features
- Minimal Equipment: Just a bowl, a whisk or hand mixer, and a baking pan
- Make-Ahead Friendly: Actually improves overnight in the fridge
- Freezer-Friendly: Wrap individual portions for easy freezer meals
- Crowd-Pleaser: I’ve never had leftovers when I bring this somewhere
- Adaptable: Works with different citrus flavors or cake mix varieties
- No Crust Required: The graham cracker topping gives you that cheesecake experience without fussing with a crust
You’ll Also Love
If this recipe worked for you, try these other easy dump cake variations:
- Cherry Chocolate Dump Cake (use cherry pie filling and chocolate cake mix)
- Apple Cinnamon Dump Cake (perfect for fall)
- Strawberry Lemonade Dump Cake (uses frozen strawberries)
- Pumpkin Spice Dump Cake (great for Thanksgiving)
- Blueberry Lemon Dump Cake (add fresh blueberries to the cheesecake layer)
Conclusion
I make this dessert more than any other in my repertoire, and that’s saying something. It’s my go-to for potlucks, family dinners, and those nights when I want something sweet but don’t want to spend an hour in the kitchen.
The best part? Nobody ever guesses how easy it actually was. I used to feel guilty about that, like I was somehow cheating. But you know what? If the end result is delicious and people are happy, does it really matter that it took 15 minutes to throw together?
So the next time someone asks you to bring dessert, or you’re just craving something tangy and sweet, give this a try. Make sure your cream cheese is soft, don’t worry about the dry spots in your cake mix, and let it cool completely before you cut into it. Follow those three rules, and you’ll have people asking for the recipe.
And when they do? You can decide whether to share the secret or not. I usually do, because honestly, everyone should know about dump cakes. They’re too good to keep to yourself.
Creamy Lemon Cheesecake Dump Cake
Incredibly easy lemon dump cake with a creamy cheesecake layer, fluffy lemon cake topping, and crunchy graham cracker crust.
Ingredients
Cheesecake Layer
- 16 oz cream cheese, softened (2 blocks)
- 1/2 cup granulated sugar
- 2 large eggs
- 1/4 cup fresh lemon juice (about 2 lemons)
- 1 tbsp lemon zest
- 1 tsp vanilla extract
Cake Layer
- 1 box (15.25 oz) lemon cake mix
- 1/2 cup unsalted butter, melted (1 stick)
- 1/3 cup water
Topping
- 1 cup graham cracker crumbs
- 3 tbsp butter, melted
- Optional powdered sugar for dusting
Instructions
- Preheat and prep Preheat oven to 350F. Use a 9×13 inch baking dish. Do not grease the pan.
- Make cheesecake layer Beat softened cream cheese and 1/2 cup sugar together until smooth. Add eggs one at a time, beating after each addition. Stir in lemon juice, lemon zest, and vanilla until well combined.
- Pour cheesecake base Pour the cheesecake mixture into the ungreased 9×13 pan and spread evenly across the bottom. The layer will be thin.
- Add cake mix layer Sprinkle the dry lemon cake mix evenly over the cheesecake layer. Do not stir or mix it in.
- Add butter and water Drizzle the 1/2 cup melted butter over the cake mix, trying to cover as much surface as possible. Then drizzle the 1/3 cup water over everything. Some dry spots are okay and normal.
- Add graham cracker topping Mix the graham cracker crumbs with 3 tablespoons melted butter until the crumbs are evenly moistened. Sprinkle this mixture evenly over the top of the cake.
- Bake Bake for 45-50 minutes until the edges are golden brown and the center is set but still slightly jiggly. It will firm up as it cools.
- Cool completely Let the cake cool at room temperature for at least 2 hours before serving. For best results, refrigerate overnight. Dust with powdered sugar before serving if desired.
Notes
Make sure cream cheese is fully softened for a smooth cheesecake layer. This dessert tastes even better the next day after the flavors have melded. Store covered in the refrigerator for up to 5 days. Individual slices freeze well for up to 3 months – wrap tightly in plastic wrap and aluminum foil. The dry spots in the cake mix layer create delicious pockets of concentrated lemon flavor.