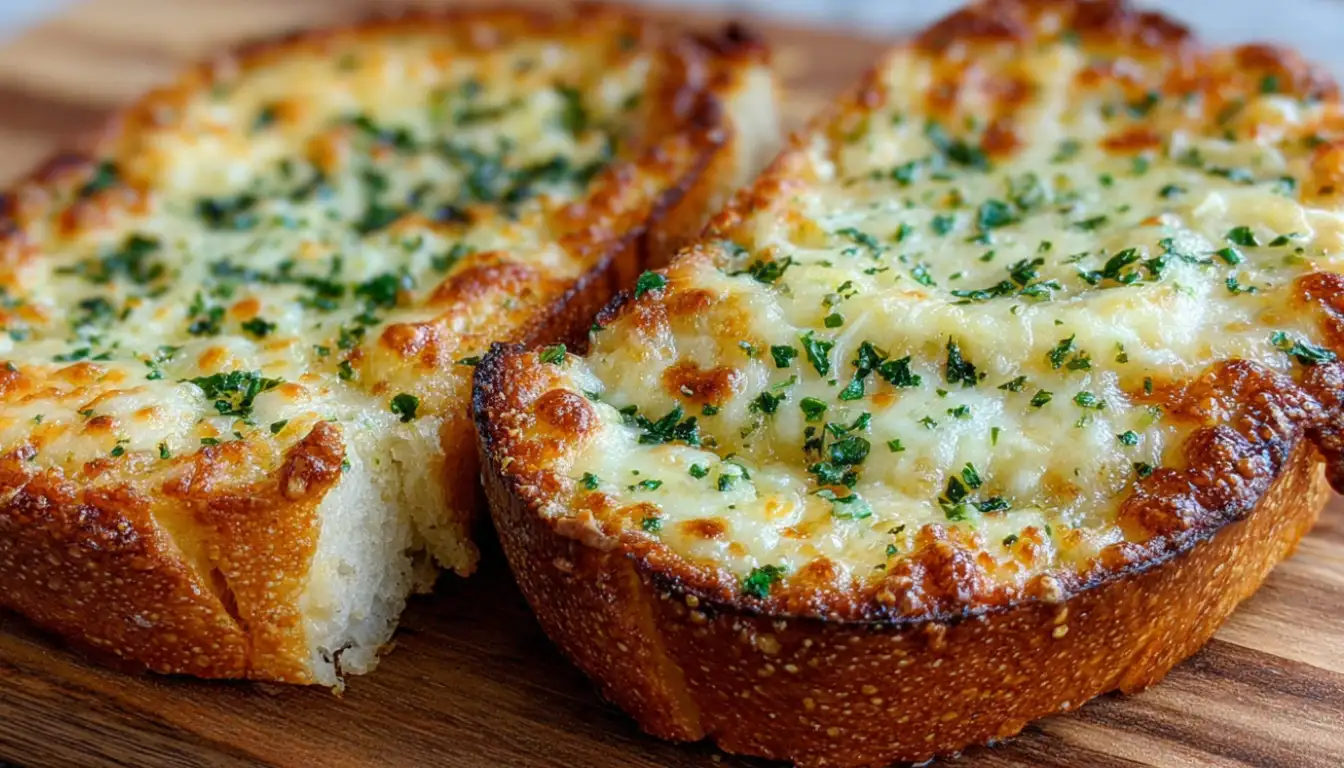
Homemade Cheesy Texas Toast Garlic Bread Recipe
You know what changed my weeknight dinner game completely? The moment I stopped buying frozen garlic bread and started making my own Texas toast version at home. I’m talking about thick-cut, butter-soaked, cheese-loaded slices that make restaurant garlic bread look sad in comparison.
I’ll be honest with you. For years, I thought garlic bread was just something you grabbed from the freezer section. Then one night, I was making pasta and realized I was out of the boxed stuff. I had some thick bread sitting on the counter, and I figured, how hard could it be? Turns out, not hard at all. And once I added that cheese layer? Game over. My family refuses to go back to the frozen version now.
The best part? This recipe comes together in about 15 minutes from start to finish. That’s faster than preheating your oven for most frozen options, and the taste difference is honestly night and day. You get crispy edges, a soft buttery center, and that perfect cheese pull that makes everyone at the table reach for seconds before they’ve finished their first slice.
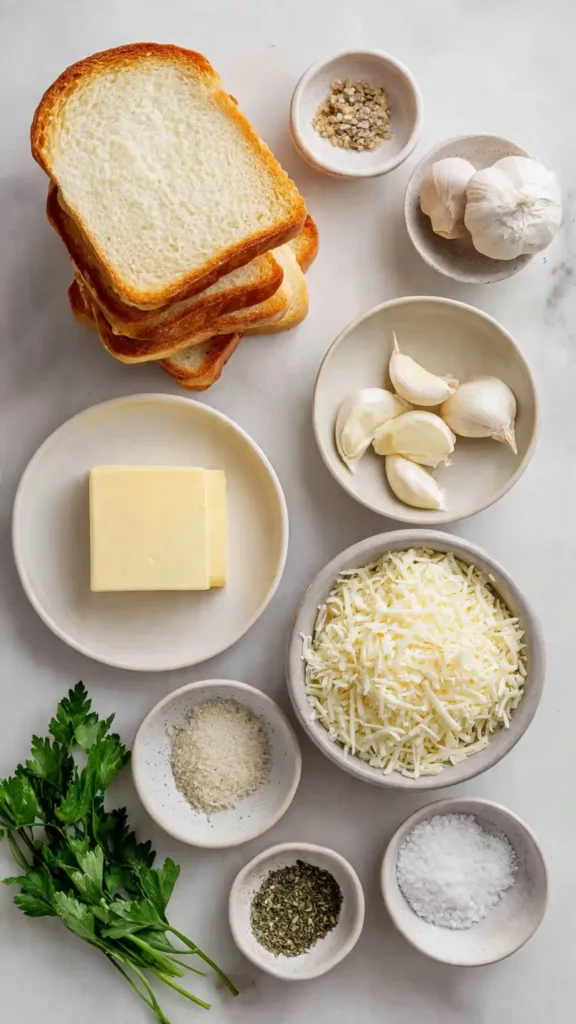
Essential Ingredients
Here’s what you need to make this magic happen:
- 1 loaf Texas toast bread (or thick-cut white bread, about 1-inch slices)
- 1/2 cup unsalted butter, softened to room temperature
- 4-6 cloves fresh garlic, minced (or 2 teaspoons garlic powder in a pinch)
- 2 cups shredded mozzarella cheese
- 1/2 cup grated Parmesan cheese
- 2 tablespoons fresh parsley, finely chopped
- 1/2 teaspoon garlic salt
- 1/4 teaspoon black pepper
- 1/4 teaspoon dried oregano (optional but recommended)
Alternative Ingredients
Look, I get it. Sometimes you don’t have everything on hand, and that’s totally fine. I’ve made this recipe dozens of ways depending on what’s in my fridge.
Bread options: If you can’t find actual Texas toast, just buy a regular loaf of white or sourdough bread and cut it into thick slices yourself. I aim for about 3/4 to 1 inch thick. Some people swear by using French bread or Italian bread, and honestly, both work great. Just slice them horizontally if you want that classic garlic bread shape.
Cheese substitutes: The mozzarella and Parmesan combo is my favorite, but I’ve used cheddar when that’s what I had available. Provolone works beautifully too. My neighbor makes hers with a Mexican cheese blend, and it’s actually incredible. Don’t be afraid to experiment.
Garlic alternatives: Fresh garlic gives you the best flavor, but I keep garlic powder in my pantry for those nights when I just can’t be bothered to peel and mince. You can also use jarred minced garlic if that’s easier for you. No judgment here.
Butter swap: I’ve tried this with margarine when I was out of butter, and while it’s not quite the same, it still tastes good. For a richer flavor, try using half butter and half cream cheese. Trust me on that one.
Step-by-Step Directions
Alright, let’s make this happen. Preheat your oven to 375°F and grab a large baking sheet. I line mine with parchment paper for easy cleanup, but you can also use aluminum foil if that’s what you have.
Step 1: Get your butter to room temperature. This is important because cold butter just won’t spread right. If you forgot to take it out earlier (like I always do), you can microwave it for about 10 seconds, but watch it carefully. You want soft butter, not melted butter.
Step 2: In a medium bowl, mix together your softened butter, minced garlic, garlic salt, black pepper, oregano, and half of your chopped parsley. I use my KitchenAid stand mixer for this because it makes everything super smooth and creamy, but you can absolutely do this by hand with a fork. When I’m feeling lazy, I just use a food processor to mince the garlic and then add everything else. It takes like 30 seconds.
Step 3: Arrange your bread slices on the baking sheet. I can usually fit about 6-8 slices depending on the size of my pan. Make sure they’re not overlapping.
Step 4: Spread that garlic butter mixture generously on each slice. Don’t be shy here. You want to cover the entire surface right to the edges. This is not the time to be conservative with butter.
Step 5: Pop the buttered bread into the oven for about 5-7 minutes. You’re looking for the edges to just start turning golden. They shouldn’t be fully toasted yet because we’re adding cheese next.
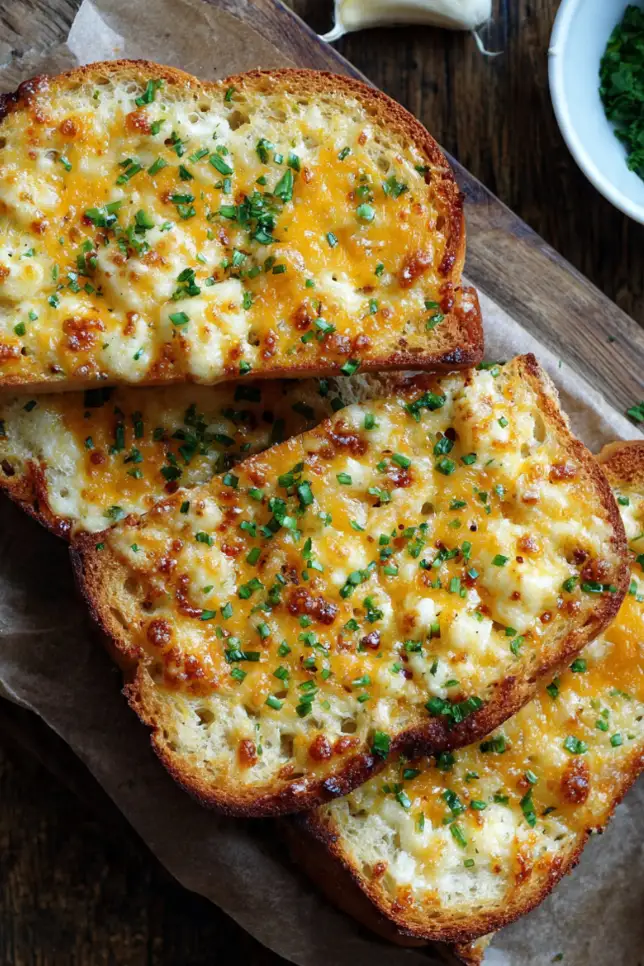
Step 6: Pull the pan out and immediately sprinkle the mozzarella and Parmesan cheese all over each slice. Be generous with the cheese. This is cheesy garlic bread, after all.
Step 7: Put it back in the oven for another 5-7 minutes until the cheese is melted, bubbly, and just starting to turn golden brown in spots.
Step 8: Remove from the oven, sprinkle with the remaining fresh parsley, and let it cool for about 2 minutes before serving. I know it’s hard to wait, but trust me, that cheese is lava-hot right now.
Pro Tips
After making this recipe at least 50 times over the past few years, I’ve learned a few tricks that make it even better.
First, use real butter. I tried making this with margarine once to save money, and while it was okay, it just doesn’t have that same rich flavor. Butter is where the magic happens.
Second, fresh garlic beats garlic powder every single time. Yes, it takes an extra minute to mince, but the flavor is so much better. If you have a garlic press, use it. It makes the job super easy.
Third, don’t skip the fresh parsley. I know dried herbs are convenient, and I use them for lots of things, but the fresh parsley adds a brightness that really balances out all that butter and cheese. Plus, it makes it look fancy, which is always nice.
Here’s something I learned the hard way: watch it carefully in that last few minutes. The difference between perfectly melted cheese and burnt cheese is about 90 seconds. I’ve ruined more than one batch by getting distracted scrolling on my phone.
If you want extra crispy edges, after the cheese melts, switch your oven to broil for just 1-2 minutes. Keep the oven door cracked and watch it like a hawk. This creates an amazing crispy, bubbly cheese top.
For meal prep, you can make the garlic butter mixture ahead and keep it in the fridge for up to a week. I actually make a double batch and store it in a glass container. Then I can make fresh garlic bread anytime without the prep work. It’s perfect for those nights when I need a quick side dish.
Some people like to use an air fryer for this, and I’ve tried it. It works, but you need to reduce the temperature to about 350°F and keep a close eye on it. The air fryer cooks faster than a regular oven.
Frequently Asked Questions
Can I freeze this? Absolutely. I actually freeze mine all the time. Make the garlic bread through step 6 (before the final bake), wrap each slice individually in plastic wrap, then store them in a freezer-safe bag. They’ll keep for up to 3 months. When you want to eat them, just unwrap and bake from frozen at 375°F for about 12-15 minutes.
What if I don’t have Texas toast bread? No problem. Just use any thick white bread, sourdough, or even French bread. The key is getting slices that are thick enough to hold all that butter and cheese without getting soggy.
Can I make this dairy-free? I haven’t tried it myself, but my friend who’s lactose intolerant uses vegan butter and dairy-free mozzarella, and she says it works pretty well. The texture won’t be exactly the same, but it’s still tasty.
How do I store leftovers? Let the bread cool completely, then store it in an airtight container in the fridge for up to 3 days. Reheat in the oven at 350°F for about 5 minutes to get it crispy again. Don’t use the microwave unless you want sad, soggy garlic bread.
Can I add other seasonings? For sure. Sometimes I add a pinch of red pepper flakes if I want a little kick. Italian seasoning works great too. Experiment and make it your own.
Why You’ll Love This Recipe
Listen, I could list a hundred reasons, but here are the big ones. This is stupid easy to make. Like, if you can spread butter on bread, you can make this recipe. There’s no fancy technique, no special skills required.
It’s also incredibly budget-friendly. A loaf of bread costs a couple bucks, and the other ingredients are all pantry staples. Compare that to $6-8 for a box of frozen garlic bread that tastes like cardboard.
The flavor is just better than anything you can buy. That fresh garlic, real butter, and quality cheese combo is unbeatable. Plus, you can customize it however you want. Want more cheese? Add more cheese. Prefer less garlic? Use less garlic. It’s your bread, your rules.
It’s also a massive crowd-pleaser. I’ve served this at dinner parties, family gatherings, and casual weeknight meals, and it disappears every single time. Kids love it, adults love it, picky eaters love it.
What Makes This Recipe Unique
The thing that sets this apart from regular garlic bread is the thickness of the bread and the cheese-to-bread ratio. Most garlic bread recipes use thin slices that get too crispy or burn easily. Texas toast gives you that perfect balance of crispy outside and soft inside.
Also, most recipes just melt butter with garlic and call it a day. This version actually makes a compound butter situation where everything gets mixed together first. It distributes the flavor way better.
The double cheese layer (mozzarella for meltiness, Parmesan for flavor) is another game-changer. A lot of recipes just use one or the other, but the combo is where it’s at.
Key Features
This recipe is vegetarian-friendly, so it works for most dietary situations. It comes together in under 30 minutes total, making it perfect for busy weeknights when you need something fast.
You probably have most of these ingredients already, which means you can make it on a whim without a special trip to the store. It’s also easily scalable. Need to feed a crowd? Double or triple the recipe. Just feeding yourself? Make one or two slices.
The leftovers (if you have any) reheat beautifully, unlike most bread-based recipes that get gross the next day. Store them in meal prep containers and you’ve got easy sides for the whole week.
You’ll Also Love
If this recipe hit the spot for you, you should definitely try my Homemade Breadsticks with Marinara Sauce. They have that same cheesy, garlicky vibe but in a different form.
My Loaded Cheese Fries are another winner if you’re into that crispy, cheesy comfort food situation. Same energy, different vehicle.
And if you’re looking for more easy side dishes, check out my Parmesan Roasted Vegetables. It’s just as simple and pairs perfectly with pasta dishes.
Conclusion
Honestly, once you make garlic bread from scratch, there’s no going back. This Cheesy Texas Toast version is my absolute favorite because it’s foolproof, delicious, and makes you look like you put in way more effort than you actually did.
The thick slices hold up perfectly to all that butter and cheese, and the flavor is just miles better than anything from a box. Plus, there’s something really satisfying about making something this good with such simple ingredients.
Give this recipe a try next time you’re making pasta, soup, or honestly just want a really good snack. Your family will thank you, and you might just find yourself making it every week like I do.
Let me know how it turns out for you! I love hearing about how people customize this recipe to make it their own.
Cheesy Texas Toast Garlic Bread
Crispy, buttery, cheesy garlic bread made with thick Texas toast slices and ready in minutes.
Ingredients
- 1 loaf Texas toast
- 1/2 cup butter
- 4-6 garlic cloves
- 2 cups mozzarella
- 1/2 cup Parmesan
- 2 tbsp parsley
- Garlic salt, pepper, oregano
Instructions
- Preheat oven to 375°F
- Mix garlic butter ingredients
- Spread on bread slices
- Bake 5-7 minutes
- Add cheese
- Bake again until melted
- Garnish and serve
Notes
Use fresh garlic for best flavor. Broil briefly for extra crispy cheese. Store leftovers in fridge up to 3 days.