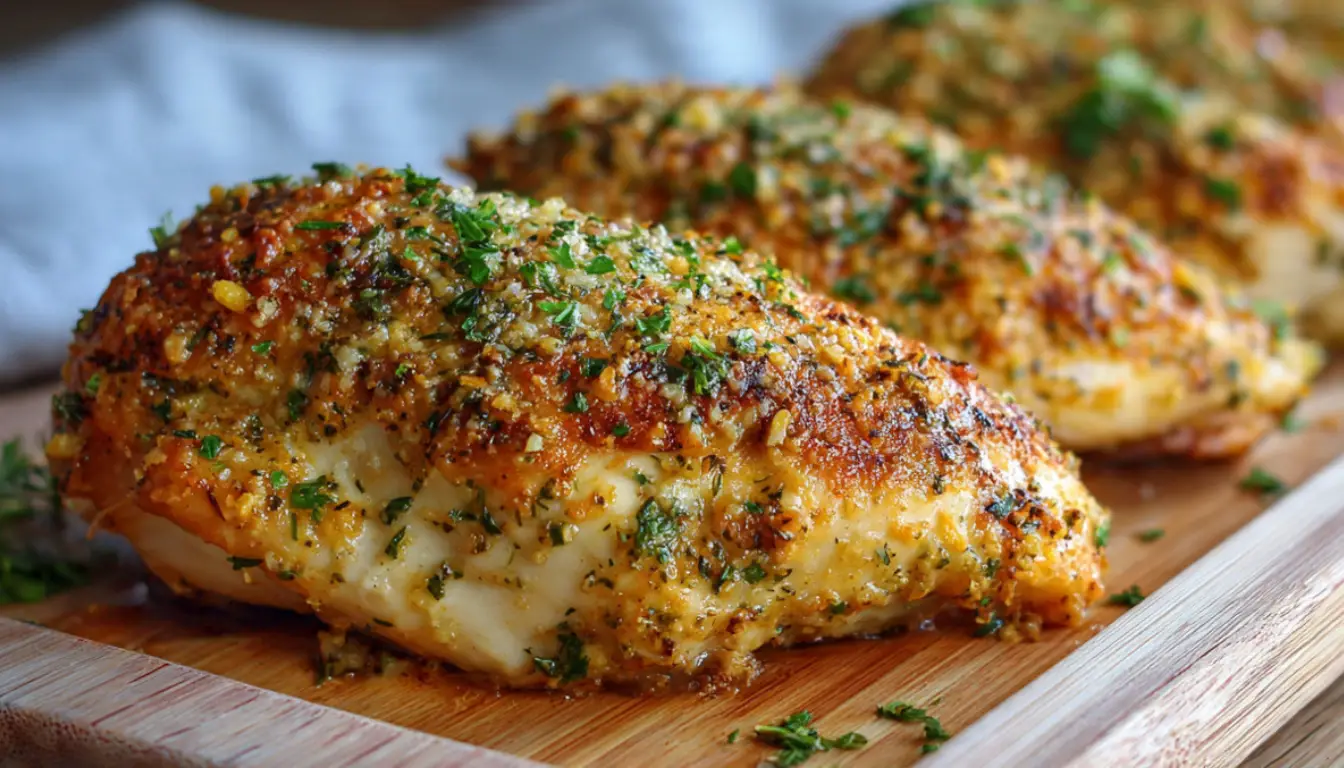
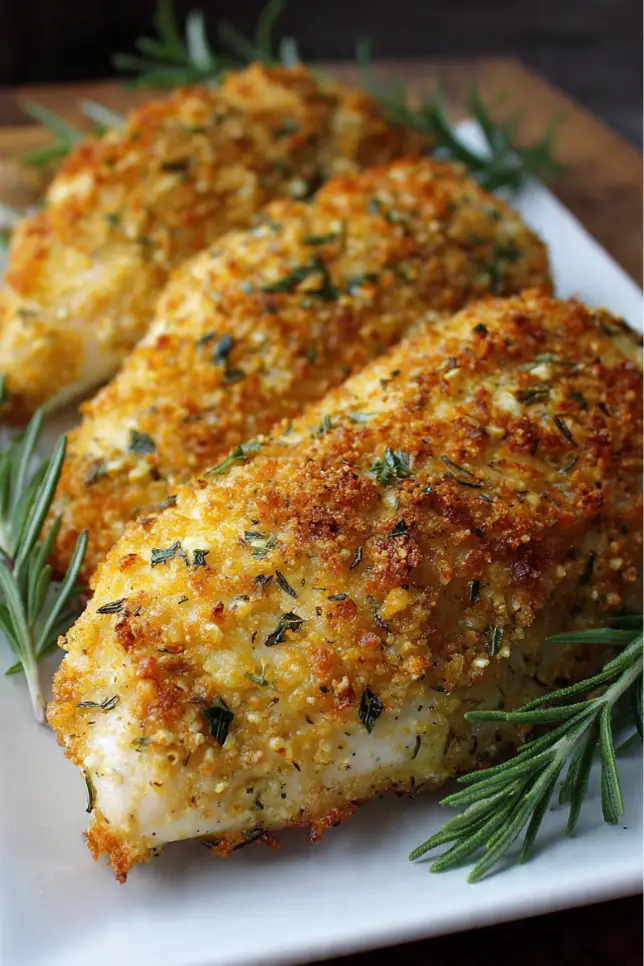
Simple Baked Ranch Chicken
You know what I love about this Simple Baked Ranch Chicken? It’s the recipe that saved my weeknight dinners about five years ago when I was completely burned out on the same rotation of boring chicken breasts. I was standing in my kitchen one Tuesday evening, staring at another package of chicken, and I thought, “There has to be a better way.” That’s when I started experimenting with ranch seasoning, and honestly, I haven’t looked back since.
This recipe transformed how I approach meal prep for the week. The combination of tangy ranch flavors with a crispy coating creates restaurant-quality chicken right in your own oven, and the best part? You probably already have most of the ingredients sitting in your pantry. I’ve made this recipe hundreds of times now, and it never fails to deliver juicy, flavorful chicken that my whole family actually gets excited about.
What makes this recipe so special is how it solves the classic chicken dilemma: dry, flavorless protein that nobody wants to eat. The ranch coating keeps everything incredibly moist while adding tons of flavor, and the technique I’ll share with you creates this amazing golden crust that rivals anything you’d get from a restaurant. Trust me on this one.
Essential Ingredients
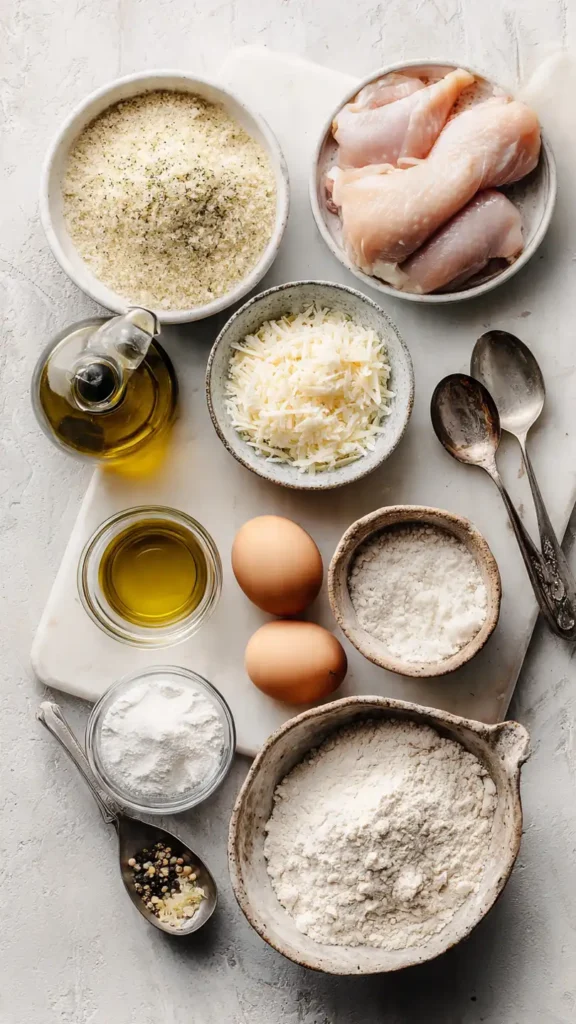
- 4 boneless, skinless chicken breasts (about 1.5 to 2 pounds total)
- 1 cup panko breadcrumbs
- 1/2 cup grated Parmesan cheese
- 2 tablespoons ranch seasoning mix (store-bought or homemade)
- 1/2 cup all-purpose flour
- 2 large eggs
- 1/4 cup whole milk
- 1 teaspoon garlic powder
- 1 teaspoon onion powder
- 1/2 teaspoon black pepper
- 1/2 teaspoon salt
- 3 tablespoons olive oil or melted butter
- Cooking spray
Alternative Ingredients
Let’s talk substitutions, because I know not everyone has the same ingredients on hand all the time.
For the breadcrumbs: Regular breadcrumbs work fine if you don’t have panko, but the texture won’t be quite as crispy. I’ve also used crushed cornflakes in a pinch, and that actually creates an incredibly crunchy coating. For a gluten-free version, almond flour or crushed pork rinds work surprisingly well.
For the Parmesan: Any hard, aged cheese will work here. I’ve used Pecorino Romano, Asiago, or even a sharp white cheddar when I’ve run out of Parmesan. Each brings its own flavor profile to the dish.
For the ranch seasoning: You can absolutely make your own by combining dried dill, dried parsley, garlic powder, onion powder, and a pinch of cayenne. I keep a jar of homemade ranch mix in my pantry because it’s cheaper and you can control the sodium levels.
For the chicken: This recipe works beautifully with chicken thighs if you prefer dark meat. Just adjust the cooking time since thighs take a bit longer. I’ve also done this with pork chops with great success.
For dairy-free needs: Swap the milk for unsweetened almond milk or oat milk, and use nutritional yeast instead of Parmesan cheese. The flavor changes slightly, but it’s still delicious.
Tools and Equipment
Here’s what makes this recipe come together smoothly. I’m going to be honest with you about what I actually use versus what you technically need.
You’ll need three shallow bowls or pie plates for your breading station. I use my trusty Pyrex glass pie dishes because they’re wide, easy to clean, and I can see what I’m doing. Any shallow dish works, though.
For the baking, I always reach for my rimmed baking sheet lined with parchment paper. If you have a wire rack that fits inside your baking sheet, even better! It allows air to circulate around the chicken for crispier results. I picked up an inexpensive cooling rack that fits perfectly in my half-sheet pan, and it’s one of those tools I use constantly for roasting vegetables and baking chicken.
A meat thermometer is absolutely essential here. I use my ThermoPro digital thermometer because guessing when chicken is done leads to either dry, overcooked meat or undercooked chicken (neither is good). The instant-read function takes all the guesswork out of cooking. Before I invested in a good meat thermometer, I ruined so many chicken dinners by overcooking them.
If you’re meal prepping this recipe for the week, you’ll want quality meal prep containers. I store my cooked chicken breasts in glass containers with tight-fitting lids. They reheat better than plastic and don’t hold onto those lingering ranch smells.
Step-by-Step Directions
Step 1: Prep your chicken. Start by pounding your chicken breasts to an even thickness, about 3/4 inch throughout. I place each breast between two pieces of plastic wrap and use a meat mallet (or a heavy skillet if you don’t have a mallet) to gently pound them. This step is crucial because even thickness means even cooking, and you won’t end up with dry edges and raw centers. It took me years to figure out that this single step was the difference between mediocre and amazing baked chicken.
Step 2: Set up your breading station. In the first shallow dish, add your flour seasoned with a pinch of salt and pepper. In the second dish, whisk together eggs and milk until well combined. In the third dish, combine panko breadcrumbs, Parmesan cheese, ranch seasoning, garlic powder, onion powder, pepper, and salt. Mix thoroughly so the seasonings are evenly distributed. Drizzle the olive oil or melted butter over the breadcrumb mixture and toss with a fork until the crumbs are slightly moistened. This fat in the breadcrumbs is what creates that golden, crispy crust.
Step 3: Bread the chicken. Pat your chicken dry with paper towels (this is important for the coating to stick properly). Dredge each piece first in flour, shaking off the excess. Then dip into the egg mixture, letting any excess drip off. Finally, press firmly into the breadcrumb mixture, coating both sides and pressing the crumbs in so they adhere well. Place on your prepared baking sheet. I learned the hard way that skipping the flour step results in the coating sliding right off during baking.
Step 4: Bake to perfection. Preheat your oven to 400°F (200°C). Lightly spray the tops of the breaded chicken with cooking spray (this helps with browning). Bake for 20-25 minutes, or until the internal temperature reaches 165°F (74°C) when checked with your meat thermometer in the thickest part. The coating should be golden brown and crispy. If you want extra crispiness, turn on the broiler for the last 2-3 minutes, but watch carefully because it can go from golden to burned really quickly.
Step 5: Rest before serving. Let the chicken rest for 5 minutes after removing from the oven. This allows the juices to redistribute, keeping everything moist and tender. I know it’s tempting to cut right in, but patience pays off here.
Pro Tips
After making this recipe probably 200 times over the years, I’ve picked up some tricks that really elevate the results.
The temperature trick: Make sure your oven is fully preheated before the chicken goes in. I use an oven thermometer because I discovered my oven runs about 25 degrees cooler than the dial says, which was causing all sorts of inconsistent results.
Double coating for extra crunch: If you want an even thicker, crunchier crust, do a double dip. After the first breadcrumb coating, dip back in the egg mixture and then in breadcrumbs again. It takes a few extra minutes but creates this incredible, restaurant-style crust.
Spacing matters: Don’t crowd the baking sheet. Leave at least an inch between each piece so the hot air can circulate properly. Crowded chicken steams instead of bakes, and you’ll lose that crispy coating.
Make it spicy: Add 1/2 teaspoon of cayenne pepper to the breadcrumb mixture if you like heat. I’ve also mixed in some hot sauce with the egg wash for an extra kick.
Meal prep like a pro: This chicken is perfect for healthy eating and meal planning. I often double the recipe on Sundays and keep cooked chicken breasts in my meal prep containers. They stay fresh for 4-5 days in the fridge and reheat beautifully. Just pop them in a 350°F oven for about 10 minutes or use your air fryer for 5 minutes to restore that crispy coating. The air fryer method actually makes the coating even crispier than the first time around.
Season generously: Don’t be shy with the ranch seasoning. The coating is where all your flavor lives, so make sure it’s well-seasoned. Taste your breadcrumb mixture before coating the chicken (obviously before adding the raw chicken) and adjust if needed.
FAQs
Can I make this ahead of time?
Absolutely! You can bread the chicken up to 4 hours ahead and keep it refrigerated until you’re ready to bake. Just add 3-5 minutes to the cooking time since you’re starting with cold chicken.
Why is my coating falling off?
This usually happens if the chicken wasn’t dry enough before breading, or if you skipped the flour step. Make sure you pat the chicken completely dry and press the breadcrumbs firmly onto the surface. The flour creates a “glue” that helps everything stick.
Can I freeze this?
Yes! Freeze the breaded (but unbaked) chicken on a baking sheet until solid, then transfer to freezer bags. They’ll keep for up to 3 months. Bake from frozen, adding about 10-15 minutes to the cooking time. You can also freeze cooked chicken, though the coating won’t be quite as crispy when reheated.
What if I don’t have ranch seasoning?
Mix together 1 tablespoon dried dill, 1 tablespoon dried parsley, 2 teaspoons garlic powder, 2 teaspoons onion powder, 1 teaspoon black pepper, and 1/2 teaspoon salt. This makes a basic ranch blend that works perfectly in this recipe.
How do I reheat leftovers?
The oven or air fryer is your best bet for maintaining that crispy coating. Avoid the microwave if possible, as it makes the breading soggy. Reheat at 350°F for 8-10 minutes in the oven, or 5-6 minutes in an air fryer at 375°F.
Recipe Info Table
| Prep Time | Cook Time | Total Time | Servings | Yield |
|---|---|---|---|---|
| 15 minutes | 25 minutes | 40 minutes | 4 | 4 chicken breasts |
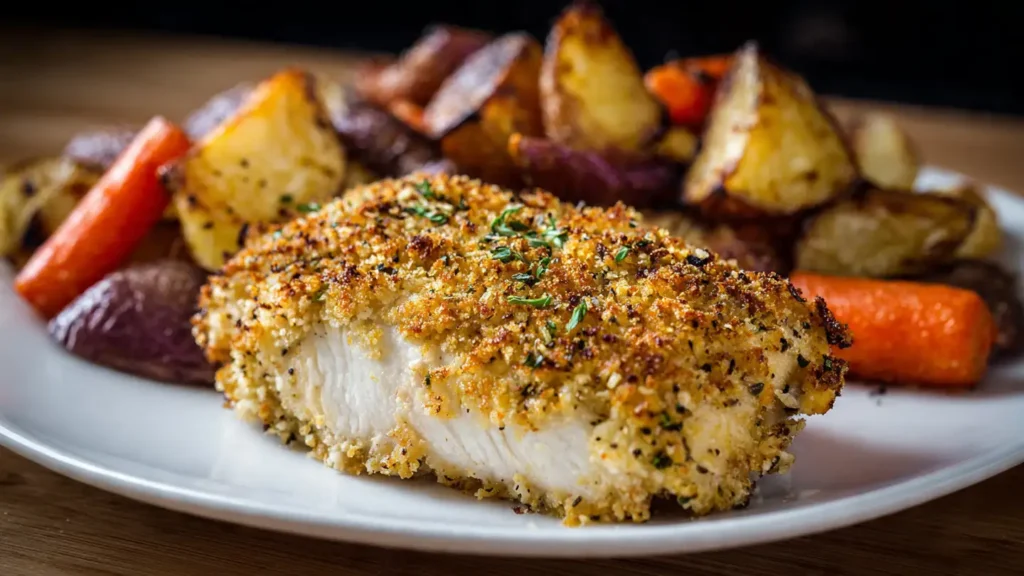
Why You’ll Love This Recipe
This Simple Baked Ranch Chicken has become my go-to recipe for so many reasons. First, it’s incredibly versatile. I’ve served this for casual weeknight dinners, packed it in lunches, sliced it for salads, and even served it at dinner parties with fancier sides. It always gets compliments.
Second, it’s foolproof. Even if you’re not confident in the kitchen, this recipe walks you through each step and produces consistent results every single time. I’ve taught this to friends who swore they couldn’t cook, and they nailed it on the first try.
Third, it’s budget-friendly. Chicken breasts go on sale regularly, and the other ingredients are pantry staples. You’re looking at maybe $8-10 to feed four people a really satisfying meal, which beats takeout any day.
And finally, it fits into healthy eating plans beautifully. This is naturally high in protein, relatively low in carbs, and if you use whole wheat panko or almond flour, you can make it even more nutritious. I’ve had friends on weight loss journeys tell me this recipe keeps them on track because it’s satisfying enough that they don’t feel deprived.
What Makes This Recipe Unique
What sets this apart from other baked chicken recipes you’ll find online? A few things, actually.
Most recipes tell you to just dip and bake, but I’ve refined the technique over years of testing. The flour layer makes a real difference in how well the coating adheres. The slightly moistened breadcrumbs (from that drizzle of oil) create a crispier, more golden crust than dry breadcrumbs ever could.
The specific combination of ranch seasoning with Parmesan and panko hits this perfect sweet spot of tangy, savory, and crunchy that you just don’t get from plain breaded chicken. I’ve tried dozens of variations, and this ratio is what works best.
Plus, the meal prep angle is huge. So many chicken recipes don’t reheat well, but this one actually holds up for days. The coating stays relatively crispy if you store it properly and reheat it the right way. That makes it perfect for people who want to eat well during busy weeks without cooking every single night.
Key Features
Crispy coating without frying: You get that satisfying crunch without any of the oil and mess of pan-frying. The oven does all the work while you clean up your breading station or prep sides.
Perfect for meal planning: Make a big batch on Sunday and you’ve got protein sorted for multiple meals throughout the week. It pairs well with everything from roasted vegetables to salads to pasta.
Family-friendly flavor: Even picky eaters tend to love this. The ranch flavor is familiar and comforting, not weird or adventurous. I’ve served this to kids who “don’t like chicken” and watched them ask for seconds.
Minimal cleanup: Unlike pan-frying, you’re not splattering oil all over your stovetop. One baking sheet, three dishes for breading, and you’re done.
Works with different proteins: While I’ve focused on chicken breasts here, this same technique works beautifully with pork chops, chicken thighs, or even thick fish fillets like cod or halibut.
Nutrition Facts Table
Per serving (1 chicken breast):
| Nutrient | Amount |
|---|---|
| Calories | 385 |
| Protein | 42g |
| Carbohydrates | 18g |
| Fat | 14g |
| Saturated Fat | 4g |
| Cholesterol | 155mg |
| Sodium | 680mg |
| Fiber | 1g |
| Sugar | 1g |
Note: Nutrition facts are approximate and will vary based on exact ingredients used and portion sizes.
You’ll Also Love
If this Simple Baked Ranch Chicken becomes a regular in your rotation (and I bet it will), here are some other recipes that pair perfectly with it or use similar techniques:
- Crispy Baked Parmesan Chicken – Uses a similar breading technique but with Italian seasonings instead of ranch
- Honey Mustard Baked Chicken Thighs – For when you want something tangy and slightly sweet
- Air Fryer Ranch Chicken Tenders – Kid-friendly strips using the same flavors but in your air fryer
- Lemon Herb Baked Chicken – A lighter, brighter take on breaded chicken that’s perfect for spring and summer
- Buffalo Ranch Chicken Casserole – Turn this concept into a one-pan dinner with pasta and cheese
Conclusion
I still remember that Tuesday evening five years ago when I was staring at yet another package of chicken, feeling uninspired and tired. This Simple Baked Ranch Chicken recipe literally changed how I cook during busy weeks. It’s become one of those recipes I don’t even need to look at anymore because I’ve made it so many times.
The beauty of this recipe is in its simplicity and reliability. You don’t need fancy equipment (though a good meat thermometer really does help), you don’t need expensive ingredients, and you don’t need advanced cooking skills. You just need chicken, some pantry staples, and about 40 minutes from start to finish.
Whether you’re feeding a family, meal prepping for the week ahead, or just looking for a reliable chicken recipe that actually tastes good, give this one a try. I think you’ll find yourself making it over and over again, just like I do. And if you’re anything like me, you’ll start keeping extra ranch seasoning on hand because you’ll want to make this multiple times a week.
Happy cooking, and let me know how yours turns out!
Simple Baked Ranch Chicken
This Simple Baked Ranch Chicken features juicy chicken breasts coated in a crispy, flavorful ranch and Parmesan crust. Perfect for weeknight dinners and meal prep, this foolproof recipe delivers restaurant-quality results right from your oven.
Ingredients
Main Ingredients
- 4 boneless, skinless chicken breasts (about 1.5 to 2 pounds total)
- 1 cup panko breadcrumbs
- ½ cup grated Parmesan cheese
- 2 tablespoons ranch seasoning mix
Breading Station
- ½ cup all-purpose flour
- 2 large eggs
- ¼ cup whole milk
Seasonings
- 1 teaspoon garlic powder
- 1 teaspoon onion powder
- ½ teaspoon black pepper
- ½ teaspoon salt
- 3 tablespoons olive oil or melted butter
- Cooking spray
Instructions
- Prep the Chicken: Pound chicken breasts to an even thickness of about ¾ inch. Place each breast between two pieces of plastic wrap and use a meat mallet or heavy skillet to gently pound them. Pat chicken dry with paper towels.
- Set Up Breading Station: In the first shallow dish, add flour seasoned with a pinch of salt and pepper. In the second dish, whisk together eggs and milk until well combined. In the third dish, combine panko breadcrumbs, Parmesan cheese, ranch seasoning, garlic powder, onion powder, pepper, and salt. Drizzle olive oil or melted butter over the breadcrumb mixture and toss with a fork until crumbs are slightly moistened.
- Bread the Chicken: Dredge each chicken piece first in flour, shaking off excess. Then dip into the egg mixture, letting excess drip off. Finally, press firmly into the breadcrumb mixture, coating both sides and pressing crumbs in so they adhere well. Place on prepared baking sheet.
- Bake: Preheat oven to 400°F (200°C). Lightly spray the tops of breaded chicken with cooking spray. Bake for 20-25 minutes, or until internal temperature reaches 165°F (74°C) when checked with a meat thermometer in the thickest part. The coating should be golden brown and crispy.
- Rest and Serve: Let the chicken rest for 5 minutes after removing from the oven to allow juices to redistribute. Serve warm.
Notes
- Make sure chicken is completely dry before breading for best coating adhesion
- Don’t skip the flour step – it creates a “glue” for the coating
- Press breadcrumbs firmly onto chicken for even coverage
- Use a meat thermometer to ensure chicken reaches 165°F internal temperature
- For extra crispiness, use a wire rack on your baking sheet
- Can be made ahead – bread chicken up to 4 hours before baking
- Freezes well – freeze breaded (unbaked) chicken for up to 3 months
- Reheat in oven or air fryer to maintain crispy coating
Nutrition Facts
Per Serving (1 chicken breast):
- Calories: 385
- Protein: 42g
- Carbohydrates: 18g
- Fat: 14g
- Saturated Fat: 4g
- Cholesterol: 155mg
- Sodium: 680mg
- Fiber: 1g
- Sugar: 1g