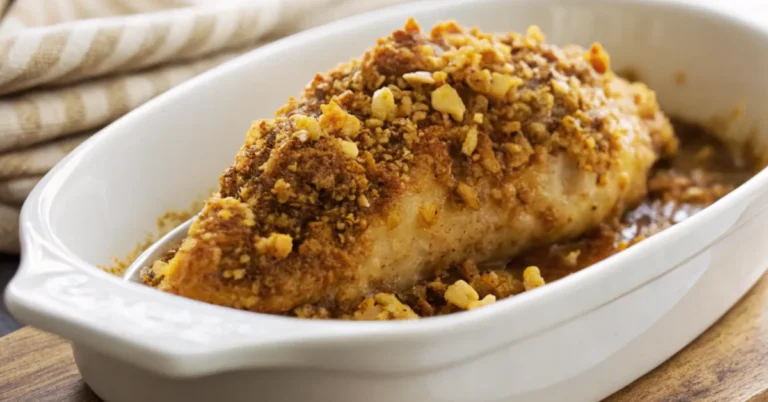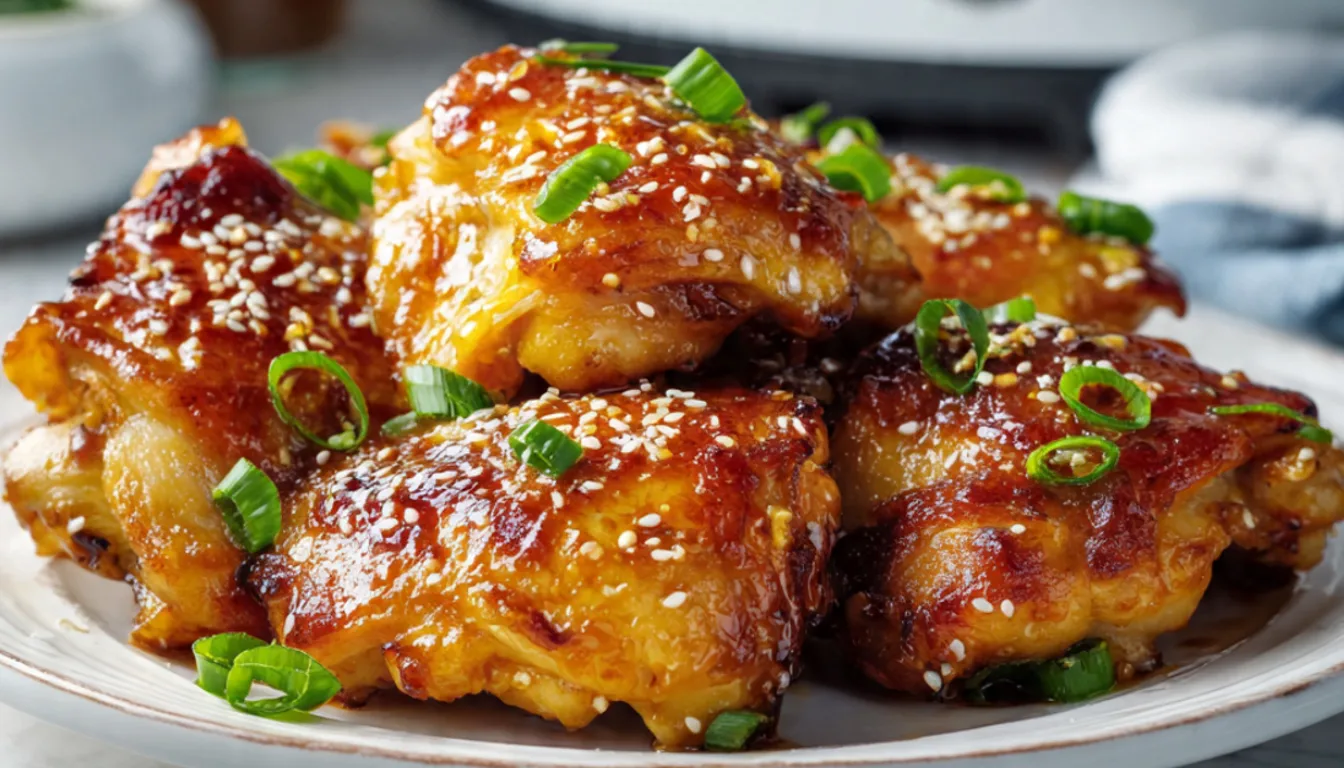
Air Fryer Honey Garlic Chicken – Glazed and Ready to Serve
You know what completely changed my weeknight dinner game? Getting an air fryer three years ago. I was skeptical at first (another kitchen gadget taking up counter space?), but this honey garlic chicken recipe alone justified every inch it occupies.
I stumbled onto this recipe during one of those frantic “what’s for dinner” moments we all have. I had chicken thighs in the fridge, honey in the pantry, and about 30 minutes before everyone started asking when food would be ready. What came out of that air fryer basket was so good that my family now requests it at least twice a month. The chicken gets this incredible caramelized crust while staying ridiculously juicy inside, and the sweet-savory glaze is honestly restaurant-quality.
Here’s the thing about air fryer chicken: it’s not just about speed (though 25 minutes total is pretty amazing). It’s about getting that crispy exterior without dealing with a splattered stovetop or heating up your whole kitchen with the oven. Plus, if you’re into meal prep like I am, you can make a double batch and have protein sorted for the week.
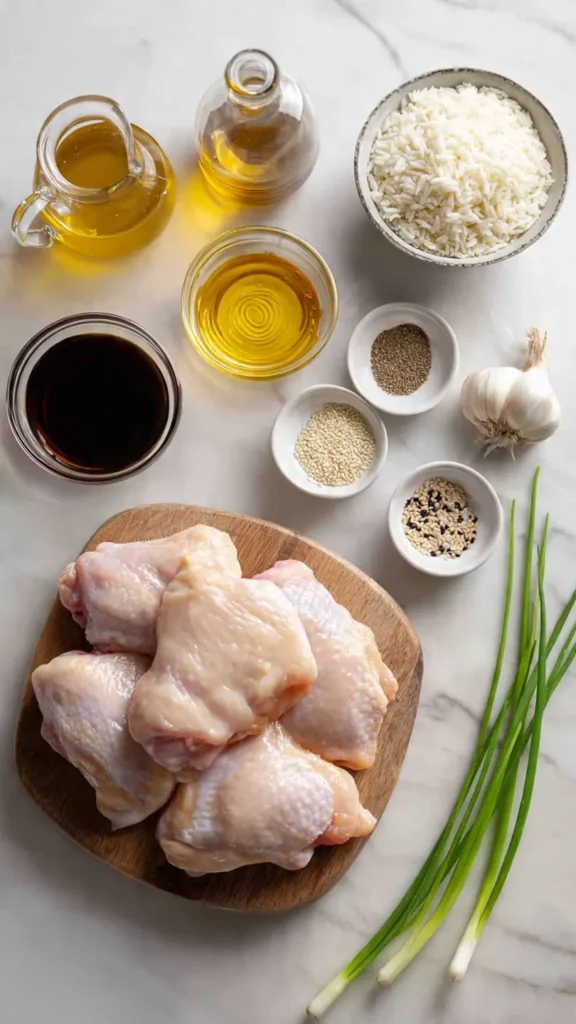
Essential Ingredients
For the Chicken:
- 2 lbs boneless, skinless chicken thighs (or breasts, but thighs are juicier)
- 2 tablespoons olive oil
- 1 teaspoon salt
- 1/2 teaspoon black pepper
- 1/2 teaspoon garlic powder
- 1/4 teaspoon paprika
For the Honey Garlic Sauce:
- 1/3 cup honey (I use local raw honey, but any works)
- 1/4 cup soy sauce (low sodium is best)
- 4 cloves fresh garlic, minced (or use a food processor to save time)
- 1 tablespoon rice vinegar
- 1 teaspoon sesame oil
- 1 teaspoon cornstarch mixed with 1 tablespoon water
- 1/4 teaspoon red pepper flakes (optional, for a tiny kick)
- 2 green onions, sliced (for garnish)
- 1 tablespoon sesame seeds (for garnish)
Alternative Ingredients
Listen, I’m all about working with what you have. Don’t let a missing ingredient stop you from making this.
Chicken: Boneless chicken breasts work fine, just reduce the cooking time by 2-3 minutes since they cook faster. Chicken drumsticks are great too, but add 5 minutes to the timer. I’ve even used this sauce on pork chops with excellent results.
Honey: Maple syrup or agave nectar can substitute in a pinch. The flavor profile shifts slightly, but it’s still delicious.
Soy Sauce: Tamari works if you’re gluten-free. Coconut aminos give a slightly sweeter, less salty result. In a real bind, I’ve used Worcestershire sauce mixed with a little water (it’s different, but tasty).
Fresh Garlic: Jarred minced garlic saves time. Use about 1.5 tablespoons. Garlic powder works in a desperate situation, but you’ll miss that fresh garlic punch.
Rice Vinegar: Apple cider vinegar or white wine vinegar both work. Even a squeeze of lemon juice gets the job done.
Step-by-Step Directions
Prep the Chicken (5 minutes):
Pat your chicken thighs completely dry with paper towels. This is crucial for getting that crispy exterior. Trust me, I learned this the hard way after making soggy chicken a few times. Mix the olive oil, salt, pepper, garlic powder, and paprika in a small bowl, then rub it all over the chicken pieces. Make sure every surface gets coated.
Preheat Your Air Fryer (3 minutes):
Set your air fryer to 380°F and let it preheat for 3 minutes. I have a Cosori air fryer, but I’ve made this in friends’ Ninja and Instant Pot air fryers with identical results. Preheating makes a real difference in getting that initial sear.
Cook the Chicken (15-18 minutes):
Arrange the chicken thighs in a single layer in the air fryer basket. Don’t overcrowd them or they’ll steam instead of crisp up. Depending on your air fryer size, you might need to work in batches. Cook for 8 minutes, flip the pieces over, and cook another 7-10 minutes until the internal temperature hits 165°F. I use an instant-read thermometer because guessing doneness is a recipe for dry chicken.
Make the Sauce (While Chicken Cooks):
In a small saucepan over medium heat, combine the honey, soy sauce, minced garlic, rice vinegar, and sesame oil. Bring it to a gentle simmer, stirring occasionally. Let it bubble for about 2 minutes so the garlic loses its raw edge. Add the cornstarch slurry (that’s the cornstarch mixed with water) and stir constantly for another minute until the sauce thickens to a glaze consistency. Remove from heat.
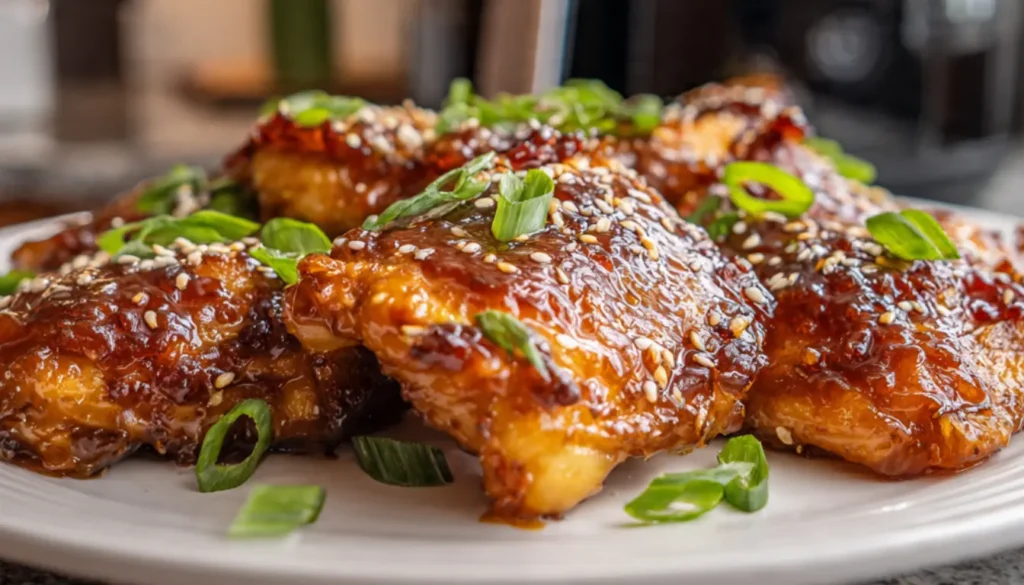
Glaze and Finish (2 minutes):
Once the chicken is cooked through, brush about half the sauce over the pieces. Pop them back in the air fryer for 2 minutes at 400°F to caramelize the glaze. This step is optional but creates this amazing sticky coating that’s absolutely worth it.
Serve:
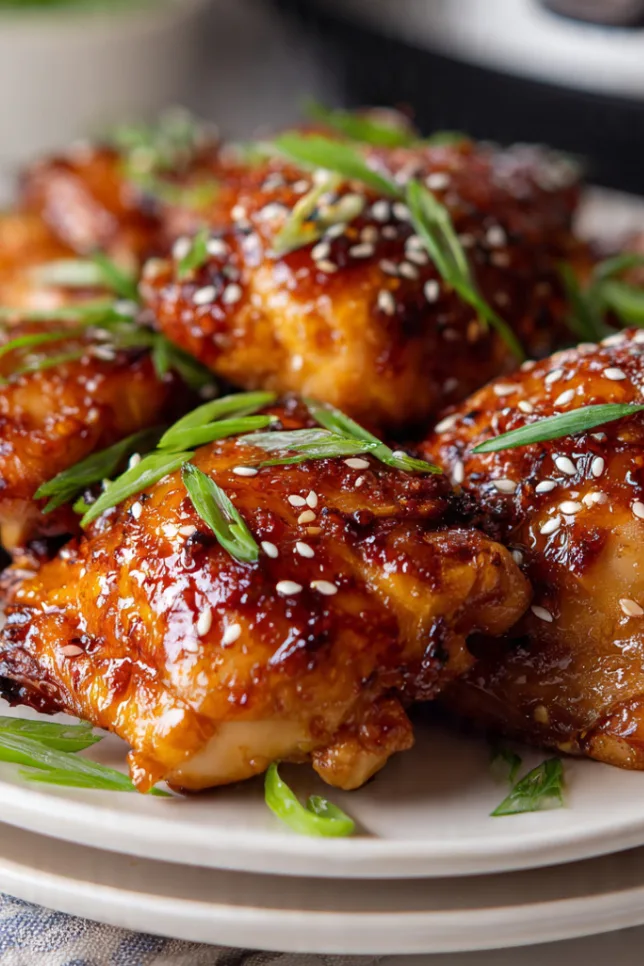
Transfer the chicken to a serving plate, drizzle with the remaining sauce, and sprinkle with sliced green onions and sesame seeds. I usually serve this over jasmine rice or with roasted vegetables, but it’s fantastic on its own too.
Pro Tips
The Marinade Trick: If you have extra time, marinate the chicken in the sauce for 30 minutes to 2 hours before cooking. The flavor penetration is incredible. I do this every Sunday during my meal prep sessions.
Batch Cooking: This recipe doubles beautifully. I often make extra and store it in meal prep containers with rice and steamed broccoli. It stays good in the fridge for 4 days and reheats perfectly.
Crispier Results: After glazing, if you want even more caramelization, give the chicken a quick 1-minute blast under the broiler. Just watch it closely so it doesn’t burn.
Sauce Thickness: If your sauce gets too thick, thin it with a tablespoon of water or chicken broth. Too thin? Simmer it longer or add a bit more cornstarch slurry.
Equipment Alternatives: No air fryer? You can make this in a regular oven. Bake at 425°F for 25-30 minutes, then broil for 2-3 minutes with the glaze. It won’t be quite as crispy, but it’s still delicious. A cast iron skillet also works great. Sear the chicken on both sides, then finish in a 400°F oven.
Frequently Asked Questions
Can I use chicken breasts instead of chicken thighs?
Yes. Chicken breasts cook slightly faster so reduce the air fryer time by a few minutes to keep them juicy.
How do I keep air fryer chicken juicy?
Pat the chicken dry before seasoning and avoid overcooking. Chicken thighs are naturally juicier and more forgiving.
Can I make honey garlic chicken without an air fryer?
Yes. Bake the chicken at 425°F for about 25 to 30 minutes, then broil briefly with the glaze to caramelize.
How long does honey garlic chicken last in the fridge?
Properly stored cooked chicken stays fresh for up to 4 days in the refrigerator.
Can I make this recipe gluten free?
Use tamari or coconut aminos instead of soy sauce for a gluten free version.
Recipe Info Table
| Detail | Info |
|---|---|
| Prep Time | 10 minutes |
| Cook Time | 20 minutes |
| Total Time | 30 minutes |
| Servings | 4 servings |
| Yield | 4 chicken thighs |
Why You’ll Love This Recipe
First off, it’s stupid easy. If you can measure ingredients and turn on an air fryer, you can make this. The active cooking time is maybe 10 minutes, and the rest is just letting the machine do its thing.
The flavor is ridiculously good for how simple it is. You get sweet from the honey, savory and umami from the soy sauce, aromatic notes from the fresh garlic and sesame, and just enough acid from the vinegar to balance everything out. It’s the kind of meal that makes people ask for the recipe.
Cleanup is minimal. One bowl for the chicken rub, one small pot for the sauce, and the air fryer basket. That’s it. On a busy weeknight, this matters more than fancy cooking techniques.
It works for multiple eating styles. Serve it over rice for a complete meal, pair it with vegetables for healthy eating goals, or slice it over salad greens for a lighter option. I’ve packed it in meal prep containers countless times, and it always makes lunch exciting instead of sad desk food.
What Makes This Recipe Unique
Most air fryer chicken recipes just season the chicken and call it done. This one takes it further with that honey garlic glaze. The two-stage cooking method (crisp first, then glaze) gives you the best of both worlds: crispy skin AND a sticky, flavorful coating.
The sauce isn’t just dumped on top. By simmering it separately and thickening it properly, you get this glossy glaze that clings to every piece of chicken instead of pooling at the bottom of the plate. That technique came from my years working in restaurant kitchens, and it makes all the difference.
Using chicken thighs instead of breasts (which most recipes call for) means you get juicier, more flavorful meat that’s harder to overcook. Thighs have more fat marbling, which is exactly what you want for air frying. Learn more about different cuts of chicken and how they cook.
Key Features
Quick Weeknight Friendly: 30 minutes from start to finish means you can make this after work without resorting to takeout.
Meal Prep Champion: Scales up easily, stores well, reheats beautifully. Check off all the boxes for Sunday meal prep.
Family Approved: Sweet enough for kids to love, sophisticated enough for adults to request. I’ve served this at dinner parties and weeknight family dinners with equal success.
Adaptable: Works with different proteins, cooking methods, and dietary modifications. The basic concept is solid enough to handle your tweaks.
Budget Friendly: Chicken thighs are one of the most affordable proteins, and the sauce ingredients are pantry staples. You’re looking at maybe $8-10 to feed four people generously.
Nutrition Facts Table
Per serving (1 chicken thigh with sauce):
| Nutrient | Amount |
|---|---|
| Calories | 320 |
| Total Fat | 14g |
| Saturated Fat | 3g |
| Cholesterol | 165mg |
| Sodium | 680mg |
| Total Carbohydrates | 21g |
| Dietary Fiber | 0g |
| Sugars | 18g |
| Protein | 28g |
Note: Nutrition facts are estimates based on standard ingredient measurements. Actual values may vary based on specific products used.
You’ll Also Love
If this honey garlic chicken hit the spot, try these similar recipes:
Air Fryer Teriyaki Salmon – Uses the same sweet-savory glaze concept but with fish. Ready in 15 minutes.
Korean BBQ Chicken Thighs – Another sticky, sweet air fryer chicken with a gochujang kick.
Crispy Orange Chicken – Takes a bit longer but delivers that takeout flavor at home.
Air Fryer Chicken Wings – Perfect for game day, uses similar cooking technique.
Sheet Pan Honey Garlic Shrimp – For when you want the same flavors but with seafood.
Conclusion
This air fryer honey garlic chicken has become one of those recipes I make without thinking. The ingredients are memorized, the timing is second nature, and I know exactly how it should look, smell, and taste at every stage. That’s what happens when you make something dozens of times because it’s just that good.
The beauty of recipes like this is their versatility. Make it exactly as written the first time, then start making it yours. Add more garlic if you’re a garlic fanatic (I am). Bump up the red pepper flakes if you like heat. Use whatever vegetables you have on hand. The core recipe is solid enough to handle your creativity.
And honestly? If you’re on the fence about getting an air fryer, recipes like this might just push you over the edge. It’s one of those kitchen tools that seems gimmicky until you use it regularly, then you wonder how you lived without it. Between this chicken, perfectly crispy vegetables, and reheating pizza without making it soggy, mine earns its counter space every single week.
Give this recipe a try next time you need dinner on the table fast. I’m betting it becomes a regular rotation in your house too.
Happy cooking!
Linda
Air Fryer Honey Garlic Chicken
Crispy air fryer chicken coated in a sticky honey garlic glaze that delivers sweet, savory, and garlicky flavor in every bite.
Ingredients
- 2 lbs boneless skinless chicken thighs
- 2 tbsp olive oil
- 1 tsp salt
- 1/2 tsp black pepper
- 1/2 tsp garlic powder
- 1/4 tsp paprika
- 1/3 cup honey
- 1/4 cup soy sauce
- 4 cloves garlic minced
- 1 tbsp rice vinegar
- 1 tsp sesame oil
- 1 tsp cornstarch mixed with 1 tbsp water
- 1/4 tsp red pepper flakes optional
- 2 green onions sliced
- 1 tbsp sesame seeds
Instructions
- Pat chicken dry and coat with olive oil, salt, pepper, garlic powder, and paprika.
- Preheat the air fryer to 380°F for 3 minutes.
- Cook chicken for 8 minutes, flip, then cook another 7 to 10 minutes until internal temperature reaches 165°F.
- Simmer honey, soy sauce, garlic, vinegar, and sesame oil. Stir in cornstarch slurry until thickened.
- Brush sauce over chicken and air fry 2 minutes at 400°F to caramelize.
- Drizzle remaining sauce on top and garnish with green onions and sesame seeds.