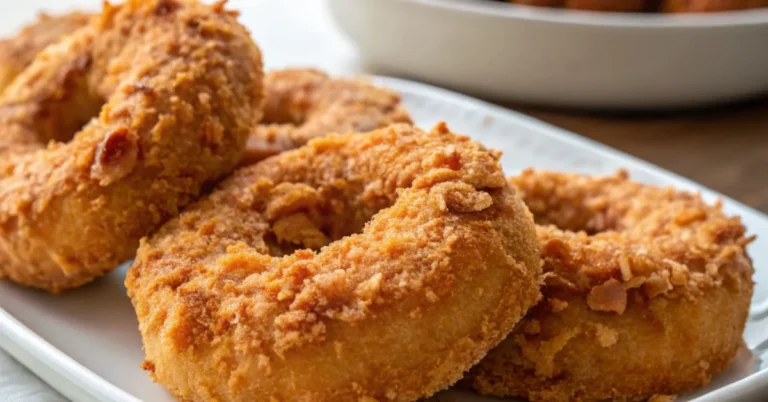
Extra Crispy Fried Chicken Recipe
You know what I remember from my early cooking days? Thinking fried chicken was something you could only get right at a restaurant. I’d spend $15 on a bucket from the chain down the street, convinced I could never replicate that crackly, golden crust at home. Then one Sunday afternoon, my grandmother pulled out her old cast iron skillet and showed me the real secret. Turns out, the best fried chicken isn’t complicated, but it does require a few tricks I wish I’d known years ago.
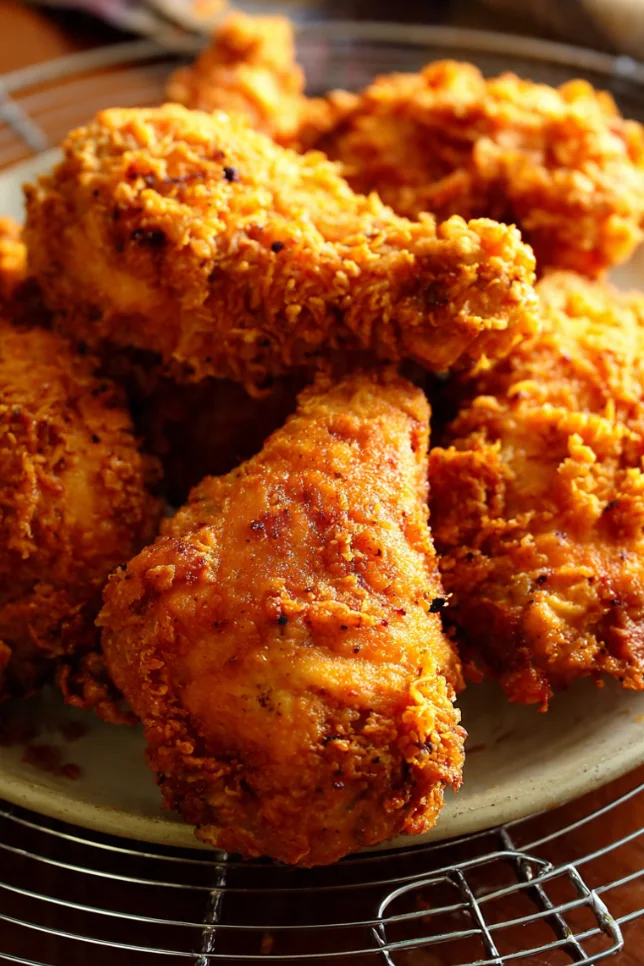
Here’s the thing about crispy fried chicken: it’s all about the double coating and getting your oil temperature just right. I’ve burned batches, ended up with soggy coatings, and once even set off my smoke alarm so badly the neighbors knocked on my door. But after a decade of testing different techniques (and yes, cleaning up plenty of grease splatters), I can finally say I’ve cracked the code.
This recipe gives you shatteringly crisp skin with juicy, perfectly seasoned meat inside. And honestly? It’s easier than you think. You don’t need any fancy equipment beyond a good heavy-bottomed pan. I’ll walk you through every step, including the mistakes I used to make so you can skip straight to the good part.
Essential Ingredients
For the Chicken:
- 3-4 pounds chicken pieces (drumsticks, thighs, breasts, wings)
- 2 cups buttermilk
- 2 tablespoons hot sauce
- 1 tablespoon salt
- 1 teaspoon black pepper
- 1 teaspoon garlic powder
For the Coating:
- 3 cups all-purpose flour
- 2 tablespoons cornstarch
- 1 tablespoon paprika
- 1 tablespoon garlic powder
- 1 tablespoon onion powder
- 2 teaspoons salt
- 1 teaspoon black pepper
- 1 teaspoon cayenne pepper (adjust to taste)
- 1 teaspoon dried thyme
- 1/2 teaspoon dried oregano
For Frying:
- Vegetable oil or peanut oil (about 3-4 cups, enough for 2 inches depth)
Alternative Ingredients
If you don’t have buttermilk, mix 2 cups whole milk with 2 tablespoons white vinegar and let it sit for 10 minutes. It’s not quite the same tang, but it gets the job done. I’ve also used regular milk in a pinch when I forgot to grab buttermilk at the store (happens more than I’d like to admit).
For the flour coating, you can swap half the all-purpose flour for rice flour if you want an even crispier texture. Some folks swear by adding crushed cornflakes to the mix, but I find that makes things a bit too crunchy for my taste. And if you’re watching the heat level, just skip the cayenne entirely or replace it with sweet paprika.
The cornstarch is actually crucial here. It creates this almost glass-like crisp coating that stays crunchy even after the chicken sits for a few minutes. Trust me on this one, I tested batches with and without it, and the difference is night and day.
Step-by-Step Directions
Step 1: Marinate the Chicken
In a large bowl or zip-top bag, combine buttermilk, hot sauce, salt, pepper, and garlic powder. Add your chicken pieces and make sure everything’s well coated. I usually do this the night before and let it sit in the fridge for at least 4 hours, but honestly, even 2 hours makes a huge difference. The acid in the buttermilk tenderizes the meat and helps that coating stick better.
Step 2: Prepare Your Coating Station
This is where being organized really pays off. Get two shallow dishes or pie plates. In the first one, pour about a cup of the seasoned buttermilk marinade (yes, reuse it). In the second, whisk together all your flour, cornstarch, and spices.
Here’s a trick I learned the hard way: make sure you mix those spices really well into the flour. My first few batches had uneven seasoning because I just dumped everything in and didn’t incorporate it properly. If you have a food processor, pulse it all together for 30 seconds to get it perfectly blended.
Step 3: Double Coat Your Chicken
Pull a piece of chicken from the marinade, let the excess drip off, then dredge it in the flour mixture. Really press it in there. Then, dip it back in the buttermilk, and coat it in flour again. This double dip is what creates those craggy, crispy bits that make fried chicken so addictive.
Set the coated pieces on a wire rack and let them rest for about 15 minutes before frying. This resting time lets the coating set up and adhere better. I used to skip this step when I was impatient, and the coating would slide right off in the oil. Not anymore.
Step 4: Heat Your Oil
Pour oil into your cast iron skillet or heavy pot until it’s about 2 inches deep. Heat it over medium-high heat to 350°F. This is where a thermometer really helps, but if you don’t have one, test it by dropping a small bit of flour in. If it sizzles immediately and rises to the surface, you’re ready.
The temperature thing is critical. Too hot, and your outside burns before the inside cooks. Too cool, and you end up with greasy, soggy chicken. I keep my thermometer clipped to the side of the pan the whole time and adjust the heat as needed.
Step 5: Fry in Batches
Don’t crowd the pan. I know it’s tempting to fit everything in at once, but that drops the oil temperature too much. Work in batches of 3-4 pieces, depending on your pan size.
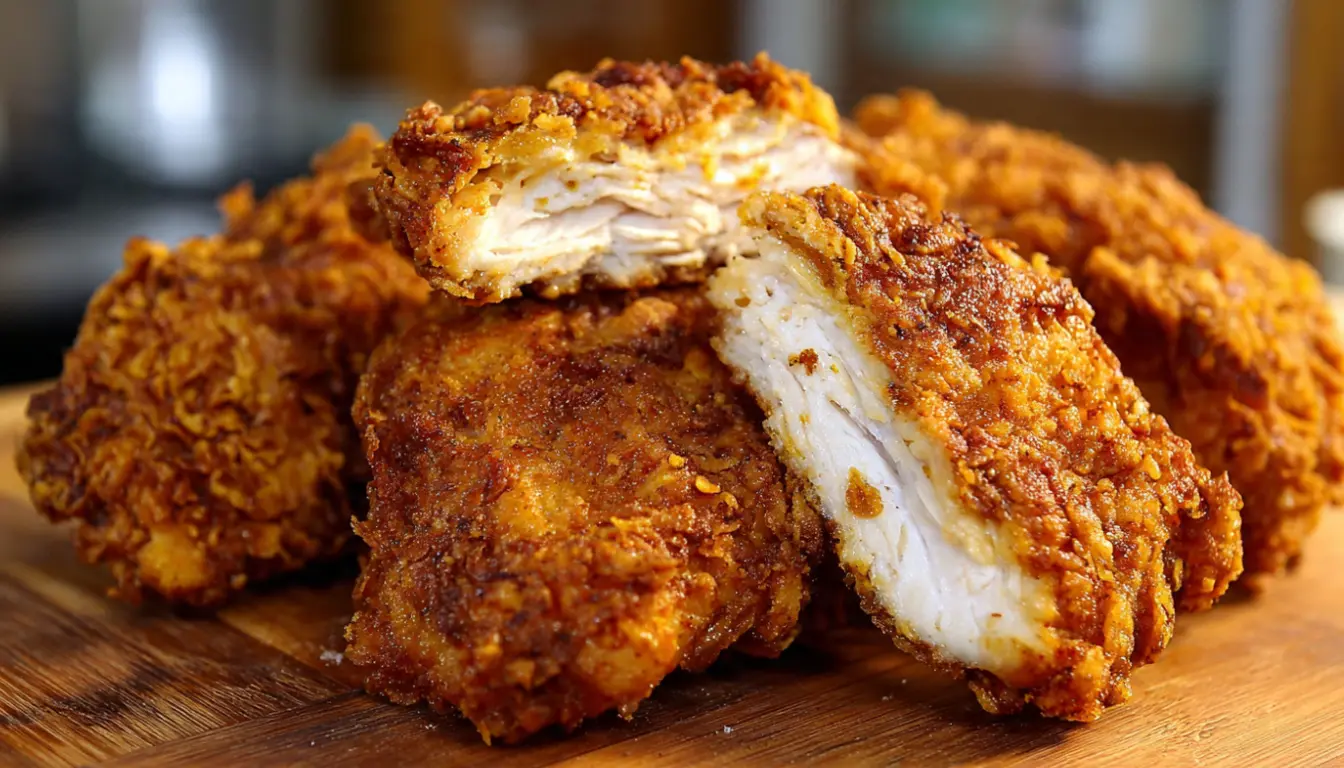
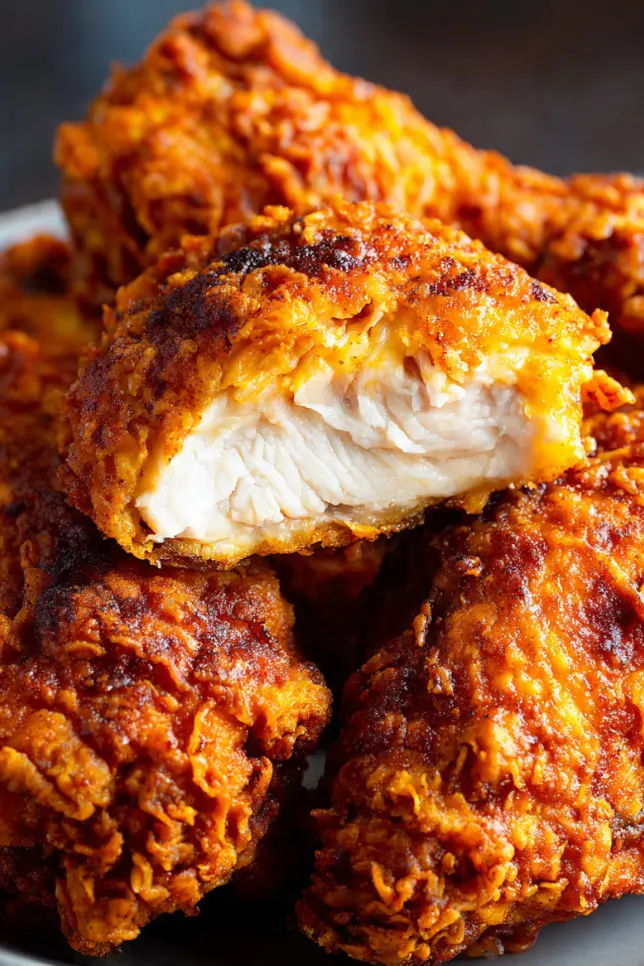
Carefully lower the chicken into the hot oil using tongs. It should sizzle like crazy, that’s what you want to hear. Fry for about 12-15 minutes for dark meat (thighs and drumsticks), flipping once halfway through. Breasts take a bit less, around 10-12 minutes. The internal temperature should hit 165°F, and the coating should be deep golden brown.
Step 6: Drain and Rest
Transfer the cooked chicken to a wire rack set over a baking sheet. Never use paper towels, they make the bottom steam and get soggy. Let it rest for 5 minutes before serving. The carryover heat will finish cooking it perfectly, and the coating will firm up even more as it cools slightly.
Pro Tips
After years of making fried chicken every which way, here are the things that actually matter:
The buttermilk marinade isn’t optional. I’ve tried making this with just a quick coating, and it’s never as good. The overnight soak makes the chicken incredibly tender and flavorful.
Keep your oil clean. If you’re frying multiple batches, scoop out any floating bits of coating between batches with a spider strainer. Those burnt bits will make your oil taste bitter and can affect the color of your next batch.
If you’re making this for meal prep (it actually keeps really well), you can reheat it in a 400°F oven for about 10 minutes. Some people swear by their air fryer for reheating, and honestly, that works great too. Just don’t use the microwave unless you want sad, rubbery chicken.
Season immediately when it comes out of the oil. I hit mine with a tiny sprinkle of flaky salt while it’s still piping hot. The salt sticks better and adds this extra pop of flavor.
Frequently Asked Questions
What makes fried chicken extra crispy?
A mix of flour and cornstarch combined with double coating creates a crunchy crust that fries into a golden crispy shell.
How long should chicken marinate in buttermilk?
At least 2 hours is recommended, though overnight marinating gives the best tenderness and flavor.
What oil is best for frying chicken?
Neutral high smoke point oils such as vegetable oil, peanut oil or canola oil work best.
How do you keep fried chicken crispy after cooking?
Always rest fried chicken on a wire rack rather than paper towels to prevent the coating from steaming.
Can fried chicken be reheated?
Yes. Reheat it in a hot oven at 400°F for about 10 minutes to restore crispiness.
Recipe Info Table
| Prep Time | Cook Time | Total Time | Servings | Yield |
|---|---|---|---|---|
| 4 hours (mostly marinating) | 30 minutes | 4.5 hours | 6-8 | 3-4 pounds chicken |
Why You’ll Love This Recipe
This isn’t your average fried chicken recipe. The double coating creates this incredibly crunchy exterior that stays crispy even after it sits for a while. I’ve made this for family gatherings and potlucks, and it’s always the first thing to disappear from the table.
The buttermilk marinade makes the chicken so tender and juicy that even the breast meat stays moist. And the spice blend is perfectly balanced, not too spicy but with enough flavor to keep things interesting. You can adjust the heat level to your liking, which means everyone from kids to spice lovers can enjoy it.
Plus, making fried chicken at home is so much cheaper than buying it from restaurants. A whole batch costs me about $12 in ingredients, compared to $20-30 for similar quality takeout.
What Makes This Recipe Unique
The cornstarch in the coating is what really sets this apart. Most traditional recipes just use flour, but adding cornstarch creates that signature Korean fried chicken style crispiness. It stays crunchy longer and has this delicate, shattery texture that you don’t get from flour alone.
The double dipping technique isn’t new, but the way I do it with the buttermilk dip between coatings creates these irregular, craggy surfaces that get extra crispy. Those little nooks and crannies are where all the flavor lives.
And unlike some recipes that call for deep frying in a Dutch oven with gallons of oil, this uses a more manageable amount in a regular skillet. Less waste, easier cleanup, and you can monitor the temperature more easily.
Key Features
Extra Crispy Coating: The combination of flour, cornstarch, and double coating creates maximum crunch
Juicy Interior: Buttermilk marinade keeps the meat tender and flavorful
Customizable Heat: Adjust the cayenne to your preference, from mild to spicy
Make-Ahead Friendly: Marinate overnight, fry when ready, or prep the whole batch for the week
Budget-Friendly: Costs about $2 per serving, much cheaper than restaurant fried chicken
No Special Equipment: Just a heavy skillet and a thermometer (or use the flour test if you don’t have one)
Nutrition Facts Table
Per serving (based on 8 servings):
| Nutrient | Amount |
|---|---|
| Calories | 420 |
| Total Fat | 24g |
| Saturated Fat | 5g |
| Cholesterol | 135mg |
| Sodium | 680mg |
| Total Carbohydrates | 18g |
| Dietary Fiber | 1g |
| Sugars | 2g |
| Protein | 32g |
Note: Nutrition information is approximate and will vary based on specific ingredients used and portion sizes.
You’ll Also Love
If you’re into crispy, flavorful chicken dishes, check out these other recipes:
- Buttermilk Biscuits (Perfect for making fried chicken sandwiches)
- Classic Coleslaw (The traditional side that cuts through all that richness)
- Southern Mac and Cheese (Because if you’re going all in on comfort food, might as well commit)
- Honey Butter (Drizzle this on your hot chicken for an amazing sweet-savory combo)
- Crispy Oven-Baked Wings (When you want that crunch without the frying mess)
Conclusion
Fried chicken has this reputation for being complicated or messy, but honestly? Once you get the technique down, it’s pretty straightforward. The key is just being patient with the marinade time and not rushing the frying process.
I make this at least once a month now, usually on Sundays when I have a bit more time to cook. Sometimes I’ll make a double batch and keep the extra pieces in the fridge for quick lunches throughout the week. Cold fried chicken is honestly one of life’s great pleasures, especially in a sandwich with some pickles and hot sauce.
The first time you pull that first piece out of the oil and see that perfect golden-brown coating, you’ll understand why this recipe is worth the effort. And when you bite into it and hear that satisfying crunch? That’s when you know you’ve nailed it.
So grab your cast iron skillet, set aside a Sunday afternoon, and give this recipe a try. Your kitchen might smell like a Southern cooking dream for a few hours, but trust me, it’s worth every delicious bite.
Extra Crispy Fried Chicken
Perfectly seasoned buttermilk fried chicken with a golden crunchy coating and juicy interior.
Ingredients
- 3 to 4 pounds chicken pieces
- 2 cups buttermilk
- 2 tablespoons hot sauce
- 1 tablespoon salt
- 1 teaspoon black pepper
- 1 teaspoon garlic powder
- 3 cups all purpose flour
- 2 tablespoons cornstarch
- 1 tablespoon paprika
- 1 tablespoon garlic powder
- 1 tablespoon onion powder
- 2 teaspoons salt
- 1 teaspoon black pepper
- 1 teaspoon cayenne pepper
- 1 teaspoon dried thyme
- 1/2 teaspoon dried oregano
- Vegetable oil for frying
Instructions
- Combine buttermilk, hot sauce, salt, pepper and garlic powder. Marinate chicken for at least 2 hours.
- Mix flour, cornstarch and all spices in a shallow dish.
- Dredge chicken in flour mixture, dip back into buttermilk, then coat again in flour.
- Rest coated chicken on a rack for 15 minutes.
- Heat oil in a skillet to 350°F.
- Fry chicken in batches for 10 to 15 minutes until golden brown and cooked through.
- Drain on a wire rack and rest 5 minutes before serving.