Cheesy Taco Sticks Recipe: Your New Go-To Party Appetizer
Look, I’ll be honest with you. The first time I made these cheesy taco sticks, it was purely out of desperation. I had about 30 minutes before my sister’s birthday party, zero party appetizers ready, and a refrigerator full of random ingredients. Fast forward to today, and I’ve made these things at least 50 times because everyone keeps asking for them.
What started as a panicked kitchen experiment became my most-requested recipe. And here’s the best part: they’re ridiculously easy to make. I’m talking about the kind of recipe where you can chat with friends, sip a glass of wine, and still pull off something that looks like you spent hours in the kitchen.
These taco sticks combine everything you love about tacos (the seasoned beef, melted cheese, crispy shell) but in a portable, finger-food format that doesn’t fall apart the second someone picks it up. No more taco shells crumbling everywhere or fillings sliding out the back. Just pure, cheesy, taco-flavored goodness wrapped in golden, flaky pastry.
Essential Ingredients
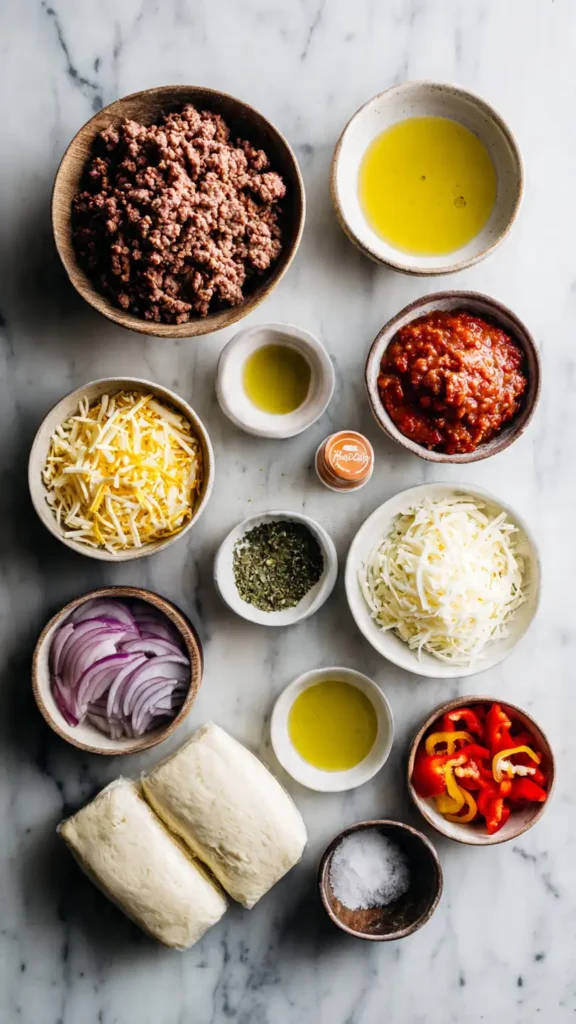
Let me walk you through what you’ll need for these beauties:
- 1 pound ground beef (80/20 works best for flavor)
- 1 packet taco seasoning mix (or 3 tablespoons homemade)
- 2 cups shredded Mexican cheese blend
- 1 package refrigerated pizza dough (13.8 oz)
- 1/4 cup diced onion
- 1/4 cup diced bell pepper (any color)
- 2 tablespoons olive oil
- 1/4 cup water
- 1 egg (for egg wash)
- Optional toppings: sour cream, salsa, guacamole, chopped cilantro
The beauty of this recipe is that most of these ingredients are probably already sitting in your pantry or fridge. I keep taco seasoning and pizza dough on hand specifically for last-minute situations like this.
Alternative Ingredients
Here’s where you can get creative and adapt this recipe to whatever you have available or your dietary preferences:
Meat alternatives: Ground turkey or chicken work perfectly if you’re trying to lighten things up. I’ve also made these with black beans for my vegetarian friends, and honestly, they disappeared just as fast. Crumbled tempeh or plant-based ground meat works surprisingly well too.
Cheese swaps: If you can’t find Mexican cheese blend, just combine equal parts cheddar and Monterey Jack. I’ve used pepper jack when I wanted extra heat, and it was fantastic. Mozzarella works in a pinch, though you’ll lose some of that authentic taco flavor.
Dough options: Can’t find pizza dough? Crescent roll dough actually works beautifully. I’ve even used puff pastry when I was feeling fancy. Each gives a slightly different texture, but they’re all delicious. If you’re working with an air fryer, the crescent dough tends to cook more evenly.
Seasoning: Instead of store-bought taco seasoning, you can mix 1 tablespoon chili powder, 1 teaspoon cumin, 1 teaspoon paprika, 1/2 teaspoon garlic powder, 1/2 teaspoon onion powder, 1/4 teaspoon oregano, and salt to taste. I started making my own after realizing I could control the sodium better.
Step-by-Step Directions
Alright, let’s get cooking. I’ve messed this up enough times to know exactly where things can go wrong, so I’ll guide you through it.
Step 1: Brown the beef Heat a large non-stick pan over medium-high heat. Add your ground beef and break it up with a wooden spoon or spatula. Here’s a tip I learned the hard way: don’t press down on the meat while it’s cooking. Just let it sit and brown properly. This takes about 5-7 minutes. You want it nicely browned with some crispy bits.
Step 2: Add veggies and season Toss in your diced onion and bell pepper. Cook for another 3-4 minutes until they soften. Drain any excess grease (I usually pour it into an old can), then stir in the taco seasoning and water. Let it simmer for about 5 minutes until the mixture thickens. The water helps the seasoning coat everything evenly. Remove from heat and let it cool slightly. This cooling step is important because if the filling is too hot, it’ll make your dough soggy.
Step 3: Prep your dough While the meat cools, roll out your pizza dough on a lightly floured surface. I usually work right on my kitchen counter after giving it a quick wipe. Roll it into a rectangle, roughly 12×16 inches. Using a pizza cutter or sharp knife, cut the dough into 8 equal rectangles. A pizza cutter makes this so much easier, trust me.
Step 4: Fill and fold Here’s where it gets fun. Place about 2-3 tablespoons of the meat mixture in the center of each rectangle. Top with a generous sprinkle of cheese (don’t be shy here). Fold the dough over lengthwise, then use a fork to crimp the edges closed. I press down firmly with the fork tines to make sure they’re sealed tight. Nothing’s worse than cheese leaking out during baking.
Step 5: Egg wash and bake Preheat your oven to 375°F. Line a baking sheet with parchment paper (saves so much cleanup time). Arrange your taco sticks on the sheet with about an inch between them. Beat that egg with a tablespoon of water and brush it over the tops. This gives them that beautiful golden color. If you’re using a cast iron skillet, you can arrange them in a circular pattern and bake them directly in the skillet for a rustic presentation.
Bake for 18-22 minutes until golden brown. The exact time depends on your oven, so start checking around 18 minutes. You want them golden and crispy, not pale and soft.

Pro Tips
Let me share some tricks I’ve picked up over the years:
Temperature matters: Make sure your filling is just warm, not hot. I learned this when my first batch turned into soggy, cheese-leaking disasters. If you’re in a rush, spread the cooked meat on a plate to cool it faster.
Seal them well: Use a fork to really press those edges together. I go over each edge twice just to be sure. Leaked cheese is delicious, but it makes a mess and you lose all that gooey goodness.
Freeze for later: These freeze beautifully. I make double batches and freeze half before baking. When you want them, just add 5-10 extra minutes to the baking time. No need to thaw. This is perfect for meal prep or when you know you’ll need quick appetizers.
Storage solutions: If you’re making these ahead, store them in meal prep containers with parchment paper between layers. They’ll keep in the fridge for up to 3 days. Using good quality airtight containers makes a huge difference in how long they stay fresh.
Air fryer option: Got an air fryer? These cook beautifully at 350°F for about 12-15 minutes. They come out even crispier than the oven version. Just make sure not to overcrowd the basket. Work in batches if needed.
Spice it up: Add sliced jalapeños to the filling, use hot salsa instead of regular, or mix some cayenne into the taco seasoning. I keep a few different spice levels when I’m serving these at parties.
FAQs
Can I make cheesy taco sticks ahead of time?
Yes, prepare them in advance and refrigerate or freeze until ready to bake.
Why are my taco sticks soggy?
Make sure the filling is cooled and not too wet before assembling.
Can I use crescent dough instead?
Absolutely, it creates a softer and flakier result.
How do I reheat leftovers?
Use an oven or air fryer for best texture. Avoid microwaving.
Why You’ll Love This Recipe
These taco sticks hit all the right notes. They’re crispy, cheesy, savory, and completely satisfying. Unlike regular tacos that require plates and napkins and still end up all over your lap, these you can eat with one hand while holding a drink with the other.
I love that they’re versatile enough for any occasion. I’ve served them at Super Bowl parties, packed them in lunch boxes, made them for casual dinners, and even brought them to potlucks. They work for everything. And because they’re finger food, kids absolutely love them. My nephew asks for them every time he visits.
The other thing I appreciate is how forgiving this recipe is. Forgot an ingredient? No problem. Want to add something extra? Go for it. Cooking is supposed to be fun, not stressful, and these taco sticks embody that philosophy perfectly.
What Makes This Recipe Unique
While there are plenty of taco-inspired appetizers out there, these taco sticks stand out because of their perfect ratio of filling to dough. I’ve tried similar recipes where you’re essentially eating bread with a tiny bit of filling, or ones that are so overstuffed they fall apart. This recipe hits that sweet spot.
The technique of par-cooking the filling ensures everything is properly seasoned and the excess moisture is cooked off. This prevents soggy dough and makes sure every bite is flavorful. A lot of recipes skip this step, but it makes a huge difference.
Another unique aspect is how well these hold up over time. I’ve had leftover taco sticks sit in my fridge for three days (though they rarely last that long) and they still taste great reheated. Try doing that with regular tacos. Using quality storage containers really helps maintain their texture when storing leftovers.
Key Features
- Ready in under 45 minutes from start to finish
- Portable and mess-free, perfect for parties or on-the-go eating
- Freezer-friendly for make-ahead convenience
- Customizable to any taste preference or dietary need
- Budget-friendly using simple, affordable ingredients
- Kid-approved and picky-eater friendly
- Versatile serving options as appetizers, snacks, or main dishes
- Minimal cleanup with one pan for cooking
You’ll Also Love
If these taco sticks hit the spot, you’ll want to check out some of my other crowd-pleasing recipes:
- Loaded Nacho Bites – Another party favorite with that perfect cheese pull
- Buffalo Chicken Rolls – Same concept, different flavor profile
- Pizza Pinwheels – My other go-to when I need something fast and impressive
Conclusion
I genuinely hope you love these cheesy taco sticks as much as my family and friends do. They’ve saved me more times than I can count when I needed something quick, delicious, and guaranteed to please a crowd.
The recipe is straightforward enough for beginners but delivers results that’ll have people thinking you’re some kind of culinary genius. And honestly, isn’t that the best kind of recipe? One that makes you look good without requiring a culinary degree?
Give them a try next time you’re hosting, need a quick dinner solution, or just want to treat yourself to something tasty. And if you have an air fryer, definitely experiment with that method. The results are incredible.
Let me know how they turn out for you. I’d love to hear if you put your own spin on them or discovered any new tricks. Happy cooking!
Cheesy Taco Sticks
Crispy, cheesy, and packed with bold taco flavor. Perfect for parties or quick dinners.
Ingredients
- 1 lb ground beef
- 1 packet taco seasoning
- 2 cups shredded cheese
- Pizza dough
- Onion and bell pepper
- Olive oil
- Egg
Instructions
- Brown the beef and cook vegetables.
- Add seasoning and simmer.
- Roll and cut dough.
- Fill, fold, and seal.
- Bake until golden.
Notes
Let filling cool before assembling. Seal edges tightly to prevent cheese leaks. Freeze unbaked for later use.