Oven-Fried Fish: Crispy, Flaky Perfection Without the Mess
You know that moment when you’re craving perfectly crispy fried fish but can’t deal with the oil splatters all over your stove? Yeah, me too. I spent years avoiding fried fish recipes at home because, honestly, the cleanup was worse than the cooking. Then I discovered oven-frying, and it completely changed my weeknight dinner game.
The beauty of oven-fried fish is simple. You get that golden, crunchy coating without standing over a pot of bubbling oil or scrubbing grease off your backsplash for an hour. It’s healthier, easier, and (here’s the kicker) it tastes just as good as the deep-fried version. Maybe even better, because you’re not weighed down by all that extra oil.
I remember the first time I tried making this. I was skeptical. How could baking possibly give me that satisfying crunch? But after testing different techniques and tweaking the process, I figured out the secret: high heat, the right coating, and a cast iron skillet or rimmed baking sheet that gets screaming hot in the oven. Game changer.
Essential Ingredients
Let me walk you through what you’ll need. Nothing fancy here, just smart choices that make all the difference.
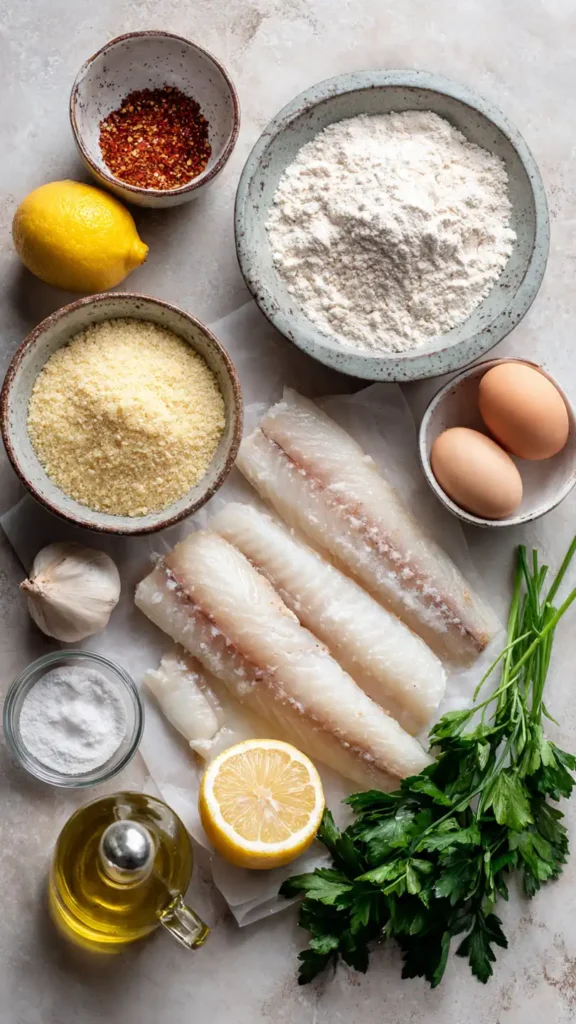
- 1.5 pounds white fish fillets (cod, haddock, or tilapia work great)
- 1 cup all-purpose flour
- 2 large eggs
- 1 cup panko breadcrumbs
- 1/2 cup regular breadcrumbs
- 1 teaspoon garlic powder
- 1 teaspoon paprika
- 1/2 teaspoon cayenne pepper (optional, if you like heat)
- 1 teaspoon salt
- 1/2 teaspoon black pepper
- 3 tablespoons olive oil or melted butter
- Lemon wedges for serving
- Fresh parsley (optional garnish)
The fish itself matters more than you’d think. I usually grab cod or haddock because they’re mild, flaky, and hold up well in the oven. Tilapia works if you’re on a budget. Just make sure the fillets are relatively uniform in thickness so they cook evenly.
Alternative Ingredients
Here’s where you can get creative based on what’s in your pantry or what dietary needs you’re working with.
For the fish: Catfish, pollock, or even salmon fillets work beautifully. I’ve done this with halibut when I’m feeling fancy, and it’s incredible. If you’re using a fattier fish like salmon, you might want to reduce the oil slightly.
For the coating: Swap regular breadcrumbs for crushed cornflakes if you want extra crunch. I’ve also used crushed crackers (Ritz work surprisingly well) when I’m out of breadcrumbs. For a gluten-free version, almond flour plus crushed rice cereal or gluten-free panko does the trick.
For the seasonings: No paprika? Use smoked paprika for a deeper flavor, or try Old Bay seasoning if you want that classic fish house taste. I sometimes throw in a pinch of dried dill or Italian seasoning depending on my mood.
Oil alternatives: If you’re watching calories, cooking spray works, but I find a light brush of olive oil gives better browning. Avocado oil is another great option if you have it on hand.
Step-by-Step Directions
Alright, let’s get into the actual cooking. This is easier than you think, I promise.
Step 1: Prep your oven and pan. Preheat your oven to 425°F. This is crucial. You need that high heat to get the coating crispy. While it’s heating, place a cast iron skillet or a heavy rimmed baking sheet in the oven. You want it hot when the fish goes on. This little trick mimics the effect of dropping fish into hot oil.
Step 2: Set up your breading station. Grab three shallow bowls or plates. In the first one, put your flour. In the second, beat your eggs with a tablespoon of water. In the third, mix your panko, regular breadcrumbs, garlic powder, paprika, cayenne, salt, and pepper. Drizzle the oil or melted butter over the breadcrumb mixture and toss it with a fork until everything’s evenly coated. This is the secret to getting that coating to brown beautifully.
Step 3: Bread the fish. Pat your fish fillets completely dry with paper towels. This step matters more than you’d think. Wet fish = soggy coating. Now dredge each fillet in flour, shaking off the excess. Dip it in the egg, letting the extra drip off. Finally, press it into the breadcrumb mixture, making sure both sides are well coated. I like to really press the crumbs on so they stick.
Step 4: Bake. Carefully remove your hot pan from the oven (use oven mitts, seriously). If you’re using a baking sheet, you can give it a light spray of cooking spray, but if it’s a well-seasoned cast iron skillet, you probably don’t need it. Place the breaded fillets on the hot pan, leaving a bit of space between each piece. Pop it back in the oven.
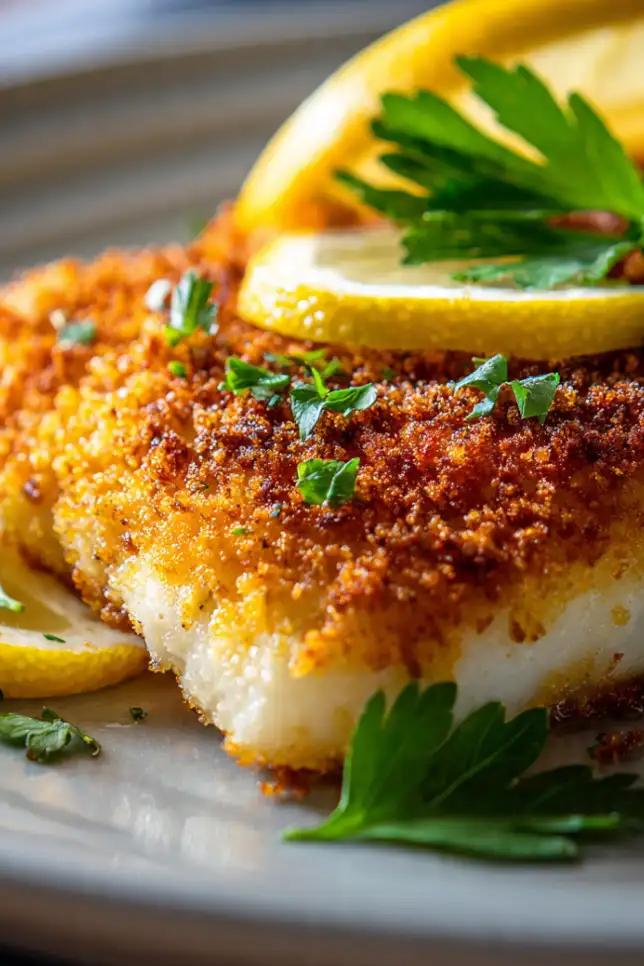
Step 5: Flip halfway. Bake for about 10-12 minutes, then carefully flip each fillet with a fish spatula. Those things are worth their weight in gold, by the way. If you don’t have one, a regular thin spatula works, just be gentle. Bake for another 10-12 minutes until the fish is golden brown and flakes easily with a fork.
The total cooking time depends on how thick your fillets are. Mine are usually done in about 20-22 minutes total, but start checking around 18 minutes if they’re on the thinner side.
Pro Tips
These are the little things I’ve learned through trial and error that make this recipe go from good to great.
Don’t skip the hot pan trick. I know it seems like an extra step, but putting fish on a cold pan will give you a soggy bottom. The hot surface starts crisping immediately.
Use a food processor for even breadcrumbs. If your panko is too coarse, pulse it a few times. You want texture, but not giant flakes that’ll fall off.
Season generously. Fish needs more seasoning than you think. I learned this the hard way after making bland oven-fried fish for a dinner party. Now I always taste my breadcrumb mixture before coating and adjust.
Let it rest. After you bread the fish, let it sit on a wire rack for 5-10 minutes before baking. This helps the coating set so it doesn’t slide off in the oven.
Storage made easy. Leftovers keep well in meal prep containers in the fridge for 2-3 days. Reheat in a 375°F oven for about 8-10 minutes to bring back some of that crispiness. Don’t microwave unless you want sad, rubbery fish.
Make it kid-friendly. Cut the fish into strips before breading for homemade fish sticks. Kids love them, and honestly, so do I. Perfect for dipping.
FAQs
Can I use frozen fish? Absolutely, but thaw it completely first and pat it very dry. Frozen fish tends to release more moisture, which can make your coating soggy. I usually let mine thaw in the fridge overnight.
What if I don’t have panko? Regular breadcrumbs work fine. You’ll get a slightly less crunchy coating, but it’s still delicious. Or try the cornflake trick I mentioned earlier.
Can I make this ahead? You can bread the fish up to 4 hours ahead and keep it in the fridge. Just let it come to room temperature for about 15 minutes before baking. I don’t recommend freezing breaded raw fish because the coating tends to get soggy when thawed.
How do I know when it’s done? The fish should flake easily with a fork and register 145°F on an instant-read thermometer. The coating should be golden brown all over.
Can I use an air fryer instead? Yes! Air fryers are basically convection ovens on steroids. Cook at 400°F for about 12-15 minutes, flipping halfway. Just don’t overcrowd the basket.
Why is my coating falling off? Usually, this means the fish was too wet when you breaded it, or you didn’t press the crumbs on firmly enough. Make sure to really pat that fish dry and press the coating on like you mean it.
Why You’ll Love This Recipe
Let me count the ways. First, it’s healthier than traditional fried fish without sacrificing that crispy texture we all crave. You’re using a fraction of the oil, which means fewer calories and less grease.
Second, the cleanup is a dream. No oil disposal, no scrubbing splattered grease off your stovetop, no lingering fish smell in your kitchen for days. Just one pan and your breading station.
Third, it’s versatile. You can season it however you want, use whatever white fish is on sale, and serve it a dozen different ways. Fish tacos one night, fish and chips another, or just a simple piece with roasted vegetables and rice.
And honestly? It’s foolproof. Even if you’ve never made fish before, this recipe is hard to mess up. The oven does most of the work for you.
What Makes This Recipe Unique
Unlike a lot of oven-fried fish recipes out there, this one actually delivers on the “fried” promise. The secret is in the details: the hot pan, the combination of panko and regular breadcrumbs, and coating the breadcrumbs with oil before baking.
I also don’t use a ton of fancy equipment. No need for an air fryer or a convection oven setting (though both help if you have them). Just a regular oven, a good pan, and a little technique.
Plus, I’ve tested this recipe with different types of fish, different coatings, and different seasonings. What you’re getting here is the version that actually works, not just a theory that sounds good on paper.
Key Features
Healthier Preparation: Uses minimal oil compared to deep frying while maintaining that crispy exterior.
Quick Weeknight Meal: From start to finish, you’re looking at under 40 minutes. Perfect for busy weeknights when you want something better than takeout.
Budget-Friendly: Fish fillets, especially cod or tilapia, are affordable. The rest of the ingredients are pantry staples.
Family-Approved: Even picky eaters tend to love crispy fish. Make it into fish sticks for the kids, and they won’t even know they’re eating something healthy.
Meal Prep Friendly: Bread several fillets at once and store in meal prep containers. You’ve got lunch sorted for days.
Adaptable Flavors: Change up the seasonings to match whatever cuisine you’re craving. Go Cajun, go Mediterranean, go Asian-inspired. The base technique stays the same.
You’ll Also Love
If you’re into this oven-fried fish, you’ll definitely want to try these other recipes on my blog:
- Crispy Baked Chicken Tenders: Same technique, different protein. Kids go crazy for these.
- Lemon Garlic Roasted Vegetables: The perfect side dish to serve alongside your fish.
- Homemade Tartar Sauce: Because oven-fried fish deserves better than store-bought sauce.
Conclusion
Here’s the thing about oven-fried fish. Once you nail this technique, you’ll wonder why you ever dealt with the mess of deep frying. It’s one of those recipes that seems too good to be true, but it actually delivers.
I make this at least twice a month now, sometimes more if I find a good sale on fish. It’s become my go-to for quick dinners, meal prep, and even when I have guests over (because who doesn’t love crispy fish?).
Give it a try this week. Start with a simple white fish like cod, follow the steps, and don’t skip the hot pan trick. I think you’ll be surprised at how well this works. And if you end up loving it as much as I do, let me know what variations you come up with. I’m always looking for new ways to jazz it up.
Happy cooking, and here’s to crispy fish without the oil splatter guilt!
Oven-Fried Fish
Crispy, golden-brown fish with a crunchy breadcrumb coating. All the flavor of fried fish with a fraction of the oil.
Ingredients
Main Ingredients
- 1.5 pounds white fish fillets (cod, haddock, or tilapia)
- 1 cup all-purpose flour
- 2 large eggs
- 1 cup panko breadcrumbs
- 1/2 cup regular breadcrumbs
Seasonings
- 1 teaspoon garlic powder
- 1 teaspoon paprika
- 1/2 teaspoon cayenne pepper (optional)
- 1 teaspoon salt
- 1/2 teaspoon black pepper
- 3 tablespoons olive oil or melted butter
For Serving
- Lemon wedges
- Fresh parsley (optional)
Instructions
- Preheat oven and pan Preheat your oven to 425°F. Place a cast iron skillet or heavy rimmed baking sheet in the oven to heat up while you prepare the fish. This creates a hot surface that mimics deep frying.
- Set up breading station Prepare three shallow bowls. Fill the first with flour, the second with beaten eggs mixed with 1 tablespoon water, and the third with panko breadcrumbs, regular breadcrumbs, garlic powder, paprika, cayenne, salt, and pepper. Drizzle oil or melted butter over the breadcrumb mixture and toss to coat evenly.
- Prepare fish fillets Pat fish fillets completely dry with paper towels. This is crucial for getting the coating to stick and stay crispy.
- Bread the fish Dredge each fillet in flour and shake off excess. Dip in egg mixture, letting excess drip off. Press into breadcrumb mixture, coating both sides thoroughly. Press firmly so the crumbs really adhere to the fish.
- Place fish on hot pan Carefully remove the hot pan from the oven using oven mitts. Place breaded fillets on the hot pan with space between each piece. The sizzle is what you want!
- Bake first side Bake for 10-12 minutes until the bottom is golden brown.
- Flip and finish baking Carefully flip each fillet with a fish spatula. Return to oven and bake for another 10-12 minutes until fish is golden brown, flakes easily with a fork, and reaches an internal temperature of 145°F.
- Serve immediately Remove from oven and serve hot with lemon wedges and fresh parsley if desired. The coating is crispiest right out of the oven.
Chef’s Notes
For extra crunch, use only panko breadcrumbs instead of mixing with regular breadcrumbs. The hot pan technique is essential for crispy results – don’t skip preheating it! Leftovers can be stored in airtight meal prep containers in the refrigerator for 2-3 days. Reheat in a 375°F oven for 8-10 minutes to restore crispiness. For a kid-friendly version, cut fish into strips before breading to make homemade fish sticks. Works perfectly in an air fryer too – cook at 400°F for 12-15 minutes, flipping halfway.