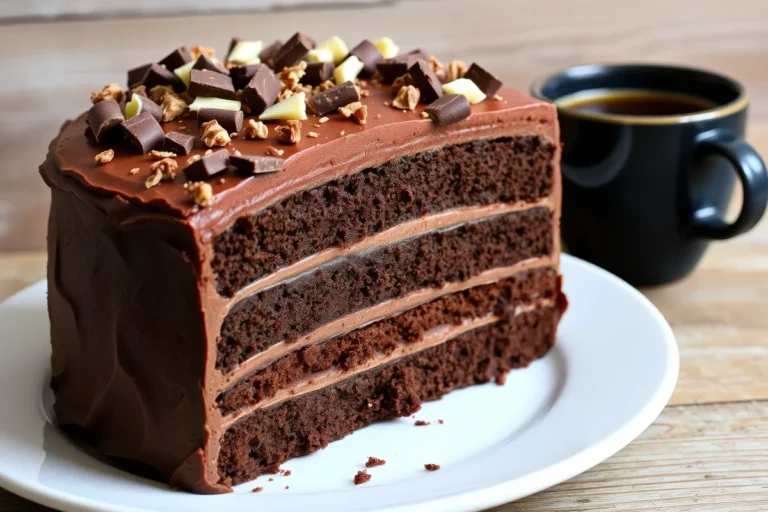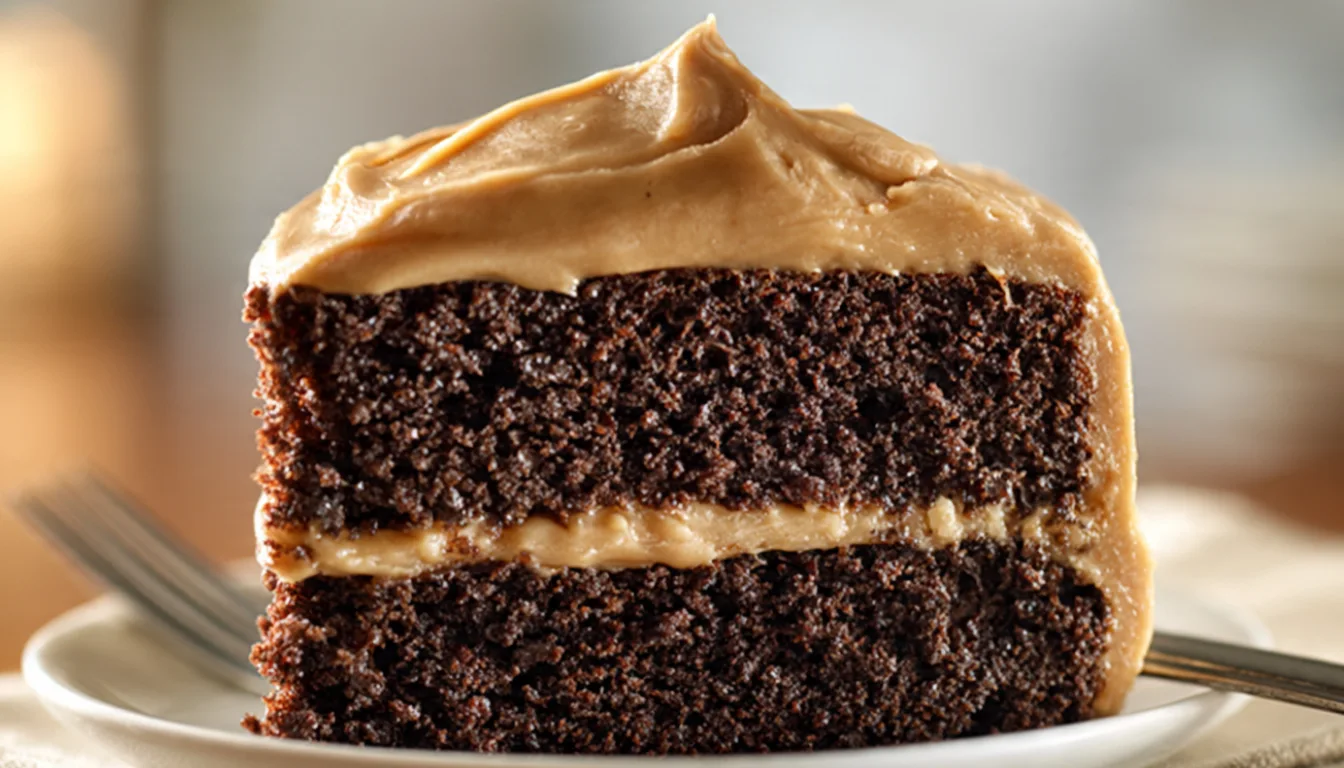
Chocolate Cake with Peanut Butter Frosting
Introduction
I have been making this chocolate cake with peanut butter frosting for close to ten years now, and I can tell you without any hesitation that it is the most requested recipe I have ever put on this blog. Every birthday, every potluck, every casual Sunday dinner where I show up with this cake, someone corners me before I even get my coat off asking how I made it.
But I want to be honest with you right from the start. My first version of this cake was not good. The chocolate flavor was flat, the crumb was dry around the edges, and the peanut butter frosting turned into this thick, gummy paste that practically ripped the top layer off the cake when I tried to spread it. I followed a recipe I found online and thought I was doing everything right. I was not.
It took me a few rounds of testing before I figured out what was actually missing. Turns out the secret to a deeply chocolatey cake is not more cocoa powder. It’s brewed coffee. And the secret to peanut butter frosting that actually spreads smoothly and stays soft is butter and heavy cream. Both of those discoveries changed everything for me, and now this cake comes together in about an hour and never disappoints.
You do not need a professional KitchenAid stand mixer to pull this off, though I will say mine makes the frosting incredibly smooth and silky with minimal effort. A regular hand mixer works perfectly fine here. What matters more than equipment is using good cocoa powder, not rushing the cooling time, and not skimping on the peanut butter.
Let’s get into it.
Why You’ll Love This Recipe
This cake is genuinely moist for three days at room temperature. Not just the first day, not only if you seal it perfectly. Three days. The buttermilk and oil in the batter keep the crumb tender without making it dense or greasy, and the layers bake up flat enough that stacking them is not a stressful exercise.
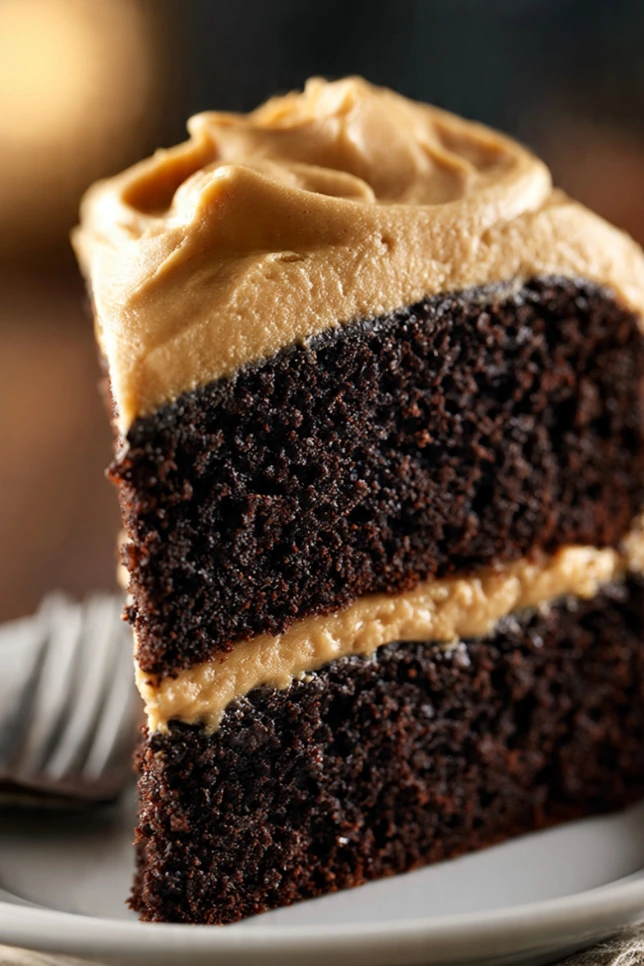
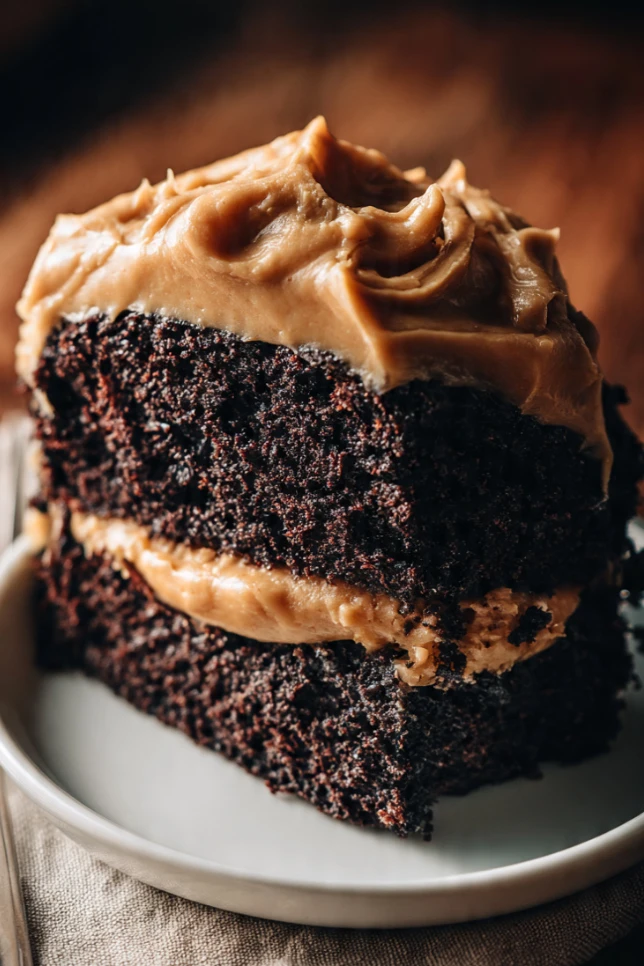
The flavor is also really well balanced. The cake itself is deeply chocolatey without tipping into bitter, and the peanut butter frosting is rich and slightly salty in a way that cuts through the sweetness perfectly. That salty-sweet thing is what keeps people going back for a second slice even when they said they were done.
And practically speaking, this recipe uses ingredients you almost certainly already have in your pantry. No specialty chocolate bars, no almond flour, no obscure baking supplies. Just the basics done really well.
What Makes This Recipe Unique
Most chocolate cake recipes tell you to use hot water to bloom the cocoa powder. I use strong brewed coffee instead. The coffee does not make your cake taste like coffee at all. What it does is amplify the chocolate flavor in a way that hot water simply cannot. I did a side by side comparison once, made both versions the same week, and the coffee version won every single taste test. That is the one thing I will never change about this recipe.
The peanut butter frosting is also different from what you will find on most recipe sites. A lot of recipes are just peanut butter and powdered sugar, which gives you something stiff and dense. I add softened butter and heavy cream, which transforms it into something whipped and spreadable that does not harden into a shell after you frost the cake. When you slice through it, the frosting gives cleanly instead of dragging.
Key Features
- Made completely from scratch with pantry staples
- Moist crumb that stays soft for three days
- Coffee in the batter for deeper chocolate flavor
- Whipped peanut butter frosting that stays soft and spreadable
- Freezer friendly, both layers and finished slices
- Works as a layer cake or cupcakes
- No fancy tools required
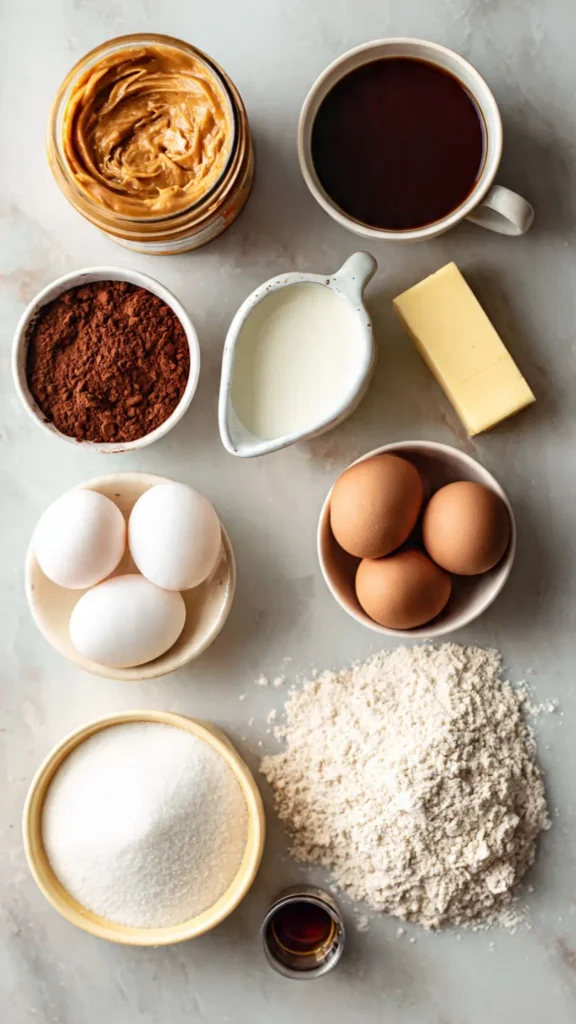
Essential Ingredients
For the Chocolate Cake:
- 2 cups all-purpose flour
- 2 cups granulated sugar
- 3/4 cup unsweetened cocoa powder (Dutch-process preferred)
- 2 teaspoons baking soda
- 1 teaspoon baking powder
- 1 teaspoon salt
- 2 large eggs, room temperature
- 1 cup buttermilk, room temperature
- 1 cup strong brewed coffee, cooled completely
- 1/2 cup vegetable oil
- 2 teaspoons pure vanilla extract
For the Peanut Butter Frosting:
- 1 cup creamy peanut butter (commercial style, not natural)
- 1/2 cup unsalted butter, softened to room temperature
- 2 and 1/2 cups powdered sugar, sifted
- 1/3 cup heavy cream
- 1 teaspoon vanilla extract
- 1/4 teaspoon salt
Alternative Ingredients
No buttermilk in the fridge? Add one tablespoon of white vinegar or lemon juice to one cup of regular whole milk, stir it, and let it sit for five minutes. That is your buttermilk substitute and it works just as well in this recipe. I use this swap probably once a month.
For the oil, melted coconut oil works if that is what you have on hand. It adds a very faint coconut note but nothing overpowering. Canola oil is the most neutral option if you want zero flavor interference.
For the frosting, I really do recommend using commercial creamy peanut butter like Jif or Skippy rather than natural peanut butter. Natural peanut butter separates and makes the frosting looser and harder to control. If natural is all you have, make sure it is stirred very well and add a tablespoon or two of extra powdered sugar to help it hold.
Want to make it dairy free? Swap the buttermilk for oat milk with a splash of apple cider vinegar, use vegan butter in the frosting, and replace the heavy cream with full-fat coconut cream. The texture is slightly different but still really enjoyable. I have made this version for friends with dairy sensitivities and gotten great feedback.
Step-by-Step Directions
Step 1: Prep your oven and pans
Preheat your oven to 350 degrees Fahrenheit. Grease two 9-inch round cake pans, line the bottoms with parchment paper circles, then grease the parchment too. This sounds like overkill but it guarantees your layers will release cleanly every time.
Step 2: Combine the dry ingredients
In a large mixing bowl, whisk together the flour, sugar, cocoa powder, baking soda, baking powder, and salt. Whisk for a solid 30 seconds so everything is completely combined before the wet ingredients go in.
Step 3: Mix the wet ingredients
In a separate bowl, whisk together the eggs, buttermilk, cooled brewed coffee, vegetable oil, and vanilla extract until smooth. Make sure your coffee is fully cooled before it goes in. Hot liquid can start cooking the eggs and you end up with a lumpy batter.
Step 4: Make the batter
Pour the wet ingredients into the dry ingredients. Using your stand mixer or hand mixer, beat on medium speed for about two minutes until the batter is smooth. It will be thin and pourable. That is completely normal and actually a good sign. Thin batter means a moist cake.
Step 5: Bake
Divide the batter evenly between your two prepared pans. I usually use a kitchen scale to get them exactly equal. Bake for 33 to 35 minutes, until a toothpick inserted into the center comes out clean or with just one or two moist crumbs. Don’t overbake. That’s how you end up with a dry cake.
Step 6: Cool completely
Let the cakes cool in the pans for 10 minutes, then run a thin knife around the edges and flip them out onto a wire cooling rack. Let them cool completely before you frost them. I made the mistake of frosting a warm cake exactly once. The frosting slid off the sides and pooled at the bottom and the whole thing looked like a disaster. Cool completely means at least 30 minutes. I usually wait an hour.
Step 7: Make the peanut butter frosting
Beat the peanut butter and softened butter together on medium-high speed for three full minutes until the mixture is light and fluffy. Add the powdered sugar one cup at a time, alternating with splashes of heavy cream. Add the vanilla and salt. Then beat on high for two more minutes. The frosting should be smooth, creamy, and spreadable, not stiff. If it feels too thick, add heavy cream one teaspoon at a time until you get the right consistency.
Step 8: Assemble and frost
Place the first cake layer on your serving plate or a cake stand. Spread a generous layer of peanut butter frosting across the top. Set the second layer on top and press gently to level it. Frost the top and sides of the cake. An offset spatula makes this much easier. If you don’t have one, the back of a large spoon works fine. It just takes a little more patience.
Pro Tips
Room temperature ingredients matter more than most people think. Cold eggs and cold buttermilk don’t incorporate as smoothly, and the batter can end up slightly curdled looking. Pull your eggs and buttermilk out of the fridge about 30 minutes before you start.
Do not overmix the batter once the wet and dry ingredients are combined. Two minutes on medium is enough. Overmixing develops gluten and makes the cake tough instead of tender.
For the frosting, use regular commercial peanut butter. The stabilizers help it hold shape and stay smooth. Natural peanut butter can make the frosting too loose and unpredictable.
An offset spatula or a bench scraper makes frosting the sides of the cake dramatically easier. If you bake cakes with any regularity, an offset spatula is worth getting. It’s inexpensive and you’ll use it constantly.
For clean slices, run your knife under hot water and wipe it clean between cuts. It makes a visible difference in how the slices look.
If you’re making this ahead, you can wrap the unfrosted layers tightly in plastic wrap and store them at room temperature for up to 24 hours before frosting. The fully frosted cake keeps well covered at room temperature for three days.
FAQs
Can I make this cake ahead of time? Yes, and the flavor actually improves overnight. Bake the layers, wrap them tightly, and store at room temperature for up to a day before frosting. The finished frosted cake keeps for three days at room temperature or five days in the fridge.
Can I freeze this cake? Absolutely. Wrap unfrosted layers in plastic wrap then foil and freeze for up to two months. Thaw overnight in the fridge before frosting. Individual frosted slices freeze well too in an airtight container. Let them come to room temperature before eating.
What cocoa powder should I use? Dutch-process cocoa gives the deepest, richest chocolate flavor and the darkest color. Natural unsweetened cocoa also works and gives a slightly brighter, more acidic chocolate taste. Both are good. I reach for Dutch-process when I have the choice.
Can I make this as cupcakes? Yes. Fill lined cupcake tins two-thirds full and bake at 350 degrees for 18 to 20 minutes. This recipe makes about 24 standard cupcakes. The frosting amount is generous enough to pipe on all of them.
My frosting is too thick. What do I do? Add heavy cream one teaspoon at a time and beat between additions until it reaches the right consistency. Add slowly because it can get loose quickly if you add too much at once.
My frosting is too runny. What do I do? Add powdered sugar one tablespoon at a time, beat, and check the consistency. It should firm up fairly quickly.
You’ll Also Love
- Peanut Butter Cookies from Scratch
- No-Bake Chocolate Peanut Butter Bars
- Fudgy Brownies with Sea Salt
- Classic Banana Bread with Chocolate Chips
- Vanilla Layer Cake with Buttercream Frosting
- Chocolate Chip Cookie Dough Ice Cream
Conclusion
This is the chocolate cake I come back to again and again because it works every single time. The coffee trick makes the chocolate flavor richer than anything I have found using hot water, and the whipped peanut butter frosting is the kind of thing people scrape off the plate with their fork after the slice is gone.
If you take one thing away from this recipe, let it be this: let the cake cool all the way before frosting, and use brewed coffee in the batter. Everything else is flexible. Taste as you go, adjust the frosting to your preference, and don’t stress if the layers aren’t perfectly level. That’s what a generous layer of frosting is for.
If you make this cake, leave a comment below and tell me how it went. I read every single one.
Chocolate Cake with Peanut Butter Frosting
A rich and incredibly moist chocolate cake made with brewed coffee for deeper flavor and topped with a creamy peanut butter frosting that stays soft and fluffy.
Ingredients
Chocolate Cake
- 2 cups all-purpose flour
- 2 cups granulated sugar
- 3/4 cup unsweetened cocoa powder
- 2 teaspoons baking soda
- 1 teaspoon baking powder
- 1 teaspoon salt
- 2 large eggs
- 1 cup buttermilk
- 1 cup strong brewed coffee, cooled
- 1/2 cup vegetable oil
- 2 teaspoons vanilla extract
Peanut Butter Frosting
- 1 cup creamy peanut butter
- 1/2 cup unsalted butter, softened
- 2 1/2 cups powdered sugar, sifted
- 1/3 cup heavy cream
- 1 teaspoon vanilla extract
- 1/4 teaspoon salt
Instructions
- Prepare the pans: Preheat oven to 350°F. Grease and line two 9-inch cake pans with parchment paper.
- Mix dry ingredients: Whisk together flour, sugar, cocoa powder, baking soda, baking powder, and salt.
- Mix wet ingredients: Combine eggs, buttermilk, cooled coffee, vegetable oil, and vanilla extract.
- Make the batter: Add wet ingredients to dry ingredients and beat until smooth.
- Bake: Divide batter evenly between pans and bake for 33 to 35 minutes.
- Cool: Let cakes cool in pans for 10 minutes, then transfer to a cooling rack until completely cooled.
- Prepare frosting: Beat peanut butter and butter until fluffy. Add powdered sugar alternately with cream. Mix in vanilla and salt.
- Assemble: Frost between cake layers, then cover the top and sides of the cake.
Notes
Use brewed coffee instead of hot water for deeper chocolate flavor. Allow cake layers to cool completely before frosting. For the smoothest frosting, use commercial creamy peanut butter rather than natural peanut butter. The frosted cake stays fresh for up to 3 days when covered at room temperature.