Baked Stromboli Recipe
Introduction
I’ll never forget the first time I attempted stromboli in my tiny apartment kitchen. I was convinced it would be this complicated, professional-level thing that required years of Italian cooking expertise. Turns out, I was overthinking it. After making dozens of stromboli over the past decade, I’ve learned that this rolled, stuffed bread is actually one of the most forgiving recipes you can tackle, and it’s become my go-to when I need to feed a crowd without spending hours in the kitchen.
What I love about stromboli is how it masquerades as fancy restaurant food while being ridiculously practical. You can prep it ahead, customize the fillings to whatever you have on hand, and it reheats like a dream. I started making these for meal prep on Sundays, and honestly, having slices ready to grab throughout the week has been a game changer for busy workdays.
The key difference between stromboli and its cousin calzone is simple: stromboli is rolled like a log and sliced into portions, while calzone is folded into a half-moon. Both are delicious, but stromboli wins for presentation and portion control. Plus, you get those beautiful swirls of filling in every slice.
Essential Ingredients
For the dough:
- 3 cups all-purpose flour
- 1 cup warm water (about 110°F)
- 2 1/4 teaspoons active dry yeast (one packet)
- 2 tablespoons olive oil
- 1 tablespoon sugar
- 1 1/2 teaspoons salt
For the filling:
- 8 ounces sliced deli ham
- 8 ounces sliced salami or pepperoni
- 8 ounces sliced provolone cheese
- 8 ounces sliced mozzarella cheese
- 1/2 cup roasted red peppers, drained and patted dry
- 2 tablespoons Italian seasoning
- 1 egg, beaten (for egg wash)
- 2 tablespoons grated Parmesan cheese

Alternative Ingredients
The beauty of stromboli is its flexibility. I’ve made vegetarian versions with sautéed mushrooms, spinach, and ricotta that were honestly just as satisfying as the meat-packed original. You can swap the deli meats for rotisserie chicken, use different cheeses like fontina or asiago, or add fresh basil and sun-dried tomatoes for a Mediterranean twist.
If you’re avoiding gluten, I’ve had decent success using store-bought gluten-free pizza dough, though the texture is slightly different. For a lower-carb option, you could use a cauliflower-based dough, but be prepared for a more delicate roll that requires gentler handling.
Don’t have roasted red peppers? Jarred artichoke hearts or even sliced black olives work great. The goal is to have some kind of moisture and flavor punch beyond just meat and cheese.
Step-by-Step Directions
Make the dough: In a large bowl (or your stand mixer if you have one), combine the warm water, yeast, and sugar. Let it sit for about 5 minutes until it gets foamy. This is how you know your yeast is alive and ready to work. Add the flour, olive oil, and salt. Mix until a shaggy dough forms, then knead for about 8 minutes by hand or 5 minutes with a dough hook until the dough is smooth and elastic. I use my KitchenAid stand mixer for this step because it saves my arms, but hand kneading works perfectly fine.
Let it rise: Place the dough in a lightly oiled bowl, cover it with a clean kitchen towel, and let it rise in a warm spot for about an hour until doubled in size. I usually put mine in the oven with just the light on, which creates the perfect warm environment.
Prepare your workspace: Once the dough has risen, punch it down (this is oddly satisfying) and turn it out onto a lightly floured surface. Roll it into a large rectangle, about 12 by 16 inches. Don’t stress about perfect measurements here. You’re going for a roughly rectangular shape that’s about 1/4 inch thick.
Layer the fillings: Here’s where it gets fun. Leave about a 1-inch border around all the edges, then layer on your meats, cheeses, and vegetables. I like to start with a layer of cheese directly on the dough, then alternate meats and more cheese, finishing with the roasted peppers on top. This cheese-first method helps prevent the dough from getting soggy.
Roll it up: Starting from one of the long edges, roll the dough tightly like you’re making a jelly roll. Pinch the seam closed and tuck the ends under. This took me a few tries to get right. My first stromboli had gaps that leaked cheese everywhere, but I learned that really pinching that seam is critical.
Prepare for baking: Transfer your roll seam-side down onto a parchment-lined baking sheet. Brush the entire surface with the beaten egg and sprinkle with Parmesan and a bit more Italian seasoning. Use a sharp knife to cut 3 or 4 diagonal slits across the top. These vents let steam escape and prevent your stromboli from turning into a bread balloon.
Bake: Pop it into a preheated 400°F oven for 25 to 30 minutes until the crust is golden brown and the internal temperature reaches 190°F. If you have an instant-read thermometer, use it. Undercooked stromboli with raw dough in the middle is not fun.
Cool before slicing: This is the hardest part. Let the stromboli rest for at least 10 minutes before cutting into it. I know it smells incredible and you want to dive right in, but cutting too soon means all your cheese will run out and you’ll be left with a hollow bread log.
Pro Tips
Use parchment paper instead of greasing your baking sheet. It makes cleanup easier and prevents sticking without adding extra oil that can make the bottom soggy.
If you’re short on time, store-bought pizza dough works in a pinch. I’ve used it plenty of times when I needed stromboli but didn’t want to wait for dough to rise. Just make sure to let refrigerated dough come to room temperature for about 30 minutes before rolling.
For meal prep, I bake two stromboli at once, slice them up, and store portions in the fridge. They reheat beautifully in a 350°F oven for about 10 minutes. Way better than microwaving, which makes the crust rubbery.
Freeze unbaked stromboli for later. Assemble it completely, wrap it tightly in plastic wrap and then foil, and freeze for up to 3 months. Bake from frozen, adding about 10 extra minutes to the cook time.
FAQs
Can I make stromboli ahead of time?
Yes, assemble and refrigerate for up to 24 hours before baking.
Why is my stromboli soggy?
Too much moisture or poor sealing can cause sogginess.
Can I freeze stromboli?
Freeze unbaked stromboli for up to 3 months.
What is the difference between stromboli and calzone?
Stromboli is rolled, calzone is folded.
Recipe Info
| Detail | Information |
|---|---|
| Prep Time | 20 minutes |
| Rise Time | 1 hour |
| Cook Time | 30 minutes |
| Total Time | 1 hour 50 minutes |
| Servings | 6 to 8 |
| Yield | 1 large stromboli |
Why You’ll Love This Recipe
This stromboli hits that perfect sweet spot between comfort food and practical weeknight dinner. It’s impressive enough to serve to guests but easy enough to throw together when you’re tired. The leftovers actually taste better the next day, which is rare for bread-based dishes.
I love that you can customize it endlessly. Have picky eaters? Make half with just cheese and pepperoni, half loaded. Need to use up random deli meat from your fridge? Perfect vehicle for that. It’s also brilliant for feeding a crowd because you can slice it into as many or as few pieces as you need.
The portability factor is huge. These slices travel well in lunch containers, they’re sturdy enough for kids to eat without making a massive mess, and they work for breakfast, lunch, or dinner. I’ve eaten cold stromboli for breakfast more times than I’d like to admit, and I regret nothing.
What Makes This Recipe Unique
Unlike a lot of stromboli recipes that use store-bought dough or pizza dough as a shortcut, this one starts from scratch. The homemade dough has better flavor and a nicer texture. That said, I’m not precious about it. Use what works for your schedule.
The layering technique I use, starting and ending with cheese, creates a moisture barrier that keeps the bread from getting soggy. This was something I learned after several disappointing attempts where the dough stayed gummy in the middle.
I also add roasted red peppers to almost every stromboli I make. They add moisture and a sweet, slightly smoky flavor that cuts through the richness of all that meat and cheese. Plus, they make the inside look really pretty when you slice it.
Key Features
This recipe is naturally dairy-rich but easily customizable for different dietary needs. The dough itself is vegan until you add the fillings, so you could make a completely plant-based version with vegan cheese and vegetables.
It’s a fantastic make-ahead meal. You can prep the dough the night before and let it rise slowly in the fridge, which actually develops better flavor. The assembled stromboli can wait in the fridge for hours before baking.
The recipe scales beautifully. Double the dough and make two different varieties, or keep the dough recipe the same and make smaller individual stromboli. I’ve done both depending on what I need.
For meal prep enthusiasts, stromboli is a dream. Slice it up, portion it into containers, and you’ve got lunch sorted for the week. It holds up better than sandwiches and is more interesting than the same salad every day.
Nutrition Facts
Per serving (1 slice, based on 8 servings):
| Nutrient | Amount |
|---|---|
| Calories | 420 |
| Total Fat | 22g |
| Saturated Fat | 10g |
| Cholesterol | 75mg |
| Sodium | 1180mg |
| Total Carbohydrates | 35g |
| Dietary Fiber | 2g |
| Sugars | 2g |
| Protein | 22g |
Keep in mind that nutrition varies significantly based on your choice of fillings. Load it with vegetables and leaner meats to lighten it up, or go full Italian deli for a more indulgent version.
You’ll Also Love
If you’re into stuffed bread situations, try Italian calzones for individual portions with similar flavors. Pizza rolls are another fun variation where you slice the dough before baking for pull-apart pieces.
For something lighter but still satisfying, my Italian sub sandwiches use similar ingredients without the baking step. And if you’re making the homemade dough anyway, it works beautifully for focaccia topped with herbs and olive oil.
Conclusion
Stromboli has earned a permanent spot in my cooking rotation, and I think it will in yours too once you realize how straightforward it is. Yes, the dough takes some time to rise, but the actual hands-on work is minimal. And the payoff, those golden-brown spirals of melted cheese and savory meat wrapped in tender bread, is absolutely worth the wait.
Start with this classic combination, then branch out once you get comfortable with the technique. I’ve made breakfast stromboli with scrambled eggs and bacon, dessert versions with Nutella and bananas, and even a Thanksgiving leftover stromboli that was possibly better than the original meal.
The key is not to overthink it. Stromboli is forgiving. Even if your roll isn’t perfect or some cheese leaks out during baking, it’s still going to taste amazing. That’s the kind of recipe I appreciate most, the ones that work with you instead of against you, and this one definitely delivers.
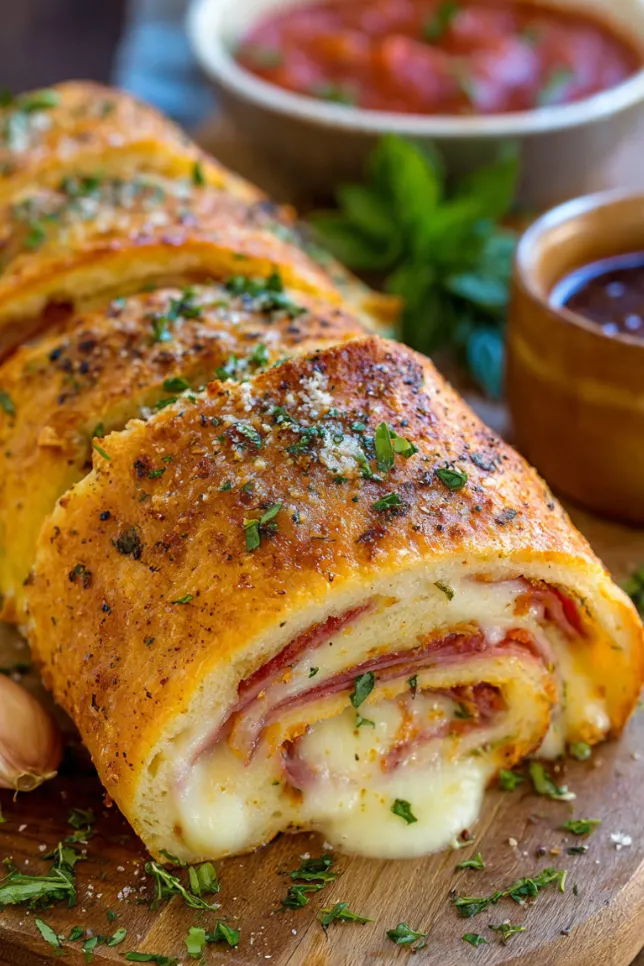
Baked Stromboli
Easy homemade stromboli filled with layers of savory meats and melted cheese.
Ingredients
- 3 cups flour
- 1 cup warm water
- 2 1/4 tsp yeast
- 2 tbsp olive oil
- 1 tbsp sugar
- 1 1/2 tsp salt
- 8 oz ham
- 8 oz salami
- 8 oz provolone
- 8 oz mozzarella
- Roasted red peppers
Instructions
- Activate yeast
- Make dough
- Let rise
- Roll dough
- Add fillings
- Roll and seal
- Bake until golden
Notes
Seal edges tightly to prevent leaks. Let rest before slicing for best results.