Homemade Banana Pudding with Caramel
You know that feeling when you bite into something so good, you immediately want to text everyone you know? That’s exactly what happened the first time I added salted caramel to my grandmother’s banana pudding recipe. I was experimenting in my kitchen on a rainy Tuesday afternoon, and honestly, I wasn’t expecting much. But when that first spoonful hit my taste buds (the perfect combination of creamy vanilla pudding, ripe bananas, and that deep, buttery caramel), I literally said “oh wow” out loud to my empty kitchen.
I’ve been making banana pudding for over ten years now, and I’ve learned that the secret to next-level desserts isn’t always about fancy techniques. Sometimes it’s just about adding one unexpected element that makes people lean back and ask, “What did you do differently?” The caramel does exactly that. It brings a sophisticated depth that transforms this humble Southern classic into something you’d be proud to serve at a dinner party.
Here’s the thing about banana pudding: everyone thinks they know how to make it. Vanilla wafers, sliced bananas, pudding, whipped cream. Done. But I’ve tasted enough mediocre versions at potlucks to know that the details matter. Watery pudding, mushy bananas, store-bought whipped topping that tastes like chemicals (you know the one I’m talking about). This recipe avoids all those pitfalls and adds that gorgeous caramel layer that takes it from “nice dessert” to “can I get this recipe?”
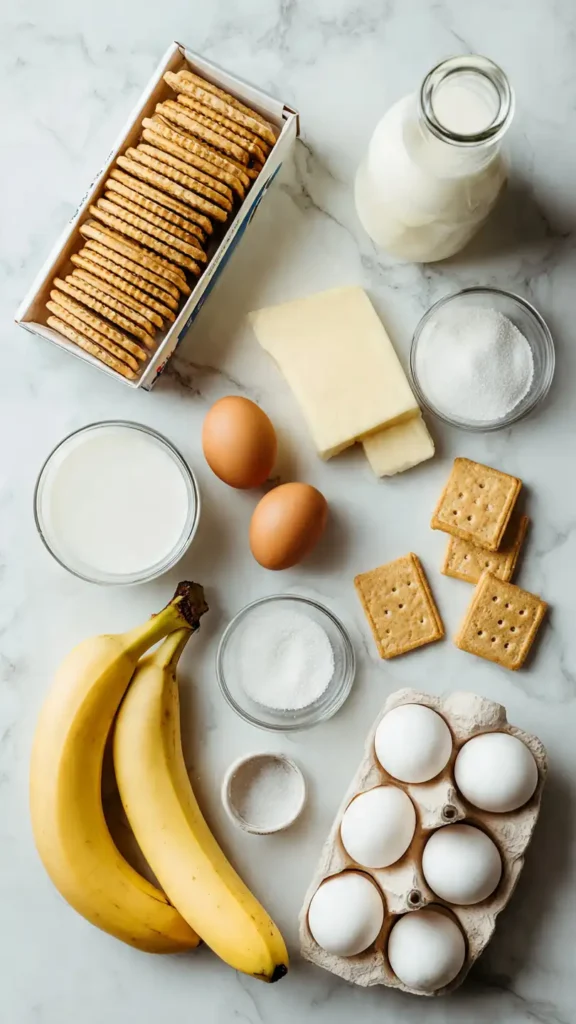
Essential Ingredients
For the Vanilla Pudding Layer:
- 3/4 cup granulated sugar
- 1/3 cup all-purpose flour
- 1/4 teaspoon salt
- 3 cups whole milk
- 4 large egg yolks
- 2 tablespoons unsalted butter
- 1 tablespoon pure vanilla extract
For the Caramel Sauce:
- 1 cup granulated sugar
- 6 tablespoons unsalted butter, cut into pieces
- 1/2 cup heavy cream
- 1 teaspoon vanilla extract
- 1/2 teaspoon sea salt
For Assembly:
- 4-5 ripe but firm bananas
- 1 box (11 oz) vanilla wafers
- 2 cups heavy whipping cream
- 3 tablespoons powdered sugar
- 1 teaspoon vanilla extract
Alternative Ingredients
Look, I get it. Not everyone has every ingredient on hand, and sometimes you need to work with what you’ve got. If you’re missing whole milk, you can use 2% milk (though the pudding will be slightly less rich). Some people swear by using sweetened condensed milk for extra creaminess, but I find it makes things too sweet when you’re already adding caramel.
For the vanilla wafers, I’ve experimented with graham crackers and even shortbread cookies. They work in a pinch, but there’s something about those classic Nilla wafers that just hits different. The texture softens perfectly without getting soggy.
If making homemade caramel sounds intimidating (I promise it’s not as scary as you think), you can use a good quality store-bought caramel sauce. Just warm it up a bit and add a pinch of sea salt to make it taste more homemade. I won’t tell anyone.
For a lighter version, Greek yogurt can replace half the whipped cream, though I only do this when I’m trying to be virtuous. This is dessert, after all.

Step-by-Step Directions
Making the Caramel (Do This First):
Start with the caramel because it needs time to cool down. Pour your sugar into a heavy-bottomed saucepan (I use my trusty cast iron skillet for this) and set it over medium heat. Don’t stir it at first. Just let it sit there and start melting. I know it feels wrong not to stir, but trust me on this. When it starts turning golden at the edges, give it a gentle swirl.
Once everything is melted and you’ve got that beautiful amber color (think maple syrup), remove it from heat and carefully add the butter. It’ll bubble up like crazy, so step back a bit. Stir until the butter melts completely, then slowly pour in the heavy cream while stirring constantly. Add the vanilla and sea salt, give it one final stir, and set it aside to cool. If you’re using a food processor to mix the butter and sugar for other recipes, this is one time to stick with the saucepan method.
Making the Pudding:
In a medium saucepan, whisk together the sugar, flour, and salt. In a separate bowl, whisk the egg yolks with about 1/2 cup of the milk until smooth. Pour the remaining milk into the saucepan with the dry ingredients and cook over medium heat, stirring constantly with a whisk.
Here’s where most people mess up: they crank the heat too high and end up with scrambled eggs in their pudding. Keep it at medium and be patient. It takes about 8-10 minutes for the mixture to thicken. You’ll know it’s ready when it coats the back of a spoon and doesn’t immediately run off.
Remove from heat and whisk in a few spoonfuls of the hot mixture into your egg yolks (this tempers them so they don’t scramble). Then pour the egg mixture back into the saucepan and cook for another 2 minutes, whisking constantly. Take it off the heat, stir in the butter and vanilla, and press a piece of plastic wrap directly onto the surface to prevent that dreaded skin from forming. Let it cool to room temperature.
Assembly Time:
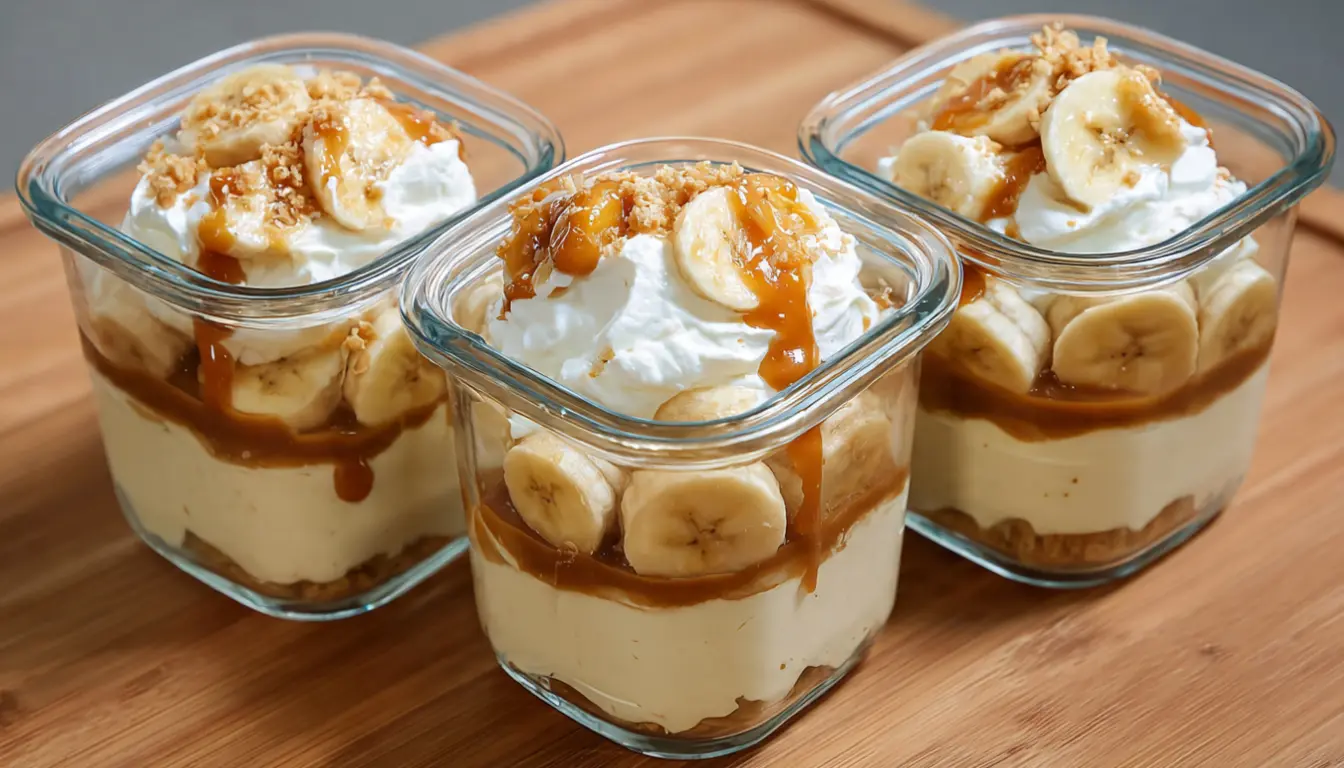
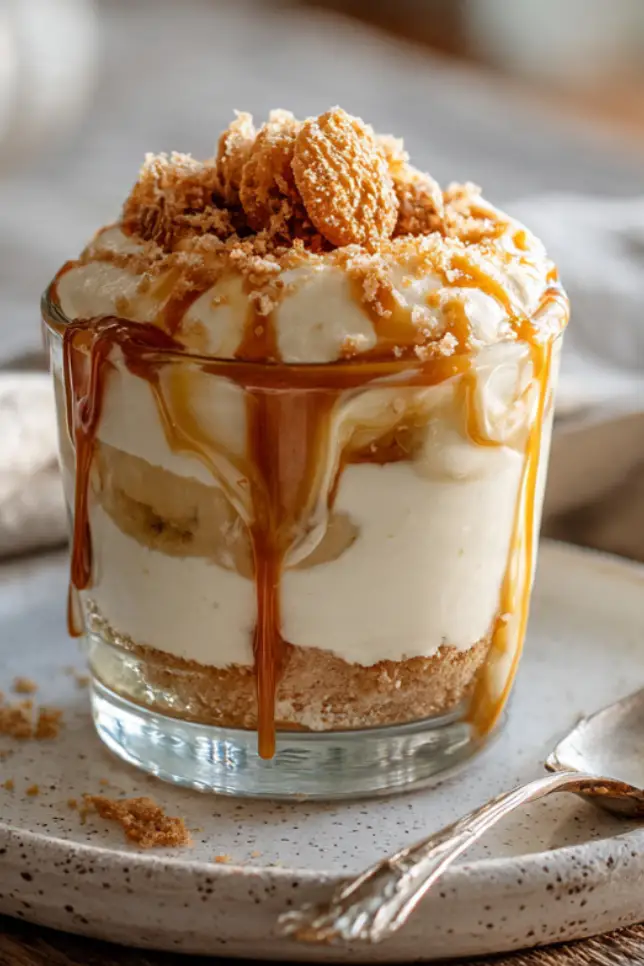
This is where it gets fun. Grab your prettiest glass dish (I use a trifle bowl because it shows off those gorgeous layers, but a 9×13 pan works too). Spread about a third of your cooled pudding on the bottom. Layer vanilla wafers on top, then slice your bananas about 1/4 inch thick and arrange them over the wafers.
Drizzle about half of your caramel sauce over the bananas. Not all of it. We’re saving some for the top because presentation matters, and also because you might want to drizzle extra on individual servings (I usually do).
Repeat the layers: pudding, wafers, bananas, caramel. Top with your final layer of pudding.
Whipped Cream Topping:
Pull out your stand mixer or a hand mixer (if you’re feeling ambitious, you can whip cream by hand, but my arm gets tired after about 30 seconds). Pour in the cold heavy cream, powdered sugar, and vanilla. Whip on medium-high until you get stiff peaks. This takes about 3-4 minutes with a KitchenAid stand mixer, maybe 5-6 minutes with a hand mixer.
Spread or pipe the whipped cream over the top layer of pudding. Drizzle with the remaining caramel and crush a few vanilla wafers to sprinkle on top for texture.
Pro Tips
Cover and refrigerate for at least 4 hours, but overnight is even better. The wafers need time to soften and all those flavors need time to meld together. I usually make this the night before I need it.
For the caramel, use a light-colored saucepan if you have one. It makes it easier to see when the sugar reaches that perfect amber color. I once burned a batch because I was using a dark pan and couldn’t see it browning.
Slice your bananas right before assembling. I learned this the hard way after coming home to a banana pudding that looked like it belonged in a science experiment. A quick dip in lemon juice helps too, but don’t soak them or you’ll taste the lemon.
If you’re making this for a crowd, it doubles perfectly. I’ve made this in a disposable aluminum pan for potlucks more times than I can count. Just use meal prep containers to store any leftovers (though in my experience, there rarely are any).
Temperature matters for the caramel. If your butter and cream are cold from the fridge, the sugar might seize up. Let them sit out for about 30 minutes before you start, or warm the cream slightly in the microwave.
FAQs
Can I make banana pudding with caramel ahead of time?
Yes, it tastes even better when prepared the day before serving.
How long does it last?
Up to 4 days in the fridge when properly stored.
Can I use store-bought caramel?
Absolutely. Just warm it and add a pinch of salt.
Why do bananas turn brown?
Exposure to air causes oxidation. Slice fresh before layering.
Can I freeze it?
No, freezing ruins the texture and consistency.
Why You’ll Love This Recipe
This isn’t your standard banana pudding. The caramel adds a layer of sophistication that makes it feel special without being complicated. I’ve served this at everything from casual backyard barbecues to formal dinner parties, and it’s always a hit.
The homemade pudding is silky smooth and actually tastes like vanilla, not chemicals. When you make pudding from scratch (especially in a good quality non-stick pan that makes cleanup easy), you control the sweetness and the texture. Store-bought pudding cups just can’t compete.
It’s also one of those recipes that looks way more impressive than the effort required. People see those beautiful layers and assume you spent hours in the kitchen. Little do they know it’s mostly just stirring and layering.
What Makes This Recipe Unique
The salted caramel is obviously the star addition here, but I also use a higher ratio of bananas to wafers than traditional recipes. More fruit means more flavor and a better texture balance.
I also skip the meringue topping that some Southern cooks swear by. Nothing against meringue (I love it in other desserts), but fresh whipped cream complements the caramel better. It’s lighter and doesn’t compete with those rich flavors.
The technique of drizzling caramel between the layers, not just on top, means every single bite has that salted caramel goodness. I’ve had too many layered desserts where the topping is amazing but the middle is bland.
Key Features
Make-Ahead Friendly: Perfect for busy schedules or when you’re hosting and need one less thing to worry about on the day of your event.
Crowd-Pleaser: I’ve never met anyone who doesn’t like banana pudding, and the caramel addition converts even the skeptics.
Classic Meets Sophisticated: It respects the traditional Southern recipe while adding a modern twist that feels current.
No Special Equipment Needed: Just basic kitchen tools. If you have a whisk, a saucepan, and a bowl, you can make this.
Customizable: Easy to adjust sweetness levels, portion sizes, or even make individual servings in mason jars (which look adorable for parties, by the way).
You’ll Also Love
If this banana pudding with caramel is hitting the spot, you’ll probably enjoy these other recipes from my kitchen:
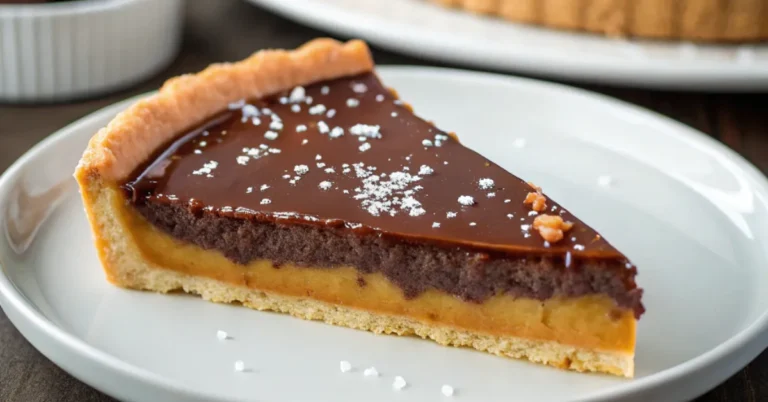
Salted Caramel Chocolate Tart – Another caramel-focused dessert that’s rich and impressive
Classic Southern Banana Pudding – The traditional version without caramel, for purists
Butterscotch Pudding Parfaits – If you love pudding desserts, this one’s creamy and nostalgic
Conclusion
There’s something deeply satisfying about taking a classic recipe and making it your own. My grandmother would probably raise an eyebrow at the caramel addition (she was a purist), but I think even she’d admit it’s pretty darn good after that first bite.
The beauty of this recipe is that it honors the original while giving it a little personality. It’s comfort food that doesn’t feel outdated. And in my book, any dessert that makes people come back for seconds (or thirds, no judgment) is a winner.
So next time you’re craving something sweet and nostalgic with a twist, give this a try. Make the caramel, layer it all up, and let it sit overnight. Then watch it disappear at your next gathering while people ask you for the recipe. You’re welcome in advance.
Happy baking (and pudding-making)!
Banana Pudding with Caramel
Classic Southern banana pudding elevated with homemade salted caramel sauce. Layers of creamy vanilla pudding, fresh bananas, vanilla wafers, and whipped cream with golden caramel drizzle.
Ingredients
Vanilla Pudding Layer
- 3/4 cup granulated sugar
- 1/3 cup all-purpose flour
- 1/4 tsp salt
- 3 cups whole milk
- 4 large egg yolks
- 2 tbsp unsalted butter
- 1 tbsp pure vanilla extract
Caramel Sauce
- 1 cup granulated sugar
- 6 tbsp unsalted butter, cut into pieces
- 1/2 cup heavy cream
- 1 tsp vanilla extract
- 1/2 tsp sea salt
For Assembly
- 4-5 ripe but firm bananas
- 1 box (11 oz) vanilla wafers
- 2 cups heavy whipping cream
- 3 tbsp powdered sugar
- 1 tsp vanilla extract
Instructions
- Make the caramel sauce Pour 1 cup sugar into a heavy-bottomed saucepan over medium heat. Let it melt without stirring, just swirl the pan occasionally. When amber colored, remove from heat and add 6 tbsp butter (it will bubble vigorously). Stir until butter melts, then slowly add 1/2 cup heavy cream while stirring constantly. Add 1 tsp vanilla and 1/2 tsp sea salt. Set aside to cool.
- Make the vanilla pudding In a medium saucepan, whisk together 3/4 cup sugar, 1/3 cup flour, and 1/4 tsp salt. In a separate bowl, whisk egg yolks with about 1/2 cup of the milk. Add remaining milk to the dry ingredients and cook over medium heat, whisking constantly, for 8-10 minutes until mixture thickens and coats the back of a spoon.
- Temper and finish pudding Remove from heat. Whisk a few spoonfuls of hot pudding mixture into the egg yolks to temper them. Pour egg mixture back into saucepan and cook for 2 more minutes, whisking constantly. Remove from heat and stir in 2 tbsp butter and 1 tbsp vanilla. Press plastic wrap directly onto surface and cool to room temperature.
- Assemble the first layer In a glass trifle bowl or 9×13 pan, spread about 1/3 of your cooled pudding on the bottom. Layer vanilla wafers on top, then slice bananas about 1/4 inch thick and arrange them over the wafers. Drizzle with about half of your cooled caramel sauce.
- Continue layering Repeat the layers: spread another third of pudding, add wafers, sliced bananas, and more caramel drizzle. Top with the final layer of pudding, reserving some caramel for the final garnish.
- Make whipped cream topping In a stand mixer or with a hand mixer, whip 2 cups cold heavy cream with 3 tbsp powdered sugar and 1 tsp vanilla on medium-high speed until stiff peaks form, about 3-4 minutes.
- Finish and chill Spread or pipe the whipped cream over the top pudding layer. Drizzle with remaining caramel sauce and sprinkle with crushed vanilla wafers for garnish. Cover and refrigerate for at least 4 hours, or preferably overnight, before serving.
Pro Tips
Use a light-colored pan for making caramel so you can see the color change. Slice bananas right before assembling to prevent browning. For best results, make this dessert the night before serving. Store leftovers covered in the refrigerator for up to 3-4 days. The caramel can be made ahead and reheated gently if it hardens.