Oven-Baked Pastel Recipe: Brazilian Street Food Made Healthier at Home
Look, I’m going to be honest with you. The first time I tried making pastéis at home, I nearly burned down my kitchen. There I was, standing over a pot of boiling oil at 11 PM on a Tuesday (because that’s when inspiration strikes, right?), trying to recreate those crispy Brazilian pastries I’d fallen in love with at a street fair. The oil splattered everywhere, my smoke alarm went off, and my partner came running downstairs thinking something was seriously wrong.
That disaster sent me on a mission to figure out a better way. And you know what? I discovered that oven-baked pastéis are not only safer and less messy, but they’re also way more practical for everyday cooking. No more oil splatters on my ceiling, no more guilty conscience about deep-frying everything, and honestly, the results are just as satisfying.
Essential Ingredients
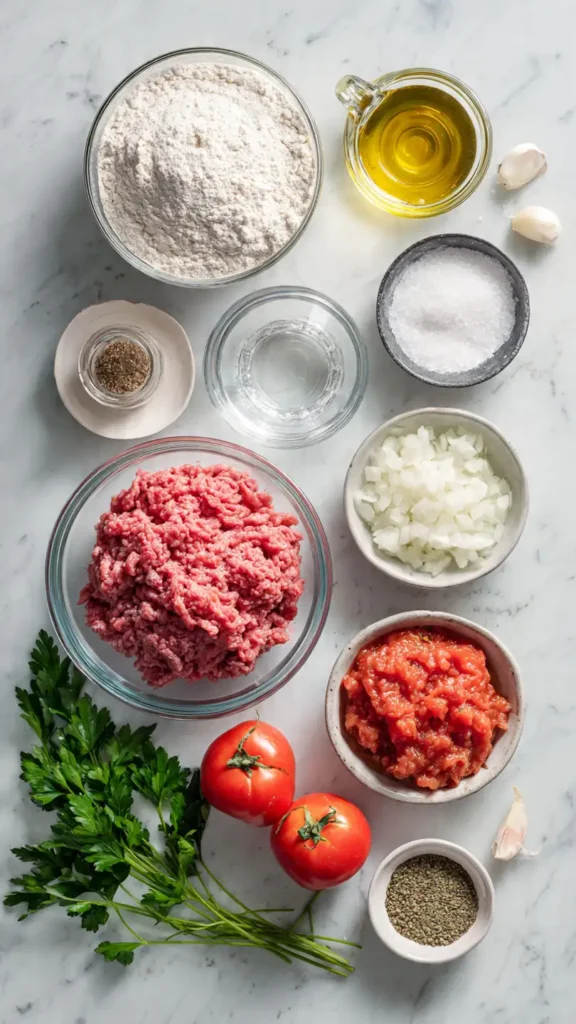
Here’s what you’ll need to make about 20 pastéis (the plural of pastel, by the way):
For the Dough:
- 3 cups all-purpose flour
- 1 teaspoon salt
- 2 tablespoons vegetable oil
- 3/4 cup warm water (plus more as needed)
- 1 tablespoon white vinegar or cachaça (trust me on this)
- 1 egg, beaten (for egg wash)
For the Filling (Classic Beef):
- 1 pound ground beef
- 1 medium onion, finely chopped
- 2 cloves garlic, minced
- 1 tomato, diced
- 2 tablespoons tomato paste
- 1 teaspoon cumin
- Salt and black pepper to taste
- 2 tablespoons fresh parsley, chopped
- 1 hard-boiled egg, chopped (optional but traditional)
- 10 green olives, chopped (totally optional, some people love them)
Alternative Ingredients
The beauty of pastéis is that they’re incredibly versatile. I’ve tried countless variations over the years, and here are my favorites:
Dough Alternatives: Can’t find cachaça? White vinegar works perfectly. Some folks swear by adding a tablespoon of vodka instead. The alcohol helps create those signature crispy layers, but if you’re avoiding alcohol completely, just stick with the vinegar.
Filling Variations: This is where things get fun. I’ve made chicken pastéis with shredded rotisserie chicken mixed with cream cheese and herbs. My vegetarian version uses black beans, corn, and cheese. There’s also the famous “pizza pastel” with mozzarella, tomato sauce, and oregano. And if you’re feeling fancy, try shrimp with catupiry cheese (or cream cheese if you can’t find catupiry).
Cheese Options: Traditional recipes use fresh white cheese, but I’ve had great success with mozzarella, cheddar, or even a sharp provolone. Whatever melts well and makes you happy.
Step-by-Step Directions
Making the Dough (The Secret to Success):
First things first, get your ingredients to room temperature. I learned this the hard way after making rock-hard pastéis because I used cold water straight from the tap.
In a large bowl (or in your food processor if you have one), combine the flour and salt. I started using my food processor for this step about three years ago, and it’s been a game-changer. My old KitchenAid stand mixer works great too, but honestly, making the dough by hand gives you a better feel for the texture.
Make a well in the center and add the oil, warm water, and vinegar. Mix everything together until it forms a shaggy dough. Here’s where your judgment comes in. The dough should be soft but not sticky. If it’s too dry, add water one tablespoon at a time. If it’s too wet, sprinkle in a bit more flour.
Knead the dough for about 5-7 minutes until it’s smooth and elastic. This is important because you want those layers. Wrap it in plastic wrap and let it rest for at least 30 minutes. I usually make my dough in the morning and let it rest in the fridge until I’m ready to use it later that day.
Preparing the Filling:
While your dough is resting, make the filling. Heat a large non-stick pan over medium-high heat (I use my trusty 12-inch skillet for this). Add the ground beef and cook, breaking it up with a wooden spoon, until it’s nicely browned. This takes about 6-8 minutes.
Add the onion and garlic, cooking until the onion is soft and translucent. Toss in the diced tomato and tomato paste, along with the cumin, salt, and pepper. Let everything simmer together for about 10 minutes until most of the liquid has evaporated. You don’t want a soupy filling because it’ll make your pastéis soggy.
Stir in the parsley and let the filling cool completely. This is crucial. Hot filling will make your dough impossible to work with and might even tear it.
Assembly Time:
Preheat your oven to 400°F (200°C). Line a large baking sheet with parchment paper or a silicone mat.
Divide your dough into two portions (makes it easier to work with). On a lightly floured surface, roll out one portion until it’s super thin, about 1/8 inch thick. The thinner you can get it without tearing, the crispier your pastéis will be.
Cut out circles using a 4-inch round cutter. I don’t have a fancy cutter, so I use a small bowl or even a coffee mug. You can also cut the dough into rectangles if you prefer that shape.
Place about 1-2 tablespoons of filling on one half of each circle, leaving a small border. If you’re using the hard-boiled egg and olives, add a few pieces now. Don’t overfill them or they’ll burst open in the oven (I speak from messy experience).
Fold the dough over to create a half-moon shape. Press the edges firmly to seal, then crimp them with a fork. This fork-crimping is traditional and helps keep everything locked in during baking.
Baking:
Brush each pastel generously with the beaten egg. This is what gives them that gorgeous golden color. Place them on your prepared baking sheet, making sure they’re not touching.
Bake for 20-25 minutes, flipping them halfway through, until they’re golden brown and crispy. The first time I made these, I didn’t flip them and ended up with soggy bottoms. Learn from my mistakes.

Pro Tips
After making hundreds of pastéis over the years, here’s what I’ve learned:
The Dough Secret: That tablespoon of vinegar or cachaça isn’t just for flavor. The acidity relaxes the gluten, making the dough easier to roll thin and creating those flaky layers. Don’t skip it.
Thickness Matters: I cannot stress this enough: roll your dough as thin as you possibly can. My first batch had thick, doughy pastéis that were more like Hot Pockets than proper pastéis. Thin dough equals crispy results.
Freezer-Friendly: These freeze beautifully. I make a double batch and store half in meal prep containers in my freezer. You can bake them straight from frozen; just add 5-10 minutes to the cooking time.
Air Fryer Option: If you have an air fryer, you can make these even crispier. Cook at 375°F for 12-15 minutes, flipping halfway. I got my air fryer last year specifically for reheating leftover pastéis, and it’s perfect.
Don’t Rush the Rest: That 30-minute rest time for the dough is non-negotiable. It allows the gluten to relax, making the dough much easier to roll out thinly.
FAQs
Why is my yogurt cake not fluffy?
Overmixing or expired baking powder can cause a dense texture. Mix gently and use fresh ingredients.
Can I use regular yogurt instead of Greek yogurt?
Yes, regular yogurt works, but the cake will be slightly lighter in texture.
Can I add fruits to yogurt cake?
Yes. Berries are perfect. Toss them in flour first so they don’t sink.
How do I store yogurt cake?
Keep it in an airtight container for up to 4 days or freeze for longer storage.
Can I make it ahead of time?
Yes. The flavor and texture improve after resting overnight.
Why You’ll Love This Recipe
First off, it’s so much healthier than the deep-fried version. I can eat three of these without feeling like I need a nap afterward. The oven-baked method also means you can make a big batch without standing over a pot of hot oil for an hour.
They’re incredibly versatile too. I’ve made these for everything from casual weeknight dinners to fancy parties, and they always disappear fast. Last month, I brought a platter of assorted pastéis to a potluck, and people were genuinely shocked when I told them they weren’t fried.
Plus, they’re perfect for meal prep. I usually spend a Sunday afternoon making a huge batch, and then I’ve got quick snacks or easy lunches for the entire week. Just grab a couple from the freezer and pop them in the oven or air fryer while you’re getting ready in the morning.
What Makes This Recipe Unique
Most pastel recipes you’ll find online are for the traditional deep-fried version. While those are delicious, they’re messy, use tons of oil, and honestly, they’re not practical for regular home cooking.
This oven-baked version gives you all the flavor and that satisfying crispy exterior without any of the hassle. The egg wash creates a beautiful golden crust that rivals the fried version, and the thin dough still gets those signature flaky layers.
I’ve also streamlined the filling to use ingredients you probably already have in your kitchen. No hunting for exotic Brazilian ingredients (though if you can find them, by all means use them). This is real food for real people with real lives.
Key Features
- Healthier Option: Baked instead of fried, cutting calories and oil consumption significantly
- Make-Ahead Friendly: Perfect for meal planning and batch cooking
- Customizable Fillings: Use whatever proteins, vegetables, or cheeses you have on hand
- Budget-Friendly: Basic ingredients that won’t break the bank
- Kid-Approved: Even picky eaters love these handheld pastries
- Party Perfect: Impressive enough for entertaining but easy enough for weeknights
- Freezer-Friendly: Store for up to 3 months and bake from frozen
You’ll Also Love
If you enjoyed this Oven-Baked Pastel recipe, you might want to try these other recipes from my collection:
- Brazilian Cheese Bread (Pão de Queijo): Another Brazilian favorite that’s naturally gluten-free and incredibly addictive
- Empanadas: Similar concept but with a slightly different dough and Latin American flavors
- Spinach and Feta Hand Pies: A Mediterranean twist on handheld pastries
- Chicken and Vegetable Pot Stickers: If you love filled pastries, you’ll enjoy these Asian dumplings
- Homemade Pizza Pockets: Perfect for using up leftover pizza ingredients
Conclusion
Making oven-baked pastéis at home might seem intimidating at first, but once you get the hang of it, it becomes second nature. I’ve been making these weekly for the past three years, and I still get excited every time that first batch comes out of the oven golden and crispy.
The key is not to stress about perfection. My first attempts looked like lumpy little pillows, and they were still delicious. With each batch, you’ll get better at rolling the dough thin, sealing the edges properly, and finding your favorite filling combinations.
So grab your ingredients, put on some Brazilian music (I recommend bossa nova for the right vibe), and get ready to fill your kitchen with the most amazing aroma. Your family and friends will think you’ve been secretly taking cooking classes. Just smile and accept the compliments.
Trust me on this one. These oven-baked pastéis are about to become your new favorite thing to make.
Oven-Baked Pastel
Crispy Brazilian pastries filled with seasoned beef, baked instead of fried for a healthier version of this street food favorite.
Ingredients
For the Dough
- 3 cups all-purpose flour
- 1 tsp salt
- 2 tbsp vegetable oil
- 3/4 cup warm water (plus more as needed)
- 1 tbsp white vinegar or cachaça
- 1 egg, beaten (for egg wash)
For the Filling
- 1 lb ground beef
- 1 medium onion, finely chopped
- 2 cloves garlic, minced
- 1 tomato, diced
- 2 tbsp tomato paste
- 1 tsp cumin
- To taste salt and black pepper
- 2 tbsp fresh parsley, chopped
- 1 hard-boiled egg, chopped (optional)
- 10 green olives, chopped (optional)
Instructions
- Make the dough In a large bowl or food processor, combine flour and salt. Add oil, warm water, and vinegar. Mix until a soft dough forms. Knead for 5-7 minutes until smooth and elastic. Wrap in plastic and rest for 30 minutes.
- Prepare the filling In a large non-stick pan over medium-high heat, cook ground beef until browned, about 6-8 minutes. Add onion and garlic, cooking until soft. Stir in tomato, tomato paste, cumin, salt, and pepper. Simmer 10 minutes until liquid evaporates. Add parsley and cool completely.
- Preheat oven Preheat oven to 400°F (200°C). Line a baking sheet with parchment paper.
- Roll and cut dough Divide dough in half. Roll one portion very thin, about 1/8 inch thick. Cut out 4-inch circles using a round cutter or bowl.
- Fill and seal Place 1-2 tablespoons filling on one half of each circle, leaving a border. Add optional egg and olives if using. Fold over to create half-moon shape. Press edges firmly and crimp with a fork.
- Brush with egg wash Brush each pastel generously with beaten egg for golden color.
- Bake Place pastéis on prepared baking sheet without touching. Bake for 20-25 minutes, flipping halfway through, until golden brown and crispy.
- Serve Let cool for 5 minutes before serving. Enjoy warm with hot sauce or chimichurri.
Notes
Roll dough as thin as possible for crispiest results. These freeze beautifully – assemble completely and freeze unbaked, then bake from frozen adding 5-10 minutes to cooking time. For air fryer: cook at 375°F for 12-15 minutes, flipping halfway. Store baked pastéis in airtight meal prep containers for up to 5 days in the refrigerator.