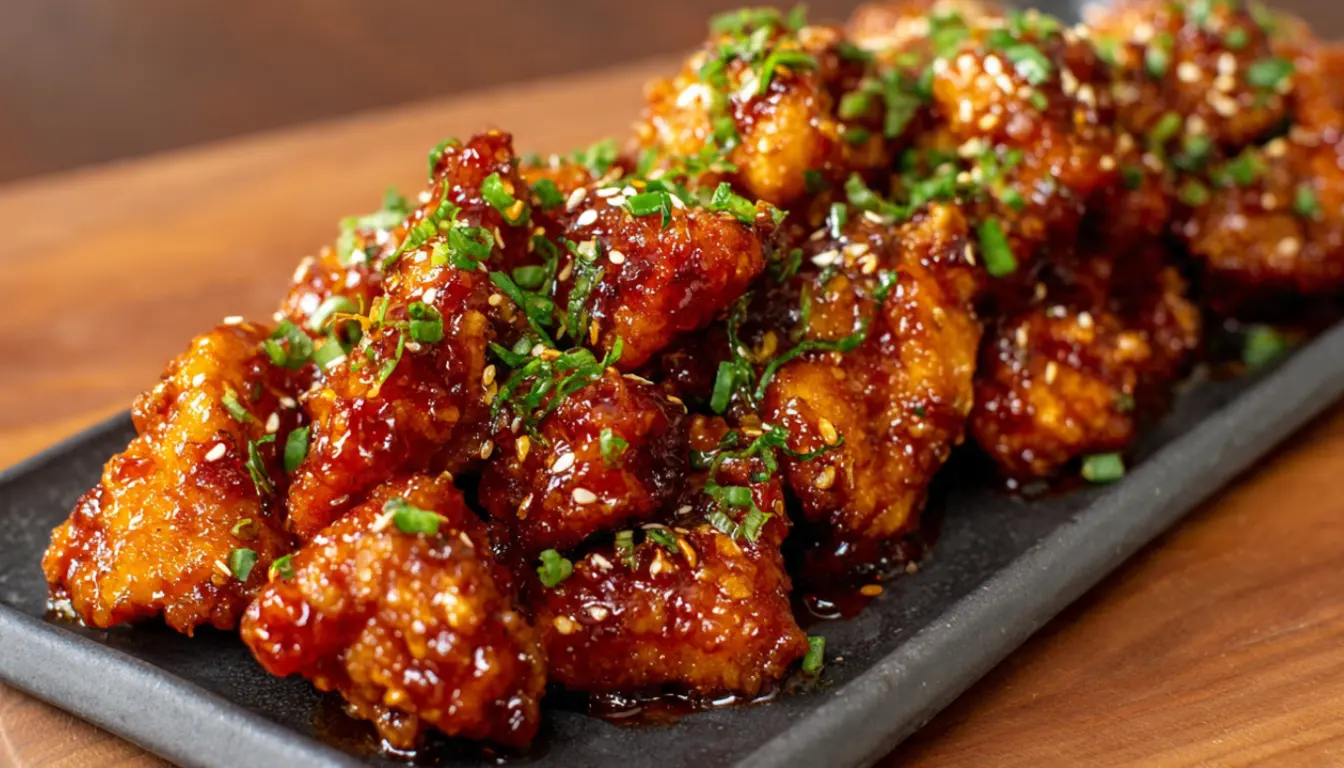
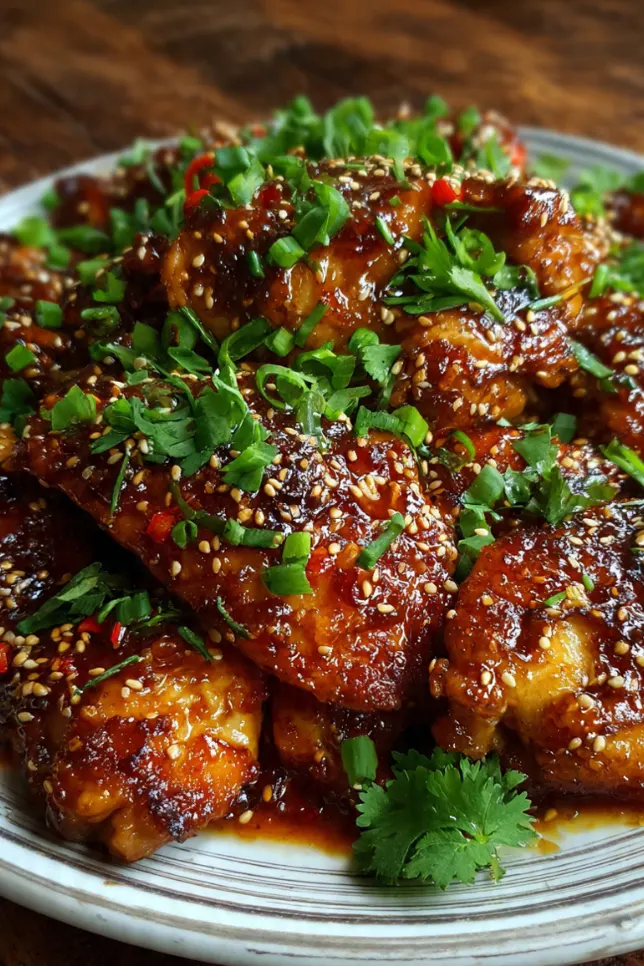
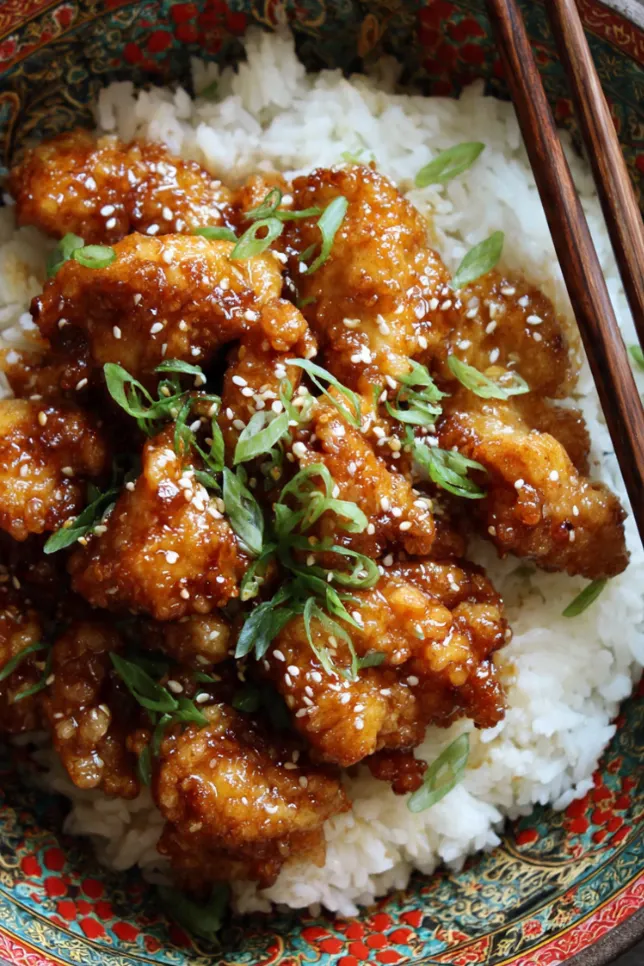
Korean Honey Butter Chicken Recipe – Crispy Glazed Chicken
Introduction
You know what’s funny? I spent years trying to recreate that sticky, sweet, garlicky chicken I had at a Korean restaurant in LA, and I kept overcomplicating it. Too much gochujang here, too many steps there. Then one night, totally frustrated and hungry, I threw together what I had in my fridge: chicken thighs, honey, butter, and a ridiculous amount of garlic. That’s when it clicked. The best Korean fried chicken doesn’t need a three-day marinade or a culinary degree. It needs crispy chicken, a killer sauce, and the confidence to use way more butter than seems reasonable.
This recipe has become my go-to for meal prep Sundays. I’ll make a double batch, and it feeds me lunch for the entire week. The sauce reheats beautifully, and honestly, it might taste even better on day three when all those flavors have had time to get friendly with each other. If you’ve been intimidated by Korean cooking or think it requires specialty ingredients you can’t pronounce, this recipe is your entry point. Simple ingredients, big flavor, and it comes together faster than ordering takeout.
Essential Ingredients
Here’s what you need for the chicken:
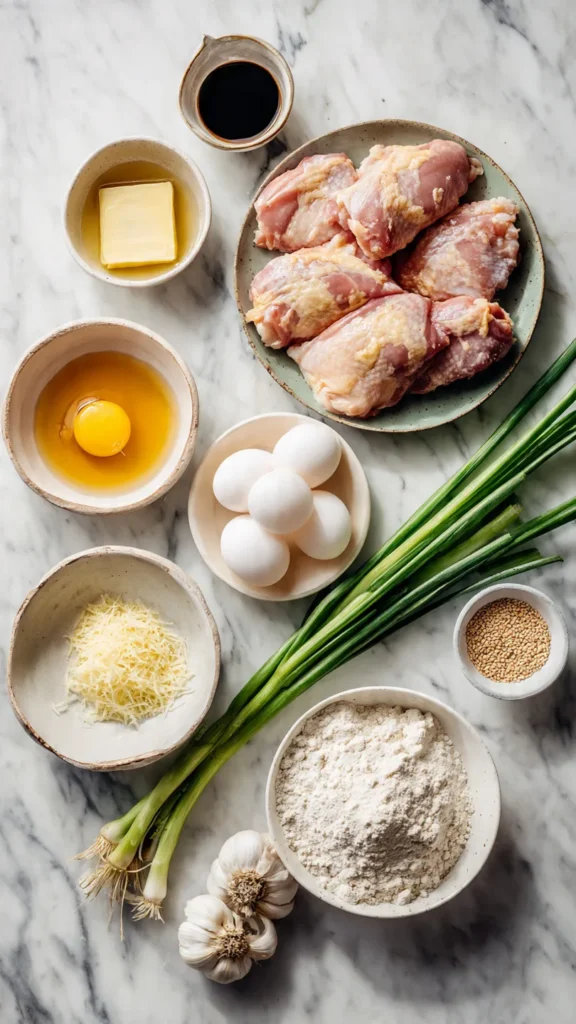
- 2 pounds boneless, skinless chicken thighs (cut into bite-sized pieces)
- 1 cup all-purpose flour
- 1/2 cup cornstarch
- 1 teaspoon salt
- 1/2 teaspoon black pepper
- 1/2 teaspoon garlic powder
- 2 large eggs
- Vegetable oil for frying
For the honey butter sauce:
- 4 tablespoons unsalted butter
- 6 cloves garlic, minced (don’t skimp on this)
- 1/3 cup honey
- 2 tablespoons soy sauce
- 1 tablespoon rice vinegar
- 1 teaspoon sesame oil
- 1/4 teaspoon red pepper flakes (optional, but recommended)
- 1 tablespoon toasted sesame seeds
- 2 green onions, sliced thin
Alternative Ingredients
Can’t find chicken thighs? Boneless chicken breasts work, but cut them smaller since they dry out faster. I’ve also made this with chicken tenders when they were on sale, and it was just as good.
Don’t have cornstarch? You can use all flour, but the coating won’t be quite as crispy. The cornstarch is what gives you that shatteringly crisp texture that stays crunchy even after you toss it in the sauce.
For the honey, any variety works. I usually grab whatever’s cheapest at the store. Same goes for the soy sauce, though I prefer low-sodium so I can control the salt level better.
If you’re out of rice vinegar, apple cider vinegar or white wine vinegar will do in a pinch. The sauce will taste slightly different, but it’ll still be delicious.
Step-by-Step Directions
Step 1: Prep the chicken
Pat your chicken pieces completely dry with paper towels. This is not the time to rush. Wet chicken won’t get crispy, and you’ll end up with soggy, sad coating. I learned this the hard way after ruining an entire batch because I was too impatient to dry the chicken properly.
Step 2: Set up your breading station
In one bowl, whisk together the flour, cornstarch, salt, pepper, and garlic powder. In another bowl, beat the eggs until they’re uniform. I like to set these up in an assembly line: chicken, egg bowl, flour mixture, then the plate where the breaded chicken will wait.
Step 3: Bread the chicken
Working in batches, dip each piece of chicken into the egg, letting excess drip off, then dredge it in the flour mixture. Press the coating on firmly so it actually sticks. Set the breaded pieces on a plate while you heat the oil.
Step 4: Heat your oil
Pour about 1 inch of vegetable oil into a large cast iron skillet or heavy-bottomed pan. Heat it over medium-high until it reaches 350°F. If you don’t have a thermometer (I didn’t for years), drop a tiny bit of the flour mixture into the oil. If it sizzles immediately, you’re ready. If it burns right away, your oil is too hot.
I finally invested in a cheap kitchen thermometer last year, and it completely changed my frying game. No more guessing, no more burnt outsides with raw insides.
Step 5: Fry the chicken
Working in batches (don’t crowd the pan), fry the chicken pieces for about 4-5 minutes per side until they’re deep golden brown and cooked through. The internal temperature should hit 165°F. Transfer to a wire rack or paper towel-lined plate.
Here’s a mistake I used to make: I’d fry everything, then make the sauce. By the time the sauce was ready, the chicken had cooled down and lost some of its crispiness. Now I make the sauce while the last batch is frying.
Step 6: Make the honey butter sauce
In a large non-stick pan or wok, melt the butter over medium heat. Add the minced garlic and cook for about 30 seconds until it’s fragrant but not brown. Burnt garlic tastes bitter, so keep an eye on it.
If you have a food processor, it makes quick work of mincing garlic. I used to do it by hand until my sister gave me a mini food processor for Christmas, and now I actually use enough garlic in my cooking instead of being lazy about it.
Add the honey, soy sauce, rice vinegar, sesame oil, and red pepper flakes. Whisk everything together and let it bubble for about 2 minutes until it thickens slightly. You want it syrupy but still pourable.
Step 7: Toss it all together
Add your fried chicken to the sauce and toss everything together until every piece is coated. Work quickly here. The longer the chicken sits in the sauce, the less crispy it gets. Some people like it super saucy and soft, others (like me) prefer it on the crispier side. You control this by how long you toss.
Step 8: Garnish and serve
Sprinkle with sesame seeds and green onions. Serve immediately while it’s still hot.
Pro Tips
The key to keeping the chicken crispy is serving it right away. If you’re meal prepping, store the fried chicken and sauce separately in different meal prep containers. When you’re ready to eat, reheat the chicken in your air fryer for 5 minutes at 350°F to crisp it back up, warm the sauce separately, then toss them together. This extra step makes leftover taste like fresh.
Double-frying is a technique used in Korean fried chicken restaurants. Fry the chicken once, let it rest for 10 minutes, then fry again for 2-3 minutes. It creates an insanely crispy coating. I only do this when I’m trying to impress someone, because honestly, the single fry method is already pretty great.
For the garlic, fresh is non-negotiable. Jarred minced garlic or garlic powder won’t give you that same punch of flavor. I buy the pre-peeled garlic cloves from Trader Joe’s to save time, and it’s been a total game-changer for weeknight cooking.
If you want to make this spicier, add a tablespoon of gochujang (Korean red pepper paste) to the sauce. It gives it a deeper, more complex heat than just red pepper flakes.
The sauce also works brilliantly on other proteins. I’ve used it on pork chops, shrimp, and even tofu. Basically, if it can be fried, this sauce will make it better.
Frequently Asked Questions
Can I bake Korean honey butter chicken instead of frying?
Yes. Bake the coated chicken at 425°F for about 20 to 25 minutes until crispy, then toss with the honey butter sauce.
Can I use chicken breast instead of thighs?
Yes. Chicken breast works well but should be cut into smaller pieces since it cooks faster and may dry out more easily.
How do I keep the chicken crispy?
Store the fried chicken and sauce separately and reheat the chicken in an air fryer before tossing with the sauce.
Can I make Korean honey butter chicken spicy?
Add red pepper flakes or mix gochujang into the sauce for extra heat and deeper flavor.
Recipe Info Table
| Prep Time | Cook Time | Total Time | Servings | Yield |
|---|---|---|---|---|
| 15 min | 25 min | 40 min | 4 | 4 servings |
Why You’ll Love This Recipe
This isn’t one of those recipes where you need seventeen specialty ingredients from the Asian market (though I love those recipes too). Everything here is available at your regular grocery store. The honey butter sauce is ridiculously versatile, you can adjust the sweetness and spice level to your taste, and it’s genuinely quick enough for a weeknight dinner.
The leftovers situation is also excellent. Unlike some fried chicken recipes that turn into a soggy mess in the fridge, this one reheats surprisingly well. I’ve eaten this cold straight from the fridge more times than I’d like to admit, and it’s still delicious. Not quite as good as fresh, but definitely better than most takeout leftovers.
What Makes This Recipe Unique
Most Korean fried chicken recipes involve double-frying and complicated sauces with hard-to-find ingredients. This version strips it down to the essentials without sacrificing flavor. The honey butter sauce is a simplified version of what you’d get at a Korean chicken joint, but it’s just as addictive.
The other thing that makes this different is how well it works for meal prep. I’ve tested this recipe a dozen times trying to figure out the best way to make it ahead, and the separate storage method I mentioned earlier really does keep the chicken crispy even days later.
Key Features
Crispy coating that stays crispy: The cornstarch-flour combo creates a light, crunchy texture that doesn’t get gummy when you add the sauce.
Balanced sweet and savory sauce: The butter adds richness, honey brings sweetness, and soy sauce gives you that umami depth. It’s perfectly balanced without being cloying.
Flexible spice level: Start with no red pepper flakes if you’re feeding kids or people who can’t handle heat, then add more at the table.
Meal prep friendly: Make a big batch on Sunday, and you’ve got lunch sorted for the week. It also freezes well (sauce and chicken separately) for up to 3 months.
Uses common ingredients: No hunting down specialty items or making special trips to the Korean market.
Nutrition Facts Table
Per serving (based on 4 servings):
| Nutrient | Amount |
|---|---|
| Calories | 520 |
| Total Fat | 28g |
| Saturated Fat | 9g |
| Cholesterol | 195mg |
| Sodium | 680mg |
| Total Carbohydrates | 38g |
| Dietary Fiber | 1g |
| Sugars | 19g |
| Protein | 32g |
Note: Nutrition facts are approximate and will vary based on specific ingredients used and portion sizes.
You’ll Also Love
If this recipe hits the spot, try my Korean BBQ Chicken Bowls with gochujang mayo and pickled vegetables. The same sticky-sweet-savory flavor profile but in bowl form.
My Crispy Garlic Parmesan Wings use a similar double-coating technique for extra crunch.
For another quick Asian-inspired dinner, check out my 30-Minute Teriyaki Chicken that uses the same meal prep strategy of keeping sauce and protein separate for maximum freshness.
Conclusion
I’ve made this recipe at least fifty times in the past two years, and it never gets old. Sometimes I’ll swap the honey for maple syrup when I’m feeling fancy, or add a splash of gochujang when I want more heat. The beauty of this recipe is that once you nail the basic technique, you can tweak it to your taste.
The first time you make it, follow the recipe exactly. Then start experimenting. Maybe you like it sweeter, or you want more garlic (is that even possible?), or you prefer thighs over breasts. Make it yours.
And seriously, don’t skip the meal prep tip. Having this chicken ready to go in the fridge has saved me from ordering expensive, mediocre takeout more times than I can count. Future you will thank present you for making that double batch.
What’s your favorite way to eat Korean fried chicken? Do you go full traditional with pickled radish and beer, or do you make it into a rice bowl situation like me? Let me know in the comments.
Korean Honey Butter Chicken
Crispy Korean style fried chicken tossed in a sticky honey butter garlic sauce with sesame and soy for a sweet savory finish.
Ingredients
- 2 pounds boneless chicken thighs
- 1 cup flour
- 1/2 cup cornstarch
- 1 teaspoon salt
- 1/2 teaspoon black pepper
- 1/2 teaspoon garlic powder
- 2 eggs
- Vegetable oil for frying
- 4 tablespoons butter
- 6 cloves garlic minced
- 1/3 cup honey
- 2 tablespoons soy sauce
- 1 tablespoon rice vinegar
- 1 teaspoon sesame oil
- 1/4 teaspoon red pepper flakes
- 1 tablespoon sesame seeds
- 2 green onions sliced
Instructions
- Pat chicken dry with paper towels.
- Mix flour, cornstarch, salt, pepper, and garlic powder.
- Dip chicken in egg then coat with flour mixture.
- Heat oil to 350°F.
- Fry chicken until golden and cooked through.
- Melt butter and sauté garlic.
- Add honey, soy sauce, vinegar, sesame oil, and chili flakes.
- Toss chicken in sauce and garnish with sesame seeds and green onions.