Homemade Cruffins: The Croissant-Muffin Hybrid That Changed My Breakfast Game
You know that moment when you bite into a perfectly flaky croissant and wish it came in a more portable, less-mess-on-your-lap format? That’s exactly how I felt three years ago when I first discovered cruffins at a fancy bakery in San Francisco. One bite and I knew I had to crack the code on making these at home.
The best part? You don’t need a professional bakery setup to pull this off. I’ve made hundreds of batches in my regular home kitchen, and I’m going to show you exactly how to make these buttery, flaky pastries that look impressive but are honestly more forgiving than you’d think.
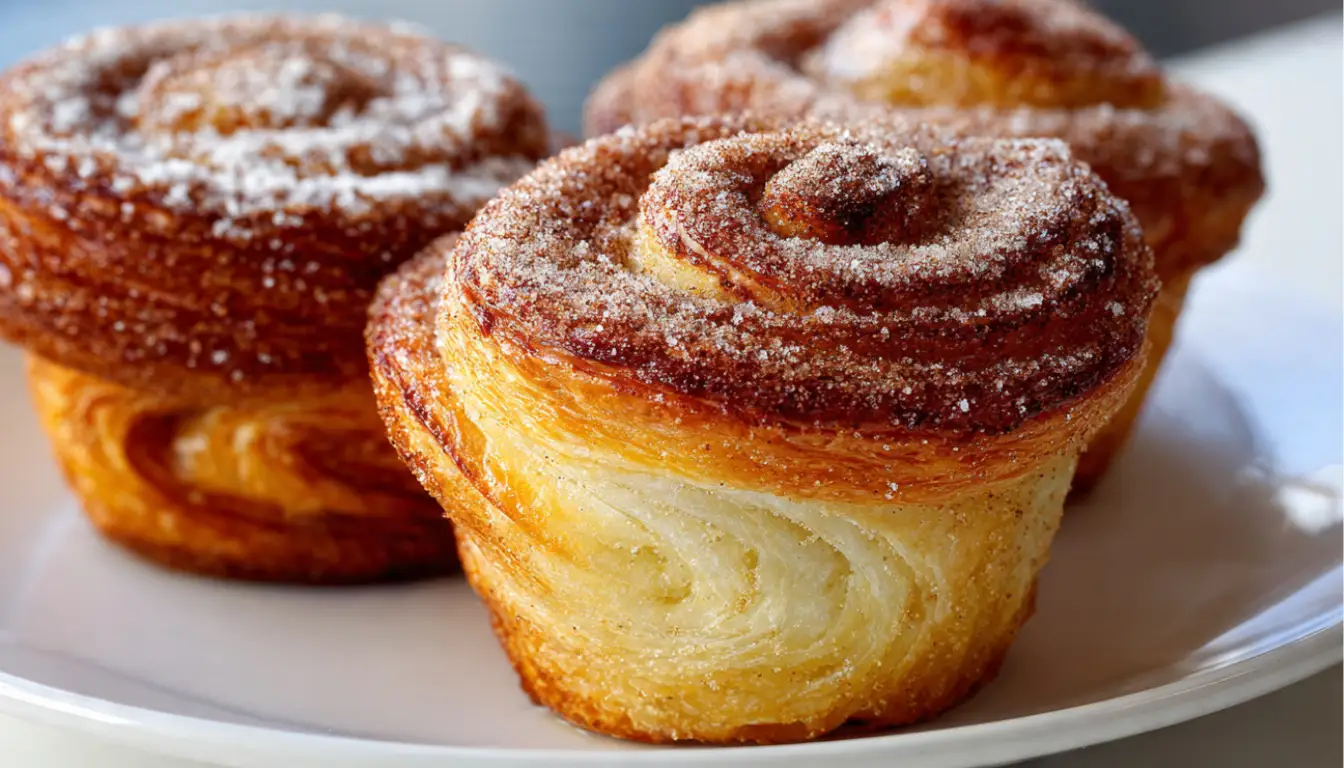
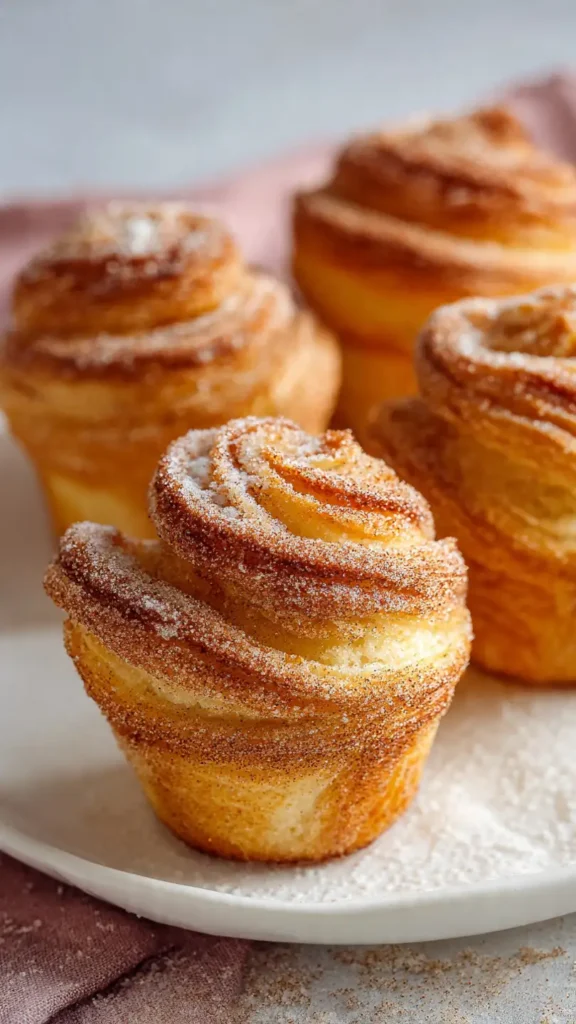
Cruffins are essentially croissant dough that’s rolled up with sweet or savory fillings, cut, and baked in a muffin tin instead of shaped into crescents. The result is layers upon layers of buttery goodness in a cute, portable package. Trust me, once you nail this recipe, you’ll be that person everyone asks to bring breakfast to gatherings.

Essential Ingredients
For the Dough:
- 3 1/2 cups all-purpose flour (I use King Arthur, but any good bread flour works)
- 1/4 cup granulated sugar
- 2 teaspoons instant yeast
- 1 1/4 teaspoons salt
- 1 cup whole milk, warmed to 110°F
- 1/4 cup water, room temperature
- 1 large egg
- 2 tablespoons unsalted butter, melted
For Lamination:
- 1 1/4 cups (2 1/2 sticks) cold European-style butter (Kerrygold is my go-to)
For Filling:
- 1/2 cup brown sugar
- 2 tablespoons cinnamon
- 4 tablespoons softened butter
For Topping:
- 1/4 cup melted butter
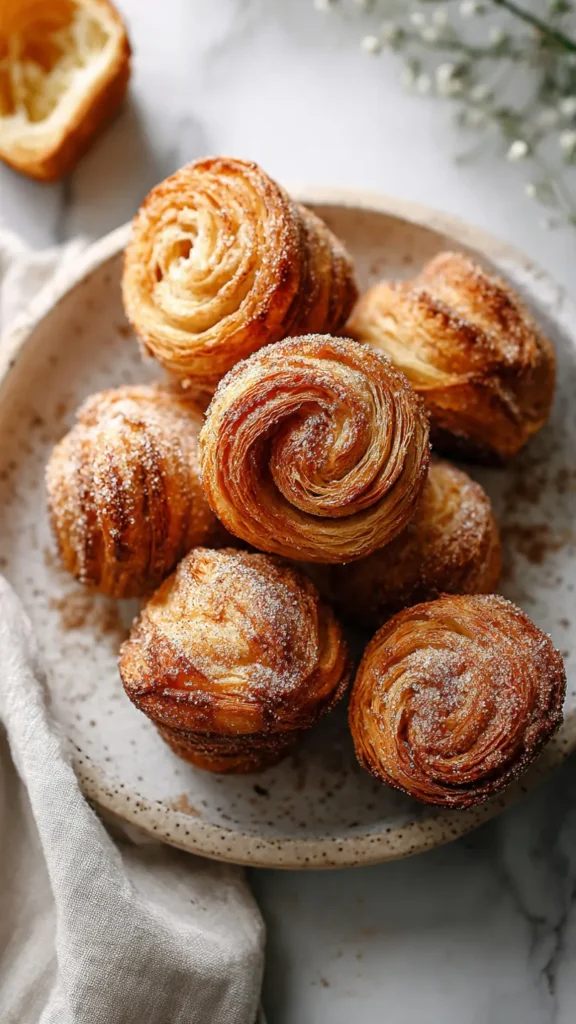
- 1/2 cup granulated sugar mixed with 1 tablespoon cinnamon
Alternative Ingredients
If you can’t find European butter, regular unsalted butter works fine, you just won’t get quite the same rich flavor. The higher fat content in European butter makes the layers extra flaky, but I’ve made this with store-brand butter plenty of times when I’m in a pinch.
For a dairy-free version, I’ve had good luck using plant-based butter alternatives, though the texture changes slightly. You’ll want to use a brand that’s specifically made for baking.
Don’t have instant yeast? Active dry yeast works too, just dissolve it in the warm milk first and let it sit for 5 minutes until foamy before adding to your stand mixer.
The filling is totally customizable. I’ve done chocolate hazelnut, lemon curd, apple cinnamon, even savory versions with pesto and cheese. Get creative once you’ve mastered the basic technique.
Step-by-Step Directions
Make the Dough (Day 1):
Start by combining flour, sugar, yeast, and salt in your stand mixer bowl. If you don’t have a KitchenAid or similar stand mixer, you can absolutely do this by hand, it just takes more arm strength and about 10 minutes of kneading.
Add the warm milk, water, egg, and melted butter. Mix on low speed with the dough hook for about 2 minutes until everything comes together. Then kick it up to medium speed and knead for 8-10 minutes. You want a smooth, elastic dough that’s slightly tacky but not sticky.
Shape it into a ball, place in a greased bowl, cover with plastic wrap, and refrigerate overnight. This cold fermentation is key for developing flavor and making the dough easier to work with when you’re doing all that rolling and folding.
Prepare the Butter Block (Day 2):
This is where things get interesting. Take your cold butter and place it between two sheets of parchment paper. Using a rolling pin, pound and roll it into a 7×7 inch square about 1/2 inch thick. The butter needs to be pliable but still cold. If it gets too warm and greasy, stick it back in the fridge for 10 minutes.
Lamination Process:
Roll your chilled dough into a 10×15 inch rectangle on a lightly floured surface. Place the butter square in the center, then fold the dough over it like you’re wrapping a present, sealing all the edges.
Now comes the fun part. Roll this package out into a long rectangle, about 10×20 inches. Fold it into thirds like a business letter. That’s your first fold. Wrap it in plastic and refrigerate for 30 minutes.
Repeat this rolling and folding process two more times, chilling for 30 minutes between each fold. I know it seems tedious, but this is what creates those beautiful flaky layers. I usually do this while catching up on podcasts or watching something on my tablet.
Shape the Cruffins:
After your final chill, roll the dough out into a large rectangle about 12×18 inches and 1/4 inch thick. Spread the softened butter over the entire surface, then sprinkle evenly with the brown sugar and cinnamon mixture.
Starting from the long edge, roll the dough up tightly like a jelly roll. Cut into 12 equal pieces using a sharp knife or unflavored dental floss (sounds weird, but it works better than a knife for clean cuts).
Grease a 12-cup muffin tin really well. I mean really well. These have a tendency to stick, so don’t skimp on the butter or cooking spray. Place each piece cut-side up in a muffin cup.
Proof and Bake:
Cover the pan loosely with plastic wrap and let the cruffins proof at room temperature for 1-2 hours, until they’ve puffed up noticeably. They won’t quite double in size, but you’ll see a clear difference.
Preheat your oven to 375°F. Bake for 25-30 minutes until deep golden brown on top. The kitchen will smell absolutely incredible, I’m warning you now.
Let them cool in the pan for 5 minutes, then brush with melted butter and dip the tops in cinnamon sugar while they’re still warm. This step is not optional, it’s basically the whole point.
Pro Tips
The butter temperature during lamination makes or breaks this recipe. It needs to be cold but pliable, about the same consistency as the dough. If the butter is too hard, it’ll break through the dough in chunks. Too soft, and it’ll squish out the sides. When in doubt, chill everything.
I learned the hard way that working in a cool kitchen matters. My first summer attempt was a disaster because my AC was broken and the butter kept melting. Now I only make these when my kitchen is under 70°F, or I work near my coldest counter.
A pastry brush is essential for getting that butter on evenly before rolling. I picked up a good silicone one for about $8 and it’s been worth every penny for pastries like this.
Don’t skip the overnight dough rest. I tried rushing it once because I was impatient, and the dough fought me every step of the way. The cold fermentation relaxes the gluten and makes rolling so much easier.
If your dough springs back when you’re rolling, let it rest for 10 minutes. Fighting with it just makes you frustrated and the dough tough.
Recipe Info
| Detail | Information |
|---|---|
| Prep Time | 45 minutes (active), plus overnight rest |
| Cook Time | 25-30 minutes |
| Total Time | 2 days (mostly hands-off) |
| Servings | 12 cruffins |
| Yield | 12 pastries |
Why You’ll Love This Recipe
These cruffins are perfect for meal prep because you can freeze the unbaked shaped dough. Just pop them in the fridge to thaw overnight, proof in the morning, and bake fresh. It’s like having a bakery in your freezer.
The technique looks intimidating, but it’s actually very forgiving. I’ve had dough tear, butter leak out, uneven layers, and they still came out delicious. Laminated dough is more resilient than people think.
You can customize the fillings endlessly. I’ve made savory versions with everything bagel seasoning and cream cheese, chocolate versions with Nutella, even a fall version with pumpkin spice and cream cheese filling.
They’re genuinely impressive. People assume these are incredibly difficult to make, so when you casually mention you made them from scratch, you get major baking credibility points.
What Makes This Recipe Unique
Most cruffin recipes require a lot of specialty equipment or professional techniques. Mine is designed for home bakers using standard kitchen tools. The only thing I really recommend is a stand mixer to save your arms, but even that’s optional if you’re feeling ambitious.
The overnight cold fermentation develops incredible flavor that you don’t get from rushed recipes. It also makes the dough much easier to work with, which is crucial when you’re doing all that rolling and folding.
I’ve tweaked the butter ratio over dozens of batches to find the sweet spot where you get maximum flakiness without butter leakage issues. Too much butter and they’re greasy, too little and they’re just spiral rolls.
Key Features
- Buttery, flaky layers just like a bakery croissant
- Portable muffin format, perfect for breakfast on the go
- Make-ahead friendly with freezer instructions
- Customizable fillings for sweet or savory variations
- Impressive presentation with approachable technique
- Rich flavor from overnight dough development
Nutrition Facts (Per Cruffin)
| Nutrient | Amount |
|---|---|
| Calories | 385 |
| Total Fat | 22g |
| Saturated Fat | 13g |
| Cholesterol | 75mg |
| Sodium | 285mg |
| Total Carbohydrates | 42g |
| Dietary Fiber | 1g |
| Sugars | 18g |
| Protein | 5g |
Nutrition information is approximate and may vary based on specific ingredients used.
FAQs
Can I make cruffins without a stand mixer?
Yes, knead by hand until the dough becomes smooth and elastic.
Why is my butter leaking out?
It usually means the butter got too warm. Keep everything chilled during lamination.
Can I freeze cruffins?
Yes, freeze before baking, then thaw and bake fresh.
What fillings work best?
Cinnamon sugar, chocolate, fruit jams, and even savory options work great.
How do I store leftovers?
Keep in an airtight container or freeze for longer storage.
You’ll Also Love
If you enjoyed this recipe, you’ll want to try my Danish pastries, which use a similar lamination technique but with different shaping. I also have a much easier version of morning buns that skip the lamination but still give you that cinnamon-sugar fix.
For another weekend baking project, my homemade bagels are surprisingly approachable and way better than store-bought. And if you’re into the whole “impress people with breakfast” thing, my sourdough cinnamon rolls are next-level.
Conclusion
Listen, I’m not going to lie and say this is a quick weeknight recipe. But for a weekend project when you want to feel like a real baker? Cruffins are so worth it. The first time I pulled a batch out of the oven and saw those perfect golden layers, I literally did a little victory dance in my kitchen.
Yes, it takes two days. Yes, there’s some rolling and folding involved. But most of that time is hands-off, and the actual active work is maybe an hour spread across the two days. Plus, once you’ve made them a couple times, the process becomes almost meditative.
The look on people’s faces when you serve these is priceless. And honestly, knowing that you made something from scratch that tastes better than most bakery versions? That feeling never gets old.
So grab your rolling pin, clear some space in your fridge for all that chilling time, and give these a shot. Start on a Friday night, finish on Saturday morning, and enjoy fresh cruffins for breakfast. Your kitchen will smell like a French bakery, and you’ll have a new signature recipe to show off.
Happy baking, and don’t forget to chill that dough!
Homemade Cruffins
Flaky croissant-style pastries baked in muffin form with rich cinnamon sugar layers.
Ingredients
- Flour, sugar, yeast, salt
- Milk, water, egg, butter
- Cold butter for lamination
- Brown sugar, cinnamon
Instructions
- Make dough and chill overnight
- Laminate with butter
- Add filling and roll
- Cut and place in muffin tin
- Proof and bake
- Coat with cinnamon sugar
Notes
Keep dough cold during lamination. Chill between folds to prevent butter leakage.