Chocolate Lava Mochi Cake: The Fudgy, Gooey Dessert You Never Knew You Needed
Let me tell you about the night I accidentally created one of my most requested recipes.
It was a Friday, I had leftover mochiko flour sitting in my pantry, and a serious chocolate craving I couldn’t shake. I’d made classic lava cakes dozens of times over my 10 years in the kitchen, but something made me reach for that bag of sweet rice flour. I honestly didn’t know what I was getting into. The result? This dense, fudgy, molten chocolate lava mochi cake that my family now requests for literally every birthday, every celebration, and sometimes just a random Tuesday.
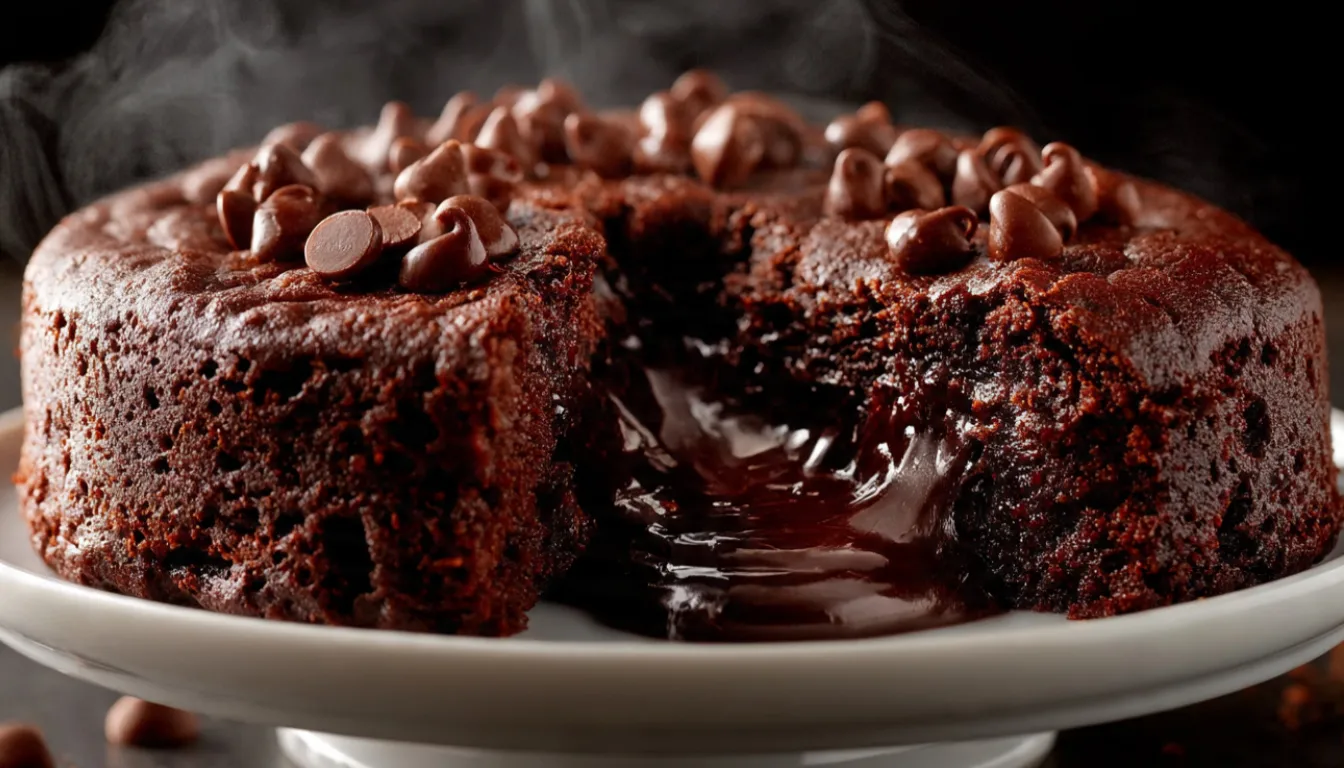
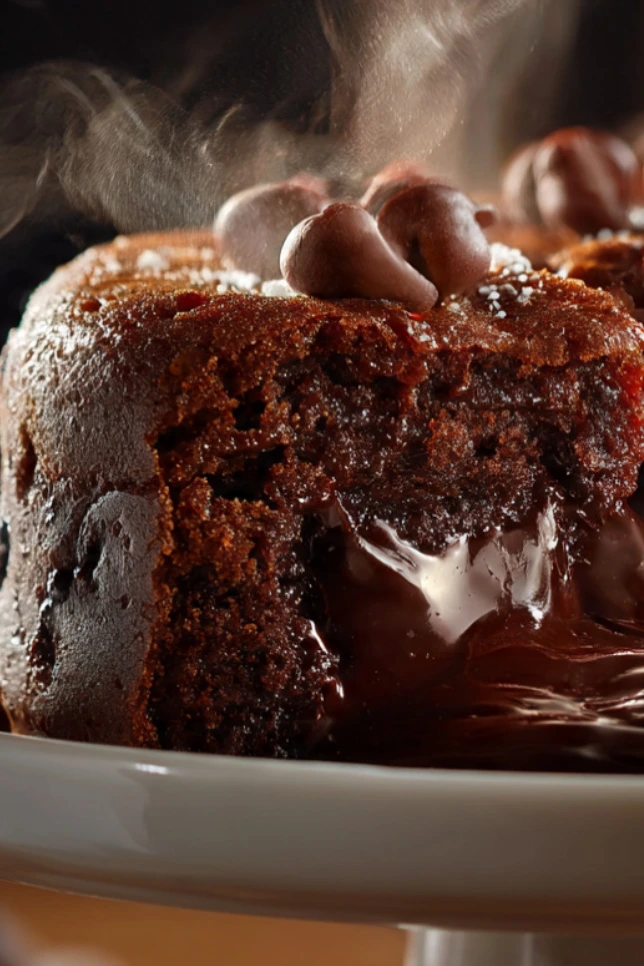
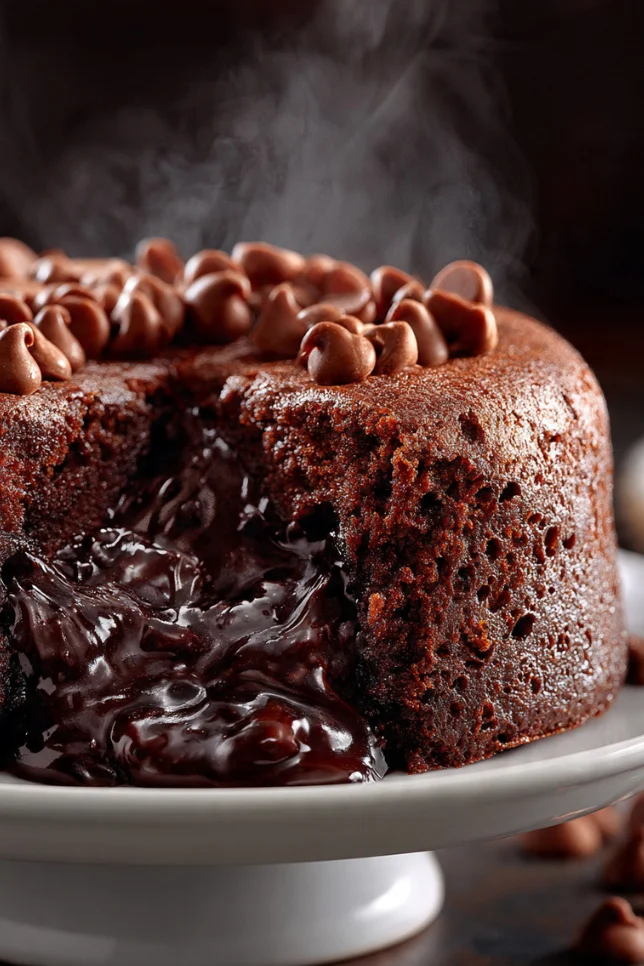
If you’ve never had mochi cake before, here’s the short version: it’s chewy, rich, and has this satisfying texture that regular cake just can’t touch. When you combine that with a warm molten chocolate center, you get something that’s almost unfair. It pulls and stretches when you break it apart (you can see exactly what I mean in the photo), and that chocolate ganache center just pours out. My daughter called it “the most dangerous dessert I’ve ever eaten,” which I took as a compliment.
Why This Works (and Why You’ll Make It Again)
Regular lava cakes are great, but they’re also a little one-note. You get the soft outer shell and the liquid center, and that’s the whole experience. The mochi version adds a whole new dimension. The glutinous rice flour creates this slightly chewy, dense crumb that holds together even when you cut into it, so you get that dramatic lava pull-apart moment every single time. It’s honestly more forgiving too. Standard lava cake timing is stressful (30 seconds too long and it’s just a chocolate cake), but the mochi base gives you a bit more wiggle room.
The other thing I love? This cake is naturally gluten-free because we’re using sweet rice flour instead of all-purpose. That’s not me trying to make it a “health food.” It just happens to work that way, and it means I can serve it to guests with gluten sensitivities without making a separate dessert.
Essential Ingredients
Here’s everything you need for this recipe. Nothing exotic, but quality matters here especially with the chocolate.
- 1 cup (130g) mochiko sweet rice flour (I use Koda Farms brand, widely available at Asian grocery stores or Amazon)
- 1/2 cup (100g) granulated sugar
- 1/4 cup (25g) unsweetened cocoa powder (Dutch-process gives a deeper flavor)
- 1 teaspoon baking powder
- 1/4 teaspoon salt
- 2 large eggs
- 1/2 cup (120ml) whole milk
- 1/4 cup (60ml) melted butter (unsalted)
- 1 teaspoon vanilla extract
- 3/4 cup (130g) semi-sweet or dark chocolate chips (I reach for Ghirardelli or Valrhona when I want to treat myself)
- 1/2 cup (120ml) heavy cream (for the ganache center)
- 2 tablespoons powdered sugar (optional, for dusting)
Alternative Ingredients
No mochiko? You can try glutinous rice flour from any Asian supermarket. It’s the same thing, just different labeling. If you want a dairy-free version, swap the whole milk for full-fat coconut milk and use coconut oil instead of butter. The flavor shifts slightly (more tropical, which honestly isn’t bad), and the texture stays beautifully chewy.
For the ganache center, you can substitute with Nutella or peanut butter cups if you want a different flavor profile. I’ve done both and they’re both incredible in their own way.
Step-by-Step Directions
Step 1: Make the ganache center first. Warm the heavy cream in a small saucepan over medium-low heat until it just starts to steam. Pour it over your chocolate chips in a heatproof bowl. Wait 2 minutes, then stir until completely smooth. Pop this in the freezer for 15-20 minutes while you prep the batter. You want it firm enough to scoop, not liquid.
Step 2: Preheat your oven to 350°F (175°C). Grease an 8-inch round cake pan and line the bottom with parchment paper. Don’t skip the parchment. Mochi cake is sticky and you’ll thank yourself later.
Step 3: Mix the dry ingredients. In a large bowl, whisk together the mochiko, sugar, cocoa powder, baking powder, and salt. Take an extra 30 seconds to really whisk this well. Lumps in cocoa powder will show up in your final cake.
Step 4: Mix the wet ingredients separately. In another bowl, beat the eggs lightly, then whisk in the milk, melted butter, and vanilla. Keep the butter slightly warm when you add it, not hot. Hot butter will scramble your eggs.
Step 5: Combine wet and dry. Pour the wet ingredients into the dry and stir until you get a smooth, thick batter. This batter is thicker than regular cake batter, which is normal. Don’t panic.
Step 6: Build the cake. Pour about two-thirds of the batter into your prepared pan and spread it evenly. Take your chilled ganache and scoop it in small spoonfuls across the center of the batter, leaving about an inch from the edges. Then pour the remaining batter over the top and smooth it out gently so the ganache is fully covered.
Step 7: Bake for 22-25 minutes. The top should look set and slightly firm when you gently press it with your finger. The center will still feel soft underneath, and that’s exactly what you want.
Step 8: Rest before cutting. Let the cake rest in the pan for 10 minutes before slicing. I know, the waiting is brutal. But cutting too early will collapse everything. Run a thin knife around the edges, invert onto a plate, then peel off the parchment. Dust with powdered sugar if you like.
Pro Tips From My Kitchen
The chocolate you use genuinely matters here. I’ve made this with grocery store brand chips and with Valrhona 70% dark chocolate, and the difference is real. If you’re making this for a special occasion, spend a few extra dollars on good quality baking chocolate. Your ganache will be silkier and more intense.
Get yourself a good non-stick cake pan or a well-seasoned cast iron skillet if you want that beautiful round shape. I actually love making individual portions in a muffin tin for parties (reduce bake time to 15-17 minutes). Guests go wild when they break into their own personal lava cake.
A digital kitchen thermometer is your best friend for the ganache. You want the cream between 185°F and 200°F before you pour it over the chocolate. Too cool and it won’t melt properly. Too hot and you can get a grainy texture.
One mistake I kept making early on: over-mixing after adding the rice flour. Mochiko develops a gummy texture when you overwork it. Stir until just combined and stop.
For storage, wrap leftover slices in airtight meal prep containers and refrigerate for up to 3 days. To reheat, 20-25 seconds in the microwave brings the molten center back to life beautifully.
What Makes This Recipe Unique
Most mochi cake recipes are baked flat in a brownie-style pan and served cold or at room temperature. This one is designed to be served warm, with a hidden ganache center that melts when you cut into it. That combination of the chewy mochi crumb and the flowing chocolate center is something you genuinely won’t find in most other recipes. It sits right at the intersection of Japanese mochi desserts and classic French patisserie technique, which makes it a real conversation starter at the table.
Key Features
This recipe is naturally gluten-free, relatively straightforward (no stand mixer needed), and absolutely scalable. Double the batch and bake in a 9×13 pan if you’re feeding a crowd. It also stores and reheats well, which is rare for molten-style desserts. Most lava cakes are a one-shot deal. This one you can make ahead, slice, and reheat individually.
FAQs
Can I make this ahead of time? Yes. Bake the cake, let it cool completely, wrap it tightly, and refrigerate for up to 2 days. Reheat individual slices in the microwave for 20-25 seconds before serving.
Why is my mochi cake gummy inside? Two possible reasons: it was underbaked, or you over-mixed the batter. Mochiko is already a sticky flour by nature, so slightly over-mixing amplifies that gumminess. Bake until the top is set and give it the full 10-minute rest.
Can I use regular all-purpose flour? You can, but you’ll lose the chewy mochi texture that makes this recipe special. It’ll become a regular molten chocolate cake, which is still delicious, just different.
What if I don’t have heavy cream for the ganache? Full-fat coconut cream works as a 1:1 substitute and gives the ganache a subtle coconut flavor that pairs really well with dark chocolate.
Can I freeze individual slices? Yes. Wrap each slice in plastic wrap, then place in a freezer-safe container. Freeze for up to 1 month. Thaw overnight in the fridge and reheat in the microwave.
Why You’ll Love This Recipe
It gives you the drama of a restaurant-level dessert with a straightforward home kitchen process. No special equipment, no tempering chocolate on marble slabs, no piping bags. Just a bowl, a whisk, and an oven. The chewy texture from the mochiko is genuinely addictive, and the ganache center makes every slice feel like an event. It’s the kind of dessert that makes people put down their forks, look at you, and ask “wait, how did you make this?”
You’ll Also Love
If this recipe hit the spot, here are a few others worth trying next:
- Japanese Milk Bread (soft, pillowy, and once you make it you’ll never buy sandwich bread again)
- Matcha White Chocolate Brownies (same chewy mochi-inspired base, completely different flavor direction)
- Salted Caramel Mochi Muffins (great for meal prep, freeze beautifully)
- No-Bake Chocolate Ganache Tart (for when you want that same intense chocolate hit without turning on the oven)
Conclusion
This chocolate lava mochi cake has been one of those happy accidents that turned into a permanent part of my recipe rotation. It’s different enough to be memorable, simple enough to actually make on a weeknight, and impressive enough that people always ask for the recipe. If you give it a try, I really want to hear how it goes. Drop a comment below, especially if you try any fun variations. The coconut milk version in particular is something I think deserves way more attention.