4-Ingredient Daily Bread Recipe: The Easiest Homemade Bread You’ll Ever Make
You know that amazing smell of fresh bread baking? The one that makes your whole house feel like a cozy bakery? I used to think that was reserved for people with fancy stand mixers and hours of free time. Then I discovered this ridiculously simple 4-ingredient bread recipe, and honestly, it changed everything about my morning routine.
I’m Linda, and I’ve been baking bread for over a decade now. I’ve made complicated sourdough starters, wrestled with temperamental yeasts, and yes, I’ve had my share of dense, hockey-puck disasters. But this recipe? It’s the one I come back to week after week, especially on those Sunday afternoons when I just want fresh bread without the fuss.
The best part? You literally need just four ingredients. No eggs, no milk, no butter. Just flour, water, salt, and yeast. That’s it. And before you think this sounds too simple to be good, trust me on this one. Sometimes the simplest recipes are the absolute best.

Essential Ingredients
Here’s what you need to make one beautiful loaf:
- 3 cups (360g) all-purpose flour – I use regular all-purpose, but bread flour works too if you want extra chew
- 1½ cups (360ml) warm water – Around 110°F, like a warm bath
- 2 teaspoons instant yeast – The quick-acting kind saves so much time
- 1½ teaspoons salt – Don’t skip this, it makes all the difference
That’s genuinely it. I keep all of these ingredients stocked in my pantry anyway, so this bread happens whenever I need it.
Alternative Ingredients
Now, I’ve experimented quite a bit with this recipe over the years (occupational hazard of being a food blogger), so here are some swaps that actually work:
Flour alternatives: You can replace up to 1 cup of the all-purpose flour with whole wheat flour for a heartier loaf. I’ve also done half bread flour, half all-purpose when I want that perfect chewy texture. For gluten-free folks, this recipe doesn’t translate well, unfortunately. Wheat gluten is really what gives this bread its structure.
Yeast options: Active dry yeast works just fine, but you’ll need to proof it first in the warm water with a pinch of sugar. Wait about 5 minutes until it gets foamy before adding the flour. Instant yeast lets you skip that step entirely.
Water substitutions: I’ve used potato water (the starchy water left from boiling potatoes) and it makes an incredibly soft, tender crumb. Some people swear by adding a tablespoon of olive oil for extra softness, though that technically makes it a 5-ingredient bread.
Step-by-Step Directions
Alright, let’s make some bread. I’m going to walk you through this exactly how I do it in my kitchen.
Step 1: Mix the dough
In a large bowl, combine your flour, yeast, and salt. I just use a regular mixing bowl, but if you have a KitchenAid stand mixer, you can absolutely use that with the dough hook. Pour in the warm water and stir everything together with a wooden spoon or spatula. The dough will look shaggy and rough. That’s exactly what you want. Don’t be tempted to add more water yet.
Step 2: The first rise
Cover your bowl with plastic wrap or a damp kitchen towel. Stick it somewhere warmish for about 2 hours. I usually put mine on top of my refrigerator or near a sunny window. The dough should roughly double in size. When you poke it with your finger, it should spring back slowly.
Here’s something I learned the hard way: don’t rush this step. I used to try speeding it up by putting the dough in a warmer spot, but that just made the bread taste yeasty and weird. Good bread fermentation takes time, and it’s worth the wait.
Step 3: Shape the loaf
Flour your counter lightly and turn out the dough. It’ll be sticky and soft. Gently shape it into a round ball by folding the edges toward the center, then flip it over so the smooth side is on top. I don’t knead it or punch it down like traditional bread recipes. Just a gentle shaping is all you need.
Step 4: The second rise
Place your shaped dough on a piece of parchment paper. Cover it again and let it rise for another 45 minutes to an hour. Meanwhile, get your oven ready.
Step 5: Preheat with purpose
Here’s the game-changer: about 30 minutes before baking, put a Dutch oven (with the lid on) into your oven and preheat everything to 450°F. A cast iron Dutch oven works beautifully for this because it traps steam, which gives you that incredible crispy crust. If you don’t have one, you can use a regular baking sheet, but you’ll want to put a pan of water on the bottom oven rack to create steam.
Step 6: Bake it
When your oven and Dutch oven are screaming hot, carefully take the pot out (use good oven mitts, seriously). Grab the parchment paper with your risen dough and lower the whole thing into the hot Dutch oven. Score the top with a sharp knife (I just make one slash down the middle), put the lid back on, and slide it into the oven.
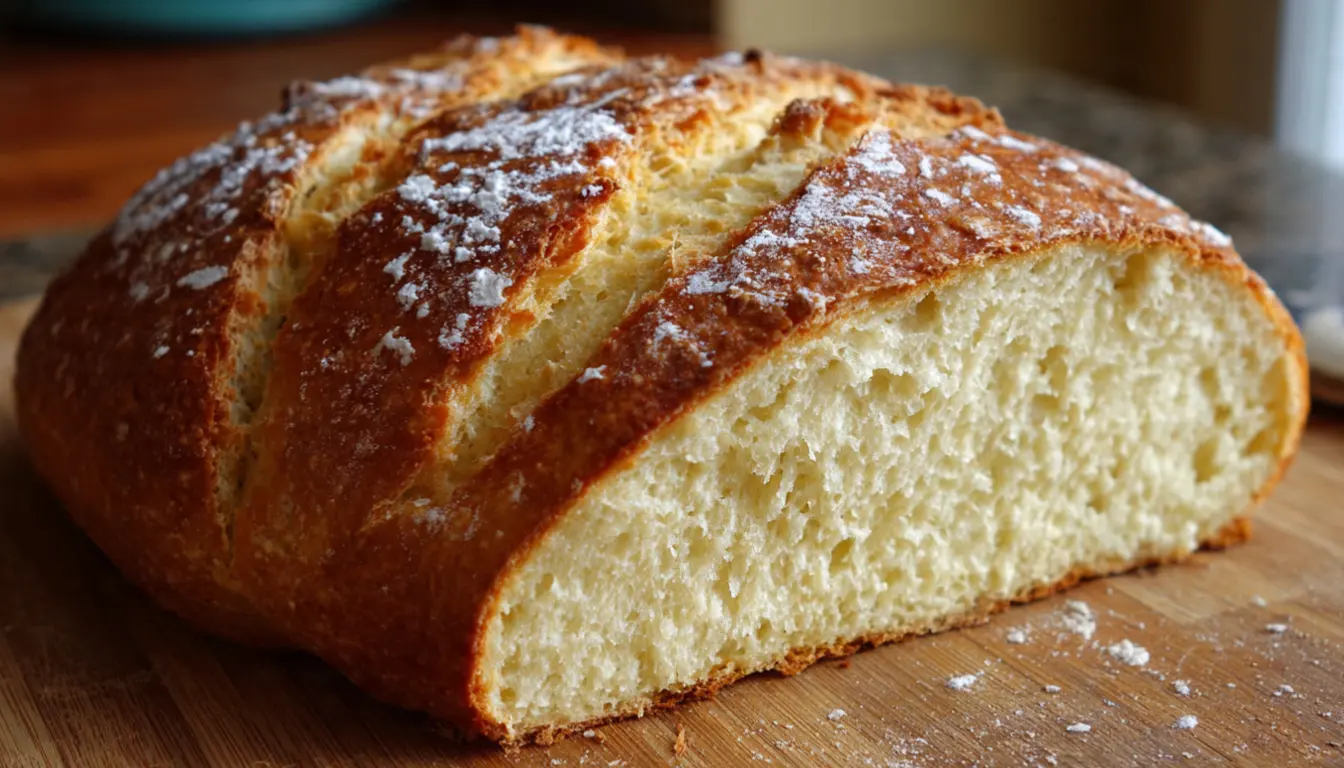
Bake covered for 30 minutes, then remove the lid and bake for another 10-15 minutes until the crust is deep golden brown.
Step 7: Cool down (hardest part)
Turn the bread out onto a wire rack and let it cool for at least 20 minutes before slicing. I know this is torture when it smells so good, but cutting into hot bread makes it gummy inside. Trust me, I’ve ruined perfectly good loaves by being impatient.

Pro Tips
After making this bread probably 200 times (not exaggerating), here are the things that make the biggest difference:
Water temperature matters. Too cold and your yeast won’t wake up. Too hot and you’ll kill it. I test the water on my wrist like you would baby formula. It should feel pleasantly warm, not hot.
Don’t add extra flour during shaping. This dough is supposed to be wet and sticky. Adding more flour just makes the bread dense. Wet hands or a lightly oiled counter work better than flouring everything.
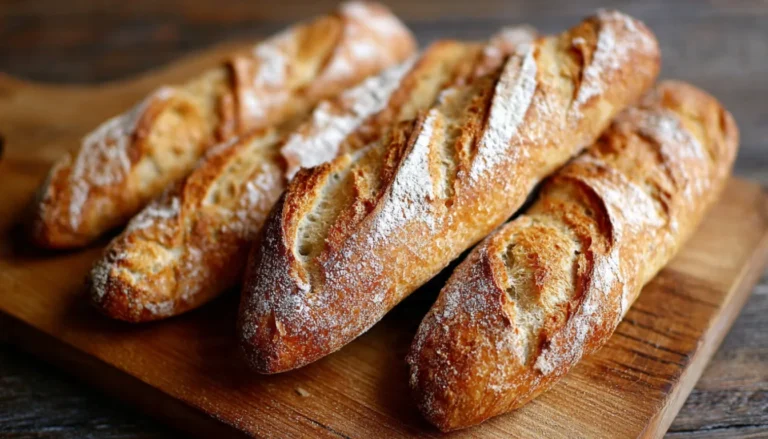
The Dutch oven trick is worth it. I resisted buying one for years because they’re not cheap, but it completely transformed my bread baking. The trapped steam creates that bakery-style crust that’s impossible to get otherwise. You can find decent ones for around $50 if you’re not going for the fancy brands.
Make it at night. I often mix the dough right before bed, let it rise overnight in the fridge (8-12 hours), then shape and bake it in the morning. The slow, cold fermentation actually develops better flavor.
Invest in a kitchen scale. Measuring flour by weight instead of volume makes a huge difference in consistency. Flour can pack down in measuring cups, but 360 grams is always 360 grams.
Frequently Asked Questions
Can I use active dry yeast instead of instant yeast?
Yes, activate it in warm water before mixing.
Why is my bread dense?
Usually بسبب yeast غير نشط أو حرارة الماء خاطئة أو دقيق زائد.
Can I make this without a Dutch oven?
Yes, just add steam in the oven using a water tray.
How should I store it?
Keep at room temp or freeze slices.
Can I add herbs or cheese?
Absolutely, customize it however you like.
Recipe Info Table
| Detail | Information |
|---|---|
| Prep Time | 10 minutes |
| First Rise | 2 hours |
| Second Rise | 45-60 minutes |
| Bake Time | 40-45 minutes |
| Total Time | About 4 hours |
| Servings | 1 loaf (8-10 slices) |
| Yield | One 1.5 lb loaf |
| Difficulty | Beginner-friendly |
Why You’ll Love This Recipe
This isn’t just another bread recipe. It’s the bread recipe I recommend to everyone who’s ever said “I can’t bake bread.” Because honestly? If you can stir ingredients in a bowl and wait a few hours, you can make this.
The crust comes out gorgeously crispy with that satisfying crackle when you tear into it. The inside is tender and chewy with those beautiful irregular holes that make you look like a professional baker. And the smell? People will literally knock on your door asking what you’re making.
Plus, there’s something incredibly satisfying about making real bread with actual ingredients you can pronounce. No preservatives, no weird additives. Just flour, water, salt, and yeast doing what they’ve been doing for thousands of years.
I also love that this bread works for meal prep. I make two loaves on Sunday, slice one for the week, and freeze the other. Having fresh bread in my freezer has saved me from so many last-minute grocery runs.
What Makes This Recipe Unique
Most no-knead bread recipes require an 18-24 hour rise time. This one gives you bakery-quality bread in about 4 hours total. The secret is using instant yeast and slightly warmer water to speed things up without sacrificing flavor.
The other unique thing? No kneading required. Traditional bread recipes have you kneading for 10-15 minutes to develop gluten. This recipe lets time do that work for you. The long rises develop the gluten structure naturally, which means less work for you and better flavor in the bread.
I’ve tested this against recipes that use milk, eggs, butter, and all sorts of add-ins. They’re good, but this simple version has a pure, honest bread flavor that just can’t be beat. It’s versatile enough to serve alongside dinner, make into sandwiches, or toast for breakfast.
Key Features
✓ Only 4 basic ingredients you probably have right now
✓ No kneading required
✓ No special equipment needed (though a Dutch oven helps)
✓ Perfect for beginners
✓ Makes one large loaf
✓ Freezes beautifully
✓ Crusty exterior, soft interior
✓ Ready in about 4 hours
✓ Costs less than $1 to make
✓ No preservatives or additives
Nutrition Facts Table
Per slice (based on 10 slices per loaf)
| Nutrient | Amount |
|---|---|
| Calories | 160 |
| Total Fat | 0.5g |
| Sodium | 290mg |
| Total Carbohydrates | 33g |
| Dietary Fiber | 1g |
| Protein | 5g |
| Calcium | 8mg |
| Iron | 2mg |
Note: Nutrition information is approximate and will vary based on specific ingredients used.
Frequently Asked Questions
Can I use active dry yeast instead of instant?
Absolutely. Just dissolve it in the warm water with a pinch of sugar first and wait 5 minutes until it’s foamy before adding the flour.
Why is my bread so dense?
Usually this means either your yeast was old/dead, your water was too hot and killed the yeast, or you added too much extra flour. Make sure your yeast is fresh and the water is warm but not hot.
Can I make this without a Dutch oven?
Yes! Bake it on a regular baking sheet at 425°F for about 35-40 minutes. Place a shallow pan of water on the bottom rack to create steam. The crust won’t be quite as crispy, but it’ll still be delicious.
How do I know when it’s done?
The bread should sound hollow when you tap the bottom, and an instant-read thermometer inserted into the center should read about 190-200°F.
How should I store this bread?
Keep it cut-side down on a cutting board at room temperature for 2-3 days. Or slice and freeze it in a freezer bag for up to 3 months. I keep mine in meal prep containers and just toast slices straight from the freezer.
Can I add herbs or cheese?
Sure! Add about 2 tablespoons of dried herbs (rosemary and garlic are amazing) or ½ cup shredded cheese after mixing the dough. Just know it won’t keep quite as long.
You’ll Also Love
If you’re enjoying this simple bread-baking approach, you should try my:
- 5-Ingredient Focaccia – Just as easy, but makes a fluffy, olive oil-rich Italian flatbread
- 3-Ingredient Pizza Dough – Uses the same basic technique for homemade pizza night
- Quick Dinner Rolls – Same method, just shaped into individual rolls
- No-Knead Cinnamon Raisin Bread – Adds just cinnamon and raisins to this base recipe
- Rosemary Garlic Artisan Bread – A fancy variation that still uses these 4 core ingredients
Conclusion
I’ll be honest with you. When I first tried this recipe years ago, I was skeptical. Four ingredients? No kneading? It seemed too simple to actually work. But that first loaf came out of the oven with a crackling crust and the most incredible smell, and I was completely sold.
Now it’s part of my weekly routine. I usually mix it up on Sunday mornings while I’m having coffee, let it rise while I do other things, and by afternoon I have fresh bread for the week. It costs less than a dollar to make, tastes infinitely better than store-bought, and makes my whole house smell like a French bakery.
The best part? People think you’re some kind of baking wizard when you serve homemade bread. Let them think that. You and I know the secret: it’s just four ingredients and a little bit of patience.
So grab your flour, yeast, salt, and water. Give this recipe a try. And when you pull that first golden loaf out of the oven, send me a message and tell me how it went. There’s nothing quite like the feeling of baking your first successful loaf of bread.
Happy baking!
Linda
4-Ingredient Daily Bread
The easiest homemade bread you will ever make with just four simple ingredients.
Ingredients
- 3 cups all-purpose flour
- 1 1/2 cups warm water
- 2 teaspoons instant yeast
- 1 1/2 teaspoons salt
Instructions
- Mix flour, yeast, and salt. Add water and stir until combined.
- Cover and let rise for 2 hours.
- Shape dough into a round loaf.
- Let rise again for 45-60 minutes.
- Preheat oven with Dutch oven to 450°F.
- Bake covered 30 minutes, then uncovered 10-15 minutes.
- Cool before slicing.
Notes
Use warm water, not hot. Do not add extra flour. A Dutch oven gives the best crust. Bread can be frozen for up to 3 months.