Danish Cheesecake Pastries with Hawaiian Bread
I still remember the first time I tried making these. It was a Sunday morning about three years ago, and I had leftover Hawaiian sweet rolls sitting on my counter. I’d been craving cheese Danish from my favorite bakery but didn’t want to get dressed and drive across town. So I thought, why not try making my own version? That experiment turned into one of my most requested recipes, and now I make these at least twice a month.
The magic here is using Hawaiian sweet bread as the base instead of traditional Danish pastry dough. You get all that buttery, flaky goodness without the hassle of laminating dough for hours. The bread puffs up beautifully in the oven, creates these perfect little wells for the cream cheese filling, and the whole thing comes together in about 45 minutes. My neighbors can smell these baking from two houses away, and I’ve had people literally knock on my door asking what I’m making.
Here’s the thing though. My first batch was a complete mess. I used way too much filling, it overflowed everywhere, and the bread got soggy. I learned the hard way that less is more with the cream cheese mixture. But once I figured out the right ratios and technique, these became foolproof. Now I can make them half-asleep on a Sunday morning, which is exactly what I did last weekend.
Essential Ingredients
For the Danish Pastries:
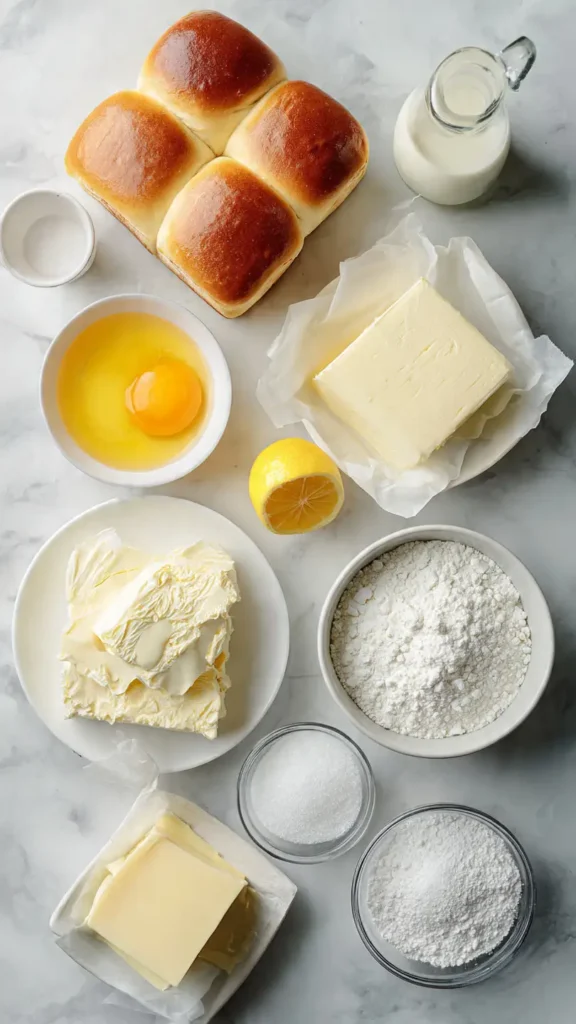
- 8 Hawaiian sweet rolls (the soft, pull-apart kind works best)
- 3 tablespoons melted butter
- 2 tablespoons granulated sugar
- 1/2 teaspoon cinnamon (optional, but I love it)
For the Cheesecake Filling:
- 8 oz cream cheese, softened to room temperature
- 1/4 cup granulated sugar
- 1 large egg yolk
- 1 teaspoon vanilla extract
- 1 tablespoon all-purpose flour
- Pinch of salt
- 1 tablespoon lemon juice (brightens everything up)
For the Glaze:
- 1 cup powdered sugar
- 2-3 tablespoons milk or heavy cream
- 1/2 teaspoon vanilla extract
- Tiny pinch of salt
Alternative Ingredients
Look, I know Hawaiian sweet rolls aren’t available everywhere. I’ve tested this with regular dinner rolls, brioche rolls, and even Portuguese sweet bread. They all work, but you’ll get slightly different textures. Brioche is probably your closest substitute because it has that same rich, buttery quality. Regular dinner rolls work too, but add an extra tablespoon of sugar to the butter mixture to compensate for the less-sweet dough.
For the cream cheese, please use full-fat. I tried making these with reduced-fat cream cheese once because I was trying to be healthy, and they turned out grainy and weird. This is a treat, not a diet food, so just use the real stuff. If you want to save money, store-brand cream cheese works perfectly fine as long as it’s full-fat.
Can’t find fresh lemon juice? Bottled works in a pinch, though fresh really does make a difference in brightening up that cream cheese flavor. And if you’re not a lemon fan, you can skip it entirely and add an extra 1/2 teaspoon of vanilla instead.
The glaze is super flexible. I’ve made versions with cream cheese in the glaze (add 2 tablespoons softened cream cheese and beat it in), maple syrup instead of vanilla, and even orange juice for a citrus twist. All delicious.

Step-by-Step Directions
Step 1: Prep Everything
Preheat your oven to 350°F. This is important because Hawaiian bread bakes at a lower temperature than regular pastries, and 350°F is the sweet spot where the bread gets golden without burning. Take your cream cheese out of the fridge if you haven’t already. It needs to be genuinely soft, not just “I left it out for 10 minutes” soft.
Grease a 9×9-inch baking pan or an 8×8-inch pan. I use a non-stick pan and still grease it because there’s nothing worse than these sticking. You can also line it with parchment paper if you’re paranoid like me.
Step 2: Prepare the Hawaiian Rolls
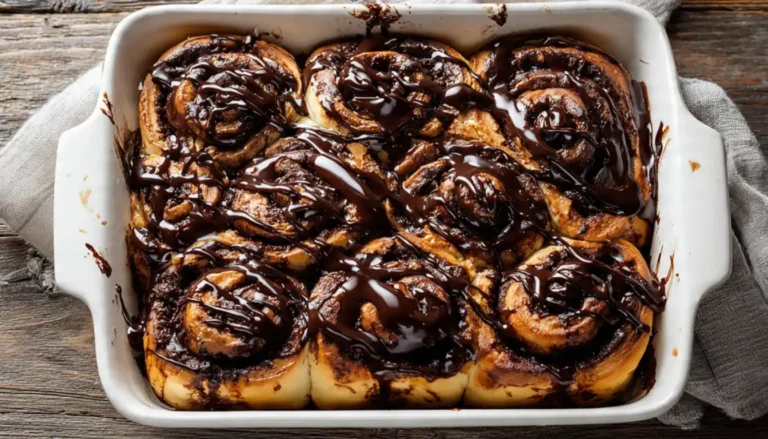
Take your Hawaiian rolls and gently flatten each one with your palm. Don’t squish them into pancakes, just press them down so they’re about half their original height. This creates space for the filling. Arrange them in your prepared pan. They should be touching but not crammed in there.
Mix the melted butter with 2 tablespoons sugar and cinnamon (if using). Brush this all over the tops and sides of the rolls. This creates that beautiful golden, slightly crispy exterior that contrasts so nicely with the soft interior.
Step 3: Make the Cheesecake Filling
In your stand mixer or using a hand mixer, beat the softened cream cheese on medium speed until it’s completely smooth with no lumps. This takes about 2 minutes. If you try to rush this, you’ll have lumpy filling, and nobody wants that.
Add the sugar and beat for another minute until it’s light and fluffy. Then add the egg yolk, vanilla, flour, salt, and lemon juice. Mix on low speed until everything is just combined. Don’t overmix at this stage or the filling will be too loose.
Step 4: Fill the Pastries
Here’s where I messed up the first time. Use a spoon to make a little indent in the center of each roll, pressing down gently to create a well. Then spoon about 1.5 to 2 tablespoons of the cream cheese filling into each well. Do NOT overfill. I cannot stress this enough. The filling puffs up as it bakes, and if you use too much, it’ll overflow and make a mess.
I actually use a small ice cream scoop now (the kind you’d use for cookie dough), and it’s perfect for portion control. Two level scoops per roll is just right.
Step 5: Bake
Slide the pan into your preheated oven and bake for 22-26 minutes. You’re looking for the rolls to be golden brown on top and the cream cheese filling to be set but still slightly jiggly in the center. If you have an instant-read thermometer, the filling should hit about 165°F.
I learned to check these at 20 minutes because every oven is different. Mine runs hot, so 22 minutes is perfect. My sister’s oven takes the full 26 minutes. Just keep an eye on them, and pull them out when the tops are gorgeously golden.
Step 6: Cool and Glaze
Let them cool in the pan for at least 15 minutes. This is torture, I know, because they smell incredible. But if you try to glaze them while they’re piping hot, the glaze will just melt and run off.
While they’re cooling, whisk together your powdered sugar, milk, vanilla, and salt. Start with 2 tablespoons of milk and add more if needed to get a thick but pourable consistency. You want it to drizzle, not run like water.
Drizzle the glaze over the warm (not hot) pastries using a spoon or a fork. I like to be generous with the glaze because that’s half the fun. Let the glaze set for about 5 minutes, then these are ready to devour.

Pro Tips
After making these probably 50 times, I’ve picked up some tricks that make them even better. First, you can prep the cream cheese filling the night before and keep it in the fridge. Just give it a quick stir before using.
Second, these freeze incredibly well. I make a double batch, bake them all, let them cool completely (but don’t glaze them yet), then wrap individual pastries in plastic wrap and freeze them in meal prep containers. When I want one, I microwave it for 30 seconds, then make fresh glaze. Tastes like I just baked them.
Third, if you want to make these ahead for a brunch, you can assemble everything the night before (rolls in pan, brushed with butter, filled with cream cheese), cover with plastic wrap, and refrigerate overnight. In the morning, just pull them out, let them sit at room temperature for 15 minutes while the oven preheats, then bake as directed. The filling might take an extra 2-3 minutes to set since it’s cold, but they turn out perfect.
For meal planning, I actually make these every Sunday and keep them in the fridge in a covered container. They stay fresh for 4-5 days, and I just pop one in the microwave for 15 seconds before eating. Way better than buying pastries from the store, and a fraction of the cost.
If you’re using a KitchenAid stand mixer for the filling, use the paddle attachment, not the whisk. The paddle gives you that smooth, dense texture you want in the cream cheese filling. The whisk incorporates too much air.
Frequently Asked Questions
Can I use regular bread instead of Hawaiian sweet bread?
Yes, but you will need to add extra sugar. Hawaiian bread gives the best flavor and texture.
Why did my cheesecake crack?
Cracks usually come from overbaking or rapid cooling. Let it cool slowly in the oven.
Can I freeze this cheesecake?
Yes. Wrap it well and freeze up to 3 months. Thaw overnight in the refrigerator.
Do I need a springform pan?
No. A lined cake pan or baking dish works just fine.
How do I know when cheesecake is done?
The center should still jiggle slightly while the edges are fully set.
Why You’ll Love This Recipe
These Danish cheesecake pastries hit that perfect sweet spot between being fancy enough to serve to guests but easy enough to make on a random Tuesday morning. The Hawaiian sweet bread makes them softer and more tender than traditional Danish pastries, and you skip all that complicated pastry-making technique.
They’re also incredibly versatile. I’ve made these for breakfast, brunch, dessert, and afternoon snacks. They work for everything. And because you bake them all together in one pan, cleanup is minimal. Just one mixing bowl, one pan, and you’re done.
The cost is another huge win. A pack of Hawaiian sweet rolls costs about three dollars, and you probably have everything else in your pantry already. Compare that to buying eight cheese Danish from a bakery, which would easily run you fifteen to twenty dollars. These taste better and cost a fraction of the price.
What Makes This Recipe Unique
I haven’t seen anyone else combine Hawaiian sweet bread with Danish pastry filling quite like this. Most recipes either use puff pastry or crescent roll dough, which gives you that flaky, layered texture. But Hawaiian bread creates something completely different. It stays soft and pillowy, almost cake-like, while still getting golden and slightly crispy on the edges.
The texture contrast is what makes these special. You get that crispy, buttery exterior from the butter-sugar coating, then the soft bread, then the tangy, creamy filling, all topped with sweet glaze. Every bite hits different notes, and it keeps things interesting from the first bite to the last.
Key Features
- Uses readily available Hawaiian sweet rolls (no specialty dough needed)
- Ready in under an hour from start to finish
- Perfect for meal prep and freezing
- Simpler than traditional Danish pastries but just as delicious
- Budget-friendly (costs about $5 total to make 8 pastries)
- Great for breakfast, brunch, or dessert
- Kid-friendly and crowd-pleasing
- Can be made ahead and reheated
You’ll Also Love
If these Danish cheesecake pastries with Hawaiian bread became your new favorite, you should definitely check out these other recipes on my blog:
- Cinnamon Roll Hawaiian Bread Bake: Another way to use Hawaiian rolls for an easy breakfast treat
- Cream Cheese Coffee Cake: Similar cream cheese filling but in cake form
- Blueberry Cream Cheese Danish: A more traditional Danish pastry that’s still beginner-friendly
- Hawaiian Sweet Bread French Toast Casserole: Perfect for using up extra Hawaiian rolls
- Mini Cheesecake Bites: Individual cheesecakes that are just as easy to make
Conclusion
Three years after that first experimental batch, I’ve made these Danish cheesecake pastries with Hawaiian bread more times than I can count. They’ve become my go-to recipe when I need something impressive but don’t have hours to spend in the kitchen. I’ve brought them to potlucks, made them for holiday brunches, and even shipped a batch to my sister across the country (they survived the journey surprisingly well).
The best part is watching people’s reactions when they bite into one. They always expect something complicated and bakery-quality, and then I get to tell them it took me less than an hour and cost about sixty cents per pastry. That “wait, really?” moment never gets old.
If you’re new to baking or intimidated by fancy pastries, start with these. They’re forgiving, they’re delicious, and even if you mess up the first batch like I did, you’ll figure it out quickly. The ingredients are simple, the technique is straightforward, and the results are consistently good.
Make them this weekend. Use that springform pan sitting in your cabinet, or just grab a regular baking pan. Fire up your KitchenAid or use a hand mixer. Whatever you’ve got will work. And when you pull these out of the oven, golden and glossy and smelling like heaven, you’ll understand why I make them so often.
Let me know how yours turn out! I love seeing photos and hearing about any variations you try. Happy baking!
Danish Cheesecake with Hawaiian Sweet Bread
Creamy, tangy cheesecake with a soft, slightly sweet bread base that melts in your mouth.
Ingredients
Hawaiian sweet bread, butter, sugar, vanilla, cream cheese, eggs, sour cream, heavy cream, lemon, topping ingredients.
Instructions
- Prepare and bake the bread base.
- Mix the cheesecake filling until smooth.
- Pour over base and bake.
- Cool slowly in oven.
- Add topping and chill before serving.
Notes
Let cheesecake sit 15 minutes before slicing. Store in fridge up to 5 days or freeze for 2 months.